
Arduino + DS1307
October 28, 2016
Description A Real Time Clock (RTC) is basically just like a watch – it runs on a battery and keeps time for you even when there is a power outage. Using an RTC, you can keep track of long timelines, even if you reprogram your microcontroller or disconnect it from USB or a power plug. […]
Arduino + Stepper (A3967) EasyStepper
October 26, 2016
Description Bipolar stepper motors always have only 4 wires. They require a dual H-bridge to drive them. Bipolar motors offer increased torque compared to unipolar motors. Flyback diodes are required to prevent voltage spikes when the power to the coil is turned off and the stepper motor acts like a generator briefly (back-emf). Note: You […]
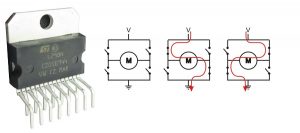
Arduino + Stepper (L298N)
October 25, 2016
Description Bipolar stepper motors always have only 4 wires. Bipolar stepper motors always have 2 coils. By driving the current in seperate directions through each of the coils, we can have a total of 4 different states: Coil A current flowing ‘left to right’. Coil A current flowing ‘right to left’. Coil B current flowing […]
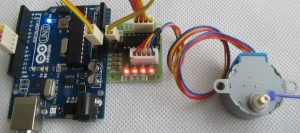
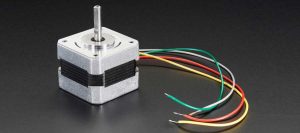
Arduino + Stepper (ULN2003A)
October 25, 2016
Description Unipolar stepper motors have 5, 6 or 8 wires. They do not require a dual H-bridge to drive them. Instead, you can use a transistor for each phase and a flyback diode to prevent voltage spikes when the power to the coil is turned off and the stepper motor acts like a generator briefly […]

Arduino + Stepper (Theory)
October 23, 2016
Description Stepper motors are DC motors that move in discrete steps. They have multiple coils that are organized in groups called “phases”. By energizing each phase in sequence, the motor will rotate, one step at a time. A stepper motor has the following characteristics: rotation in both directions, precision angular incremental changes, repetition of accurate […]
Arduino – DC Motor
October 23, 2016
Description Alternating Current (AC) and Direct Current (DC) are fundamentally different. Alternating Current (AC) Mains power in Australia uses 240Vac 50Hz sine wave alternating current. One of the benefits of alternating current is that it can be transported over long distances using high voltage transmission lines with minimal power loss compared to direct current. Alternating […]
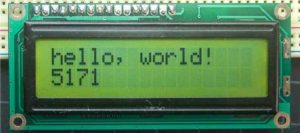
Arduino + LCD(16×2)
October 7, 2016
Description The LiquidCrystal library allows you to control LCD displays that are compatible with the Hitachi HD44780 driver. There are many of them out there, and you can usually tell them by the 16-pin interface. This example sketch prints “Hello World!” to the LCD and shows the time in seconds since the Arduino was reset. […]
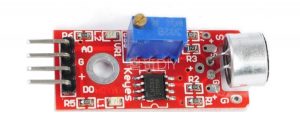
Arduino + Microphone
October 6, 2016
Description The microphone module allows you to detect sound. Pinout The module has the following pins: A0, analog output; real-time output voltage signal of the microphone. D0, digital output; when the sound intensity reaches a certain threshold, the digital output goes high. G, ground. +, Vcc (+5Vdc) The threshold-sensitivity can be adjusted via a potentiometer […]
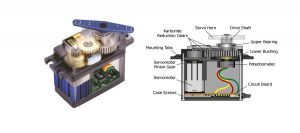
Arduino + Servo (or ESC)
October 5, 2016
Description The Arduino servo library allows an Arduino board to control RC (hobby) servo motors. Servos have integrated gears and a shaft that can be precisely controlled. Standard servos allow the shaft to be positioned at various angles, usually between 0 and 180 degrees. Continuous rotation servos allow the rotation of the shaft to be […]

Arduino + Analog vs Digital
October 4, 2016
Digital signals In the Arduino + Pushbutton article we used a pushbutton as an input device connected to a DIGITAL I/O pin. We used internal pull up resistors so that we could connect a pushbutton directly between digital I/O pin 8 and GND. Circuit Instead of a pushbutton we can simply connect a wire to […]