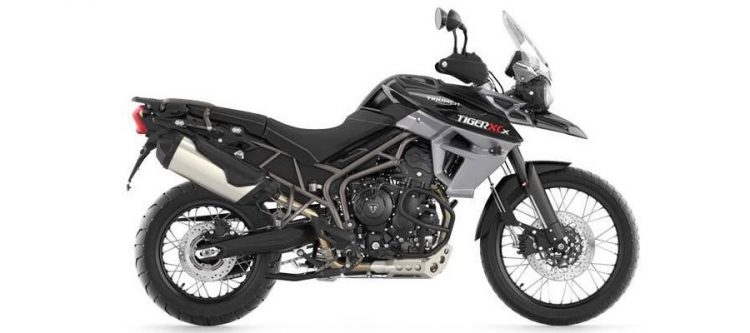
Triumph Tiger 800 XCx 2015 maintenance
Service Manual
Triumph_Tiger_800_XC_2010-2013_(ABS_Model_included) Service Manual.pdf
Tiger Tool
TigerTool V3.7.zip
TigerTool V3.7 Instructions.zip
TigerTool Batch Files.zip
Cleaning
Here are some of the things I do to clean my motorbike.
Chain cleaning
- Yoghurt or ice cream container
- Kerosene
- Lithium grease (Fuchs Silkolene Titanium Dry Lube)
- Toothbrush
- Scrubbing brush
- Cloth rag

The finer the brush, the quicker it wears out and the less scrubbing it does. The coarser the brush, the better it cleans but the downside is it splatters black chain grease droplets everywhere.
Simply dab the toothbrush / scrubbing brush in a bit of kerosene and start scrubbing. A center stand makes life a lot easier. Use a cloth rag or tissue paper to wipe clean when done. Don’t spray with WD40 – it does not hurt it, but it isn’t great eather. Instead, spray with a proper lithium based chain grease (often white in color). Wipe clean with a cloth rag or tissue paper (sprocket and outside of chain). You only need chain grease between the links. The best time to lubricate the chain is immediately after a ride when metal chain links are expanded and will shrink when they cool. Leave overnight to dry. Use sparingly as excess grease attracts dirts. Keeping your chain clean (using kerosine) is key.
Rust protection
Spray plastic covers, engine block, fuel tank, exhaust heat shields and rims liberally with WD40. Use a clean cloth to wipe. This will leave a film of water displacement solution on rust prone parts like bolts, nuts, brackets, etc. Do not spray WD40 on brake discs.
Washing
Use a pressure washer to quickly wash of any dirt. Use a large sponge and bucket with cold water and simple dishwashing liquid to clean panels. Use a different small disposable kitchen dishwashing sponge to clean engine, wheels and frame.
Wax
Put a toothpaste sized dab of Turtle wax on a clean cloth. Lightly wipe over metal painted parts i.e. fuel tank. Let dry for 1 or 2 minutes. Use a different clean (microfibre / fluffy) cloth and polish off in circular motion. Be careful not to rub it into small seams and cracks as it dries white and is a bit hard to remove.
Tips
- Use shaving cream as an anti fog agent on a helmet visor.
- Don’t use a glass cleaner containing ammonia on polycarbonate plastics like a helmet visor.
- Do not use graphite powder in key locks or electrical switches. Use some WD40 or silicone spray instead.
- WD40 is a water dispersant with a mild lubricant. If you want to lubricate, better use silicone spray i.e. CRC marine 66 silicone spray or similar.
Wheels
Front Wheel Size WM 2.5 X 2 1
Front Tyre Size 90/90 – 21
Front Tyre Pressure 2.5 bar (36 psi)
Recommended Front Tyre
1. Bridgestone Battle Wing BW501 G
2. Pirelli Scorpion Trail
Rear Wheel Size MT 4.25 x 17
Rear Tyre Size 150/70 – 17
Rear Tyre Pressure 2.9 bar (42 psi)
Recommended Rear Tyres
1. Bridgestone Battle Wing BW502
2. Pirelli Scorpion Trail
Liquids
Coolant: 2.7 liters
Oil: 3.6 liters
DOT4 brake fluid: 500ml bottle
Reset Service Interval Announcement (SIA)
Connect an On Board Diagnostic (OBD) protocol scan tool to the motorbike to reset the Service Interval Announcement (SIA).
Procedure
- Use ELM327 On Board Diagnostic (OBD) scan tool.

- Connect USB cable to laptop computer and install USB-to-serial adapter software.
- Connect ELM327 device to motorbike OBD plug underneath pillion seat.
- Turn ignition key to position where electrical systems are active. Do not start the motorbike.
- Use Tigertool v2.5 software on laptop to interface with the Triumph Tiger 800 XCx management system:TigerTool_V2.5
TigerTool V2.5 Instructions
ELM327 Silicon Labs CP210x_Universal_Windows_Driver.zip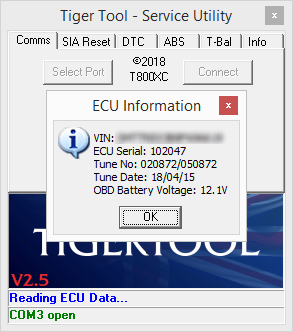
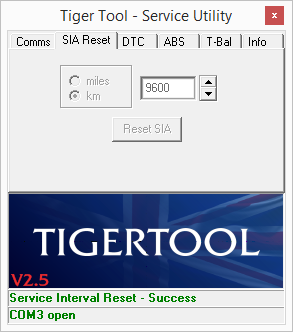
- Reset the Service Interval Announcement (SIA):
‘Reset ECU’
The ECU takes in a number of variables to tune engine performance. The oxygen sensor in the exhaust tells the ECU if the engine is running rich or lean. The perfect air-to-fuel ratio is 14.68:1 (= stoichiometric). A stoichiometric chemical reaction is one where the quantities of the reactants and products are such that all of the reactants are consumed and none remain after completion of the chemical reaction. The ECU will adjust engine timing and fuel mixture based on
- Engine demand.
- Engine/Coolant temperature.
- Air temperature.
- Fuel temperature.
- Fuel quality.
- Varying filter restriction.
- Air pressure.
- Engine pumping efficiency.
After changing the exhaust, changing the air filter, changing the coolant, changing the oil and filter, etc. – returning the ECU to baseline may help if the engine is running a bit rough or if it does not idle properly:
- Start engine.
- Don’t touch anything.
- Wait for engine to heat up and cooling fan to kick in.
- Wait 12 minutes.
- Stop engine.
This should return the ECU to baseline. The result may be hardly noticeable as the changes are subtle.
Note that pre-2015 Triumph Tiger 800 bikes suffered from issues with the ‘idle stepper motor’:
Tiger 800 stepper motor
Oil Change
Every 10000km; every 5000km if using inexpensive oil or off road driving.
Requirements
- Small container to collect bolts and nuts.
- Oil filter puller if current filter does not have socket nut.
- Latex gloves optional.
- Plastic oil drip pan.
- Funnel with flexible extension as the filler opening sits close to the frame.
- Cloth rags x 2.
- Oil filter. I recommend K&N KN-204 oil filter with a nut on the end as this is easy to loosen and tighten.
- Sump drain plug washer copper or aluminium,
22mm outer diameter (OD) x 14mm inner diameter (ID) x 1.5mm thickness. - Oil 10W40 or 10W50 (semi)synthetic which meets specification API SH (or higher) and JASO MA.
I used Fuchs Silkolene Comp 4 10W40 4Litre. As this is harder to get in my area I switched to:
- Castrol POWER1 Racing 4T Motorcycle Oil, 10W-50, 4 Litres $112.99 (Supercheap Auto)
Other options in Australia are:
- Motul 5100
- Penrite Racing 15 15W50 5 Litre (Autobarn)
- Penrite HPR 10 Full Syn 10W50 6 Litre (Autobarn / Supercheap Auto)
- Castrol POWER1 Racing 4T Motorcycle Oil, 10W-50, 4 Litres
Cheaper clean oil is better than dirty expensive oil.
Procedure
- Run engine hot and leave to rest for 15-30 minutes.
- Place on center stand.
- Remove skidplate:
- 2x 5mm allen key bolts.
- 4x 12mm socket nuts.
- Place oil drip pan.
- Remove sump drain bolt:
- 1x 8mm allen key bolt.
- Gently tap allen key with nylon hammer to loosen bolt.
- Remove sump drain bolt. Don’t worry if you drop the bolt.
- Replace sump drain bolt washer with a new washer.
In an emergency you can reuse the washer by either heating red-hot with a blow torch or by using sandpaper and sanding in a ‘figure eight’ pattern to remove microscopic scratches from the surface to ensure a proper seal. Just get some new washers… - Drain oil. Clean your hands.
- Partially unscrew filler cap to let air in.
- Slowly(!) unscrew oil filter and place upside down (on plastic pin) in oil drip pan.
- Clean engine surfaces.
- Screw in sump drain bolt and a new washer.
- Lubricate oil filter seal with new oil and screw in oil filter.
- Tighten oil filter nut using 17mm socket wrench.
- Fill engine with 3.6 litres of oil using funnel with flexible extension.
- Screw in filler cap. This step is easy to forget(!)
- Idle engine.
- Check oil level. Be careful not to overfill.
- Install skidplate. Do not overtighten.
Note the visible rubber hex spacers the bolts screw into; these will start to twist if overtightening.
Coolant change
Coolants are mostly demineralized water, rust inhibitor and Ethylene Glycol (= antifreeze). There are some different between the rust-inhibitors used:
Triumph recommends their own brand of HOAT (Hybridized Organic Acid Technology) coolant, which is a low-silicate type of coolant. The type of coolant liquid we want is OAT (Organic Acid Technology) and silicate-free and developed for aluminium engines. Silicates are good corrosion inhibitors but can drop out of solution and plug small passageways if not regularly changed. They can also cause water pump seal wear.
Organic Additive Technology (OAT) coolant contains only organic corrosion inhibitors such as carboxylates and triazole. These virtually non-depleting corrosion inhibitors give OAT coolants an extended life which can in some instances often be for the lifetime of the engine or vehicle.
I have purchased 5L Penrite Blue premixed coolant (= OAT based).
Pre-mixed / Concentrate
Pre-mix coolants are already diluted with water at a pre-set ratio normally between 33% to 50%. Concentrate coolants need to be mixed with demineralized / distilled water yourself.
Brake Fluid change (Front + Rear)
Tip:
Tiger Tool v2.5 – Bleed ABS when ready to bleed brakes after refilling
This function is used to bleed the ABS system. Pressing the Start button will allow the diagnostic tool to send a command to operate the solenoid valves in the ABS hydraulic modulator. This allows any trapped air in the hydraulic modulator to be bled from the system via the front and rear brakes.
– If any diagnostic trouble codes (DTCs) are present, the diagnostic tool will prompt you to read and erase the DTCs before continuing with the bleed procedure.
– The faults which caused the DTCs to be stored must be rectified and cleared before continuing with the bleed system command.
– The bleed procedure will not complete successfully if DTCs are present.
1. Refer to the relevant service manual for your motorcycle.
2. Press the Start button and bleed the front and/or rear brakes as directed by the instructions in the service manual.
3. The bleed sequence will run for a period of between 90 and 140 seconds depending on the model. Press the Stop button to end the bleed sequence at any time. Once the bleed sequence has completed the diagnostic tool will display a message ABS system bleed complete.
4. Allow the ABS hydraulic modulator to cool for 5 minutes before repeating the bleed procedure.
5. Repeat the bleed sequence as necessary.
On the most recent ABS systems such as that fitted to the latest Tiger 1200 range, the bleed process consists of three stages – Flush Stage, Bleed Stage 1 & Bleed Stage 2 – and takes around 140s to complete. On other models this can be between 90 & 140s. On older ABS systems the bleed process takes just 7s and may have to be executed several times.
After pressing the ABS bleed button on the laptop i got about 5 seconds before the ABS pump activated for about 2-3 seconds, this is enough time to get the spanner on, complete a bleed cycle without the ABS pump running, then complete another bleed cycle with the ABS pump running for 2 to 3 seconds. I repeated this several times until i had used a reservoir of fluid. Point to note, you have to press the ABS bleed button each time you want to trigger the ABS pump and then it’ll only give you 2-3 seconds of running time. (After an approx. 5 sec delay) I did this for the rear and front brake and it seems to have worked ok. I did another check for ABS fault codes afterwards and it remained clear. Overall its easy enough to use once you know what to expect and have an extra hand is useful to pump the lever/pedal while you’re cracking open/closed the relevant bleed nipple.
How I did mine
- Use syringe to suck old brake fluid out of brake reservoir.
- Fill brake reservoir with fresh brake fluid (Castrol DOT4).
- Connect Air Boy venturi vacuum pump to bleed nipple.
- Turn on air compressor and lock the Air Boy handle clip so it keeps running.
- Open bleed nipple 1/4 turn.
- Keep topping up the reservoir with fresh brake fluid as the old brake fluid is sucked out the bleed nipple.
- Flush about 3 reservoirs of liquid, close the bleed nipple first and turn off the air compressor last.
- Do this for 1x rear, then 1x front (left) and 1x front (right). Longest path first.
As no air enters the system there is no need to flush the ABS hydraulic modulator through the brake line.
Chain rubbing strip replace
Air filter change
Every 20.000km.
Requirements
- K&N TB-8011 replacement air filter (washable, oiled, life long)
- Unifilter pre-filter
Procedure
Fuel tank removal
- Remove the pillion seat and rider’s seat.
- Disconnect the battery, negative (black) lead first.
- Remove lower radiator panels.
- Remove upper radiator panels.
- Remove cockpit assembly.
- Remove the fuel tank infill panels.
- Release the two bolts securing the fuel tank to the frame.
- Raise the fuel tank and disconnect the electrical connections to the fuel pump and the fuel level sensor.
- Ease the double check clip latch away from the connector until the release buttons are exposed.
- Disconnect the fuel hose by squeezing the sides of the connector and pulling the hose free from its spigot on the fuel pump plate.
- Note the position of the two breather hoses and disconnect the two breather hoses.
- Remove the fuel tank from the frame.
Air filter removal
- Disconnect the intake air temperature sensor multi-plug.
- Disconnect the MAP sensor multi-plug and hose.
- Release the 11 fixings and remove the airbox upper section.
- Remove the 2 fixings amd remove the air filter element.
Pre-filter (UNI filter)
Cleaning and oiling instructions: UNI filter cleaning oiling instructions.pdf
The (paper) airfilter of a Tiger 800 XCx is somewhat inaccessible. Replacing the air intake snorkel under the driver seat with an easily accessible foam (oiled and washable) pre-filter is a good idea, especially when riding on gravel roads or off road.
Procedure
- Remove pillion seat and driver’s seat.
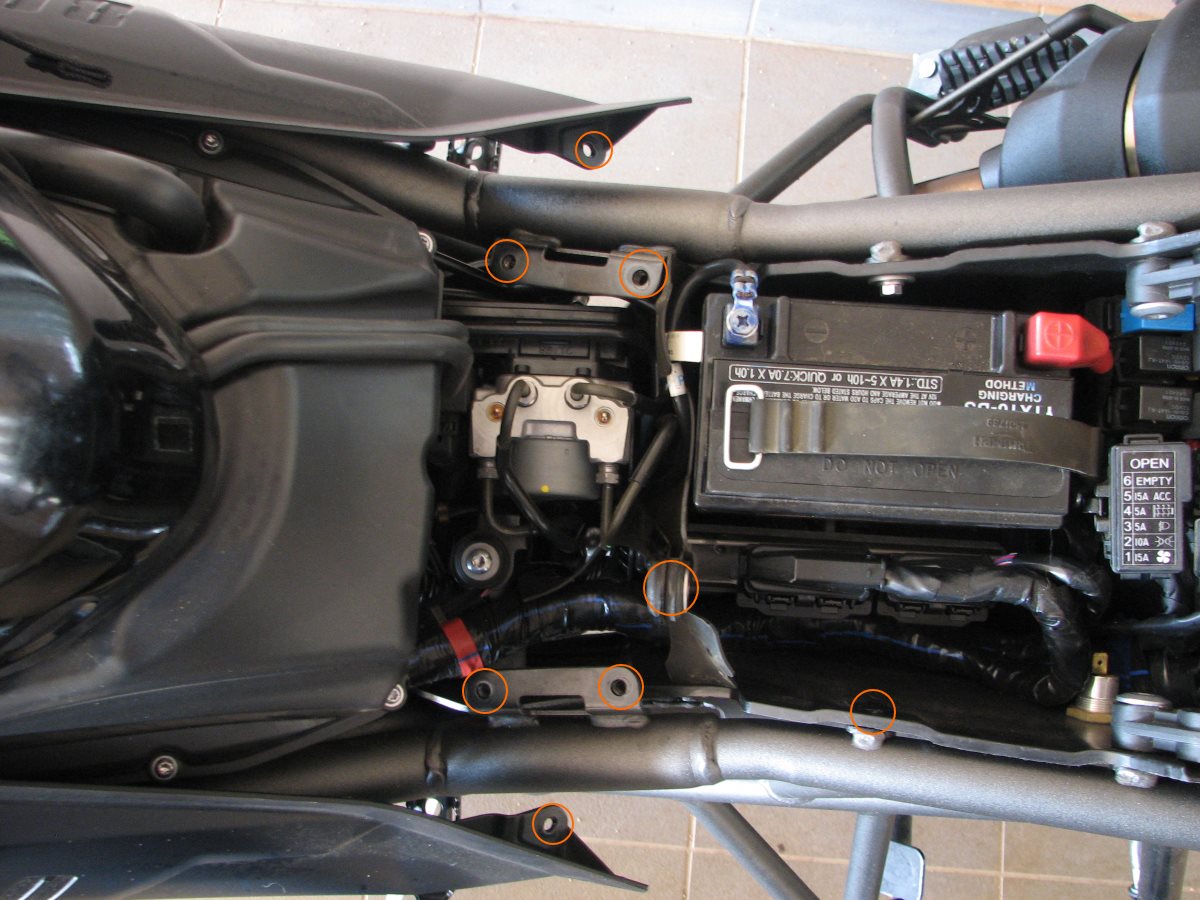
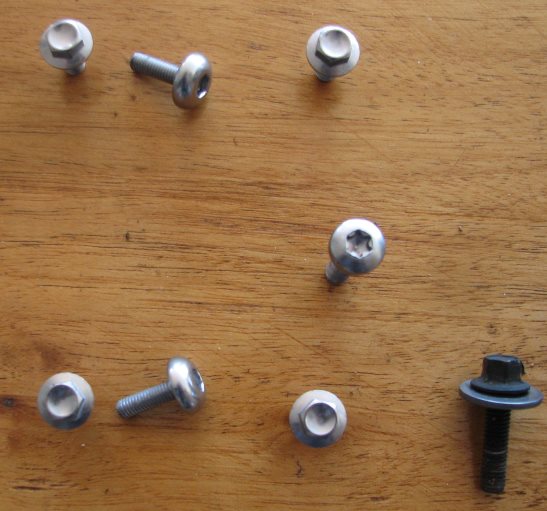
- Remove the plastic front seat bridge:
- Remove 4x 8mm bolts.
- Remove 2x Allen key hex bolts.
- Remove 1x Torx bolt.
- Disconnect rubber flap (3 small holes resting on plastic pins).
- Disconnect metal clip of rubber battery safety strap.
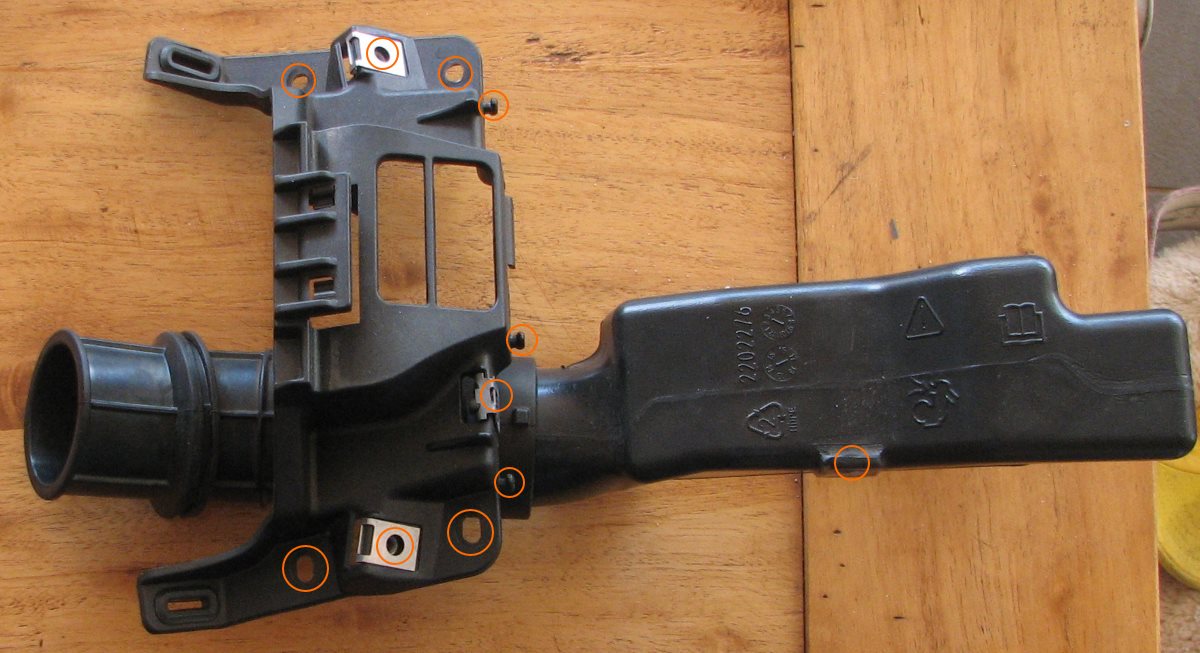
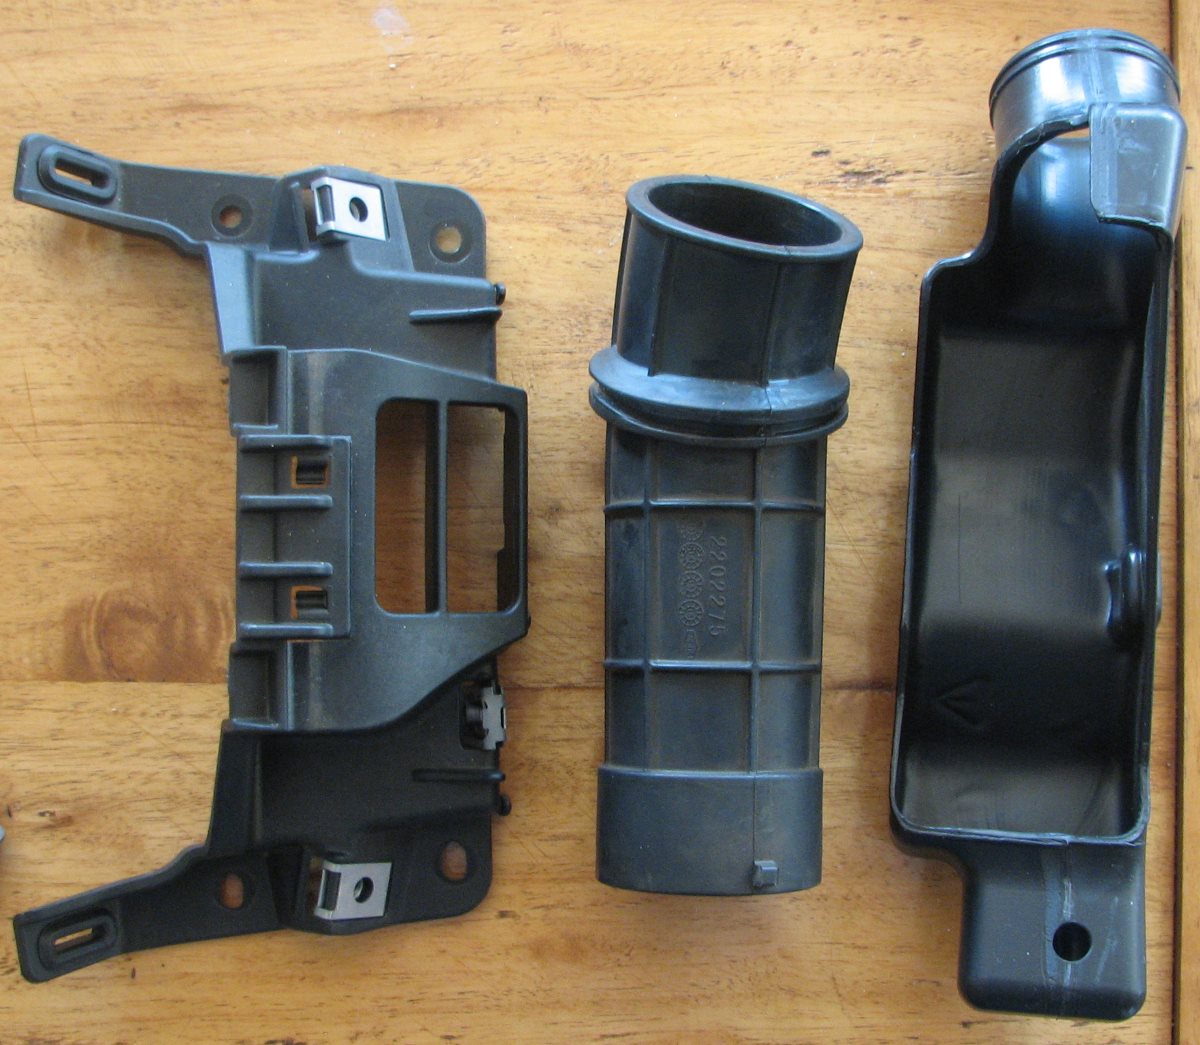
- Remove the plastic part of the air intake snorkel assembly:
- Remove 1x black 8mm bolt and washer.
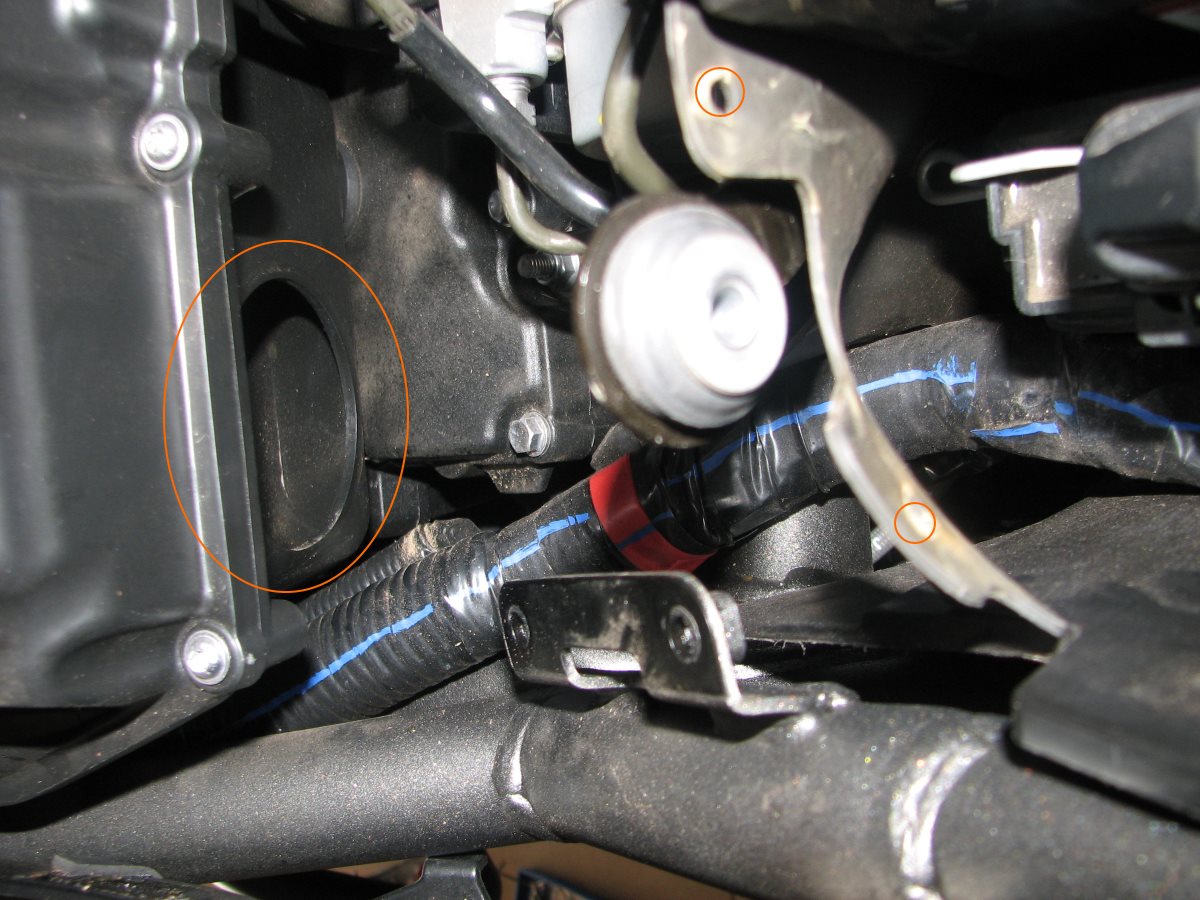
- Remove the rubber part of the air intake snorkel assembly. Compress the rubber ring near the circular airbox air intake opening to do so.
- Leave UNIfilter pre-filter in bag with the black rubber ring exposed.
- Squeeze the groove in the black rubber ring of the UNIfilter pre-filter and move into position. The black rubber ring should fit snugly inside the circular airbox air intake opening.
Service Log
Feb 2019 – 9500km Oil filter replaced + oil change. Air prefilter installed. Next service at 20000km.
Jul 2021 – 17500km. Oil filter replaced + oil change.
Feb 2022 – 18000km. Brake fluid replaced (Castrol React Performance DOT4). Next service at 2 years.
Feb 2022 – 18000km. Coolant replaced (Penrite Blue Premix 5L Organic Acid Technology Phosphate Amine, Silicate Borate Nitrate free rust inhibitor).
Feb 2022 – 18000km. Air filter replaced (K&N).
May 2022 – 18300km. Battery replaced (Yuasa YTX16-BS 14.7 Ah (20HR) 230A CCA // 12V 14Ah (10HR) -> Motobatt MBTX16U 12V 19Ah (10HR) // 12V 20.1Ah (20HR) 270A CCA PHCA 521A AGM 150mm x 87mm x 161mm // 6 in. x 3 7⁄16 in. x 6 3⁄8 in.)
Nov 2024 – 20000km Oil filter replaced + oil change. Castrol POWER1 Racing 4T Motorcycle Oil, 10W-50, 4 Litres $112.99, Next service at 30000km or in 2 years