Pocket hole jig
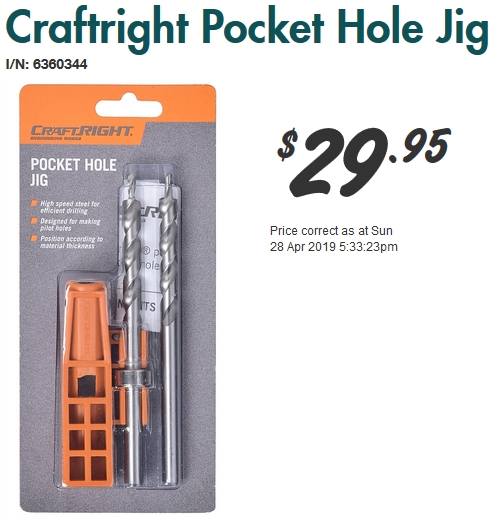
Disclaimer: The orignal pocket hole jig was developed and manufactured by Kreg in the USA. If you want a quality pocket hole jig, the original Kreg pocket hole jig (including clamp) comes recommended. Here in Australia it is a bit overpriced as is the case with many imported high end products ($30 AUD for a stepped drill bit). It is a quality product though that is well designed and will last you a long time.
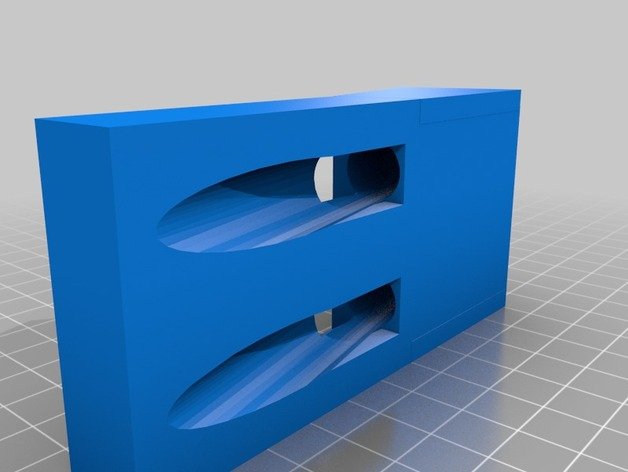
I thought I’d use up some of the last of my filament on printing a pocket hole jig:
https://www.thingiverse.com/thing:1598200
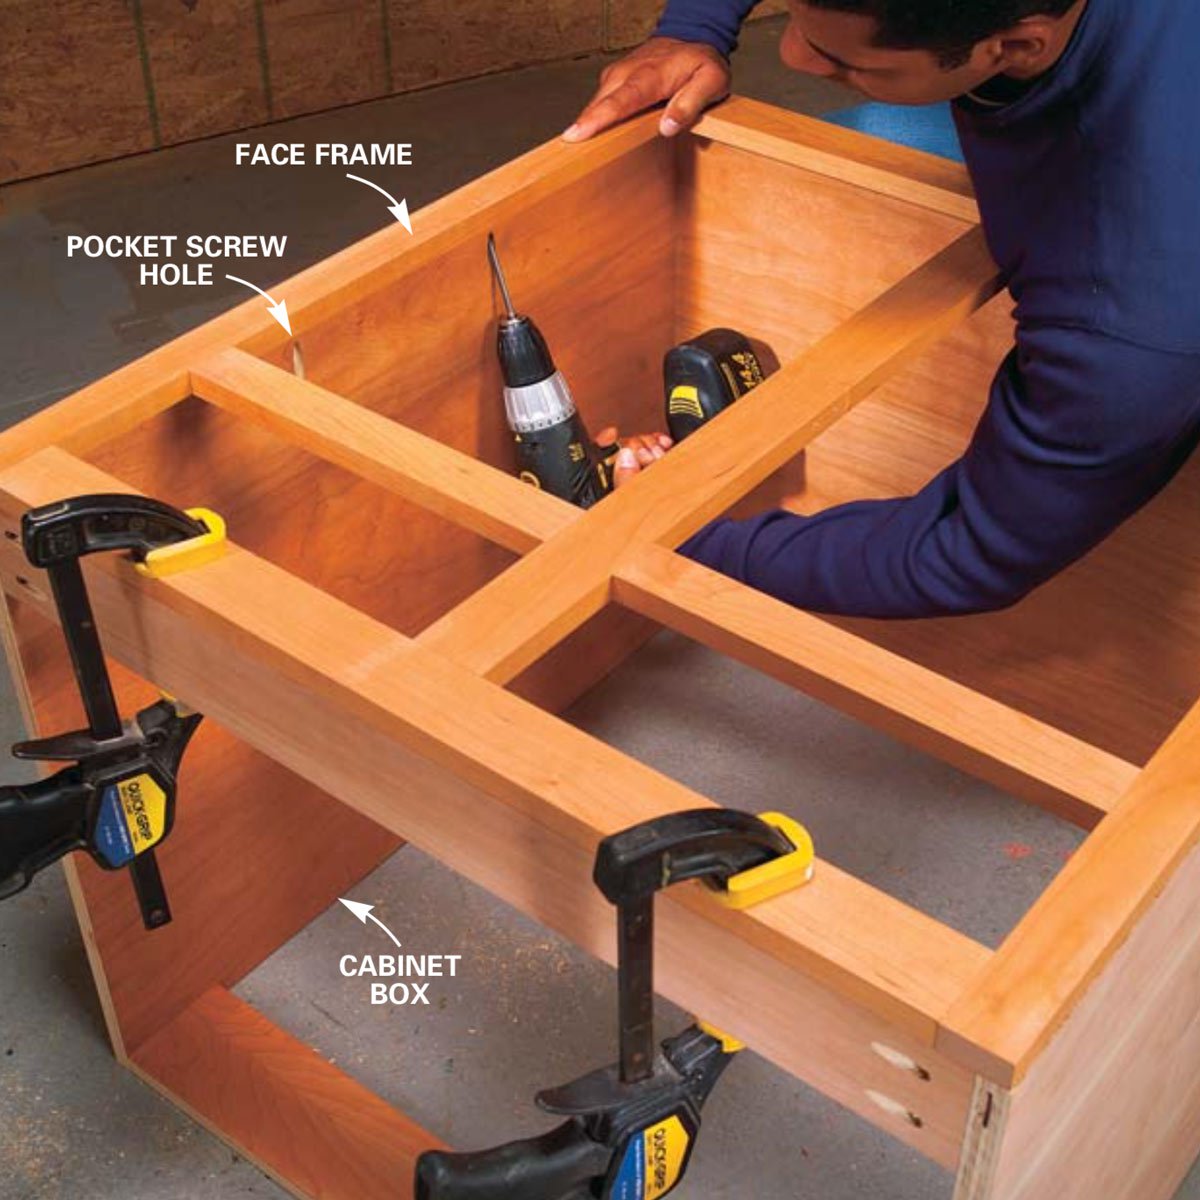
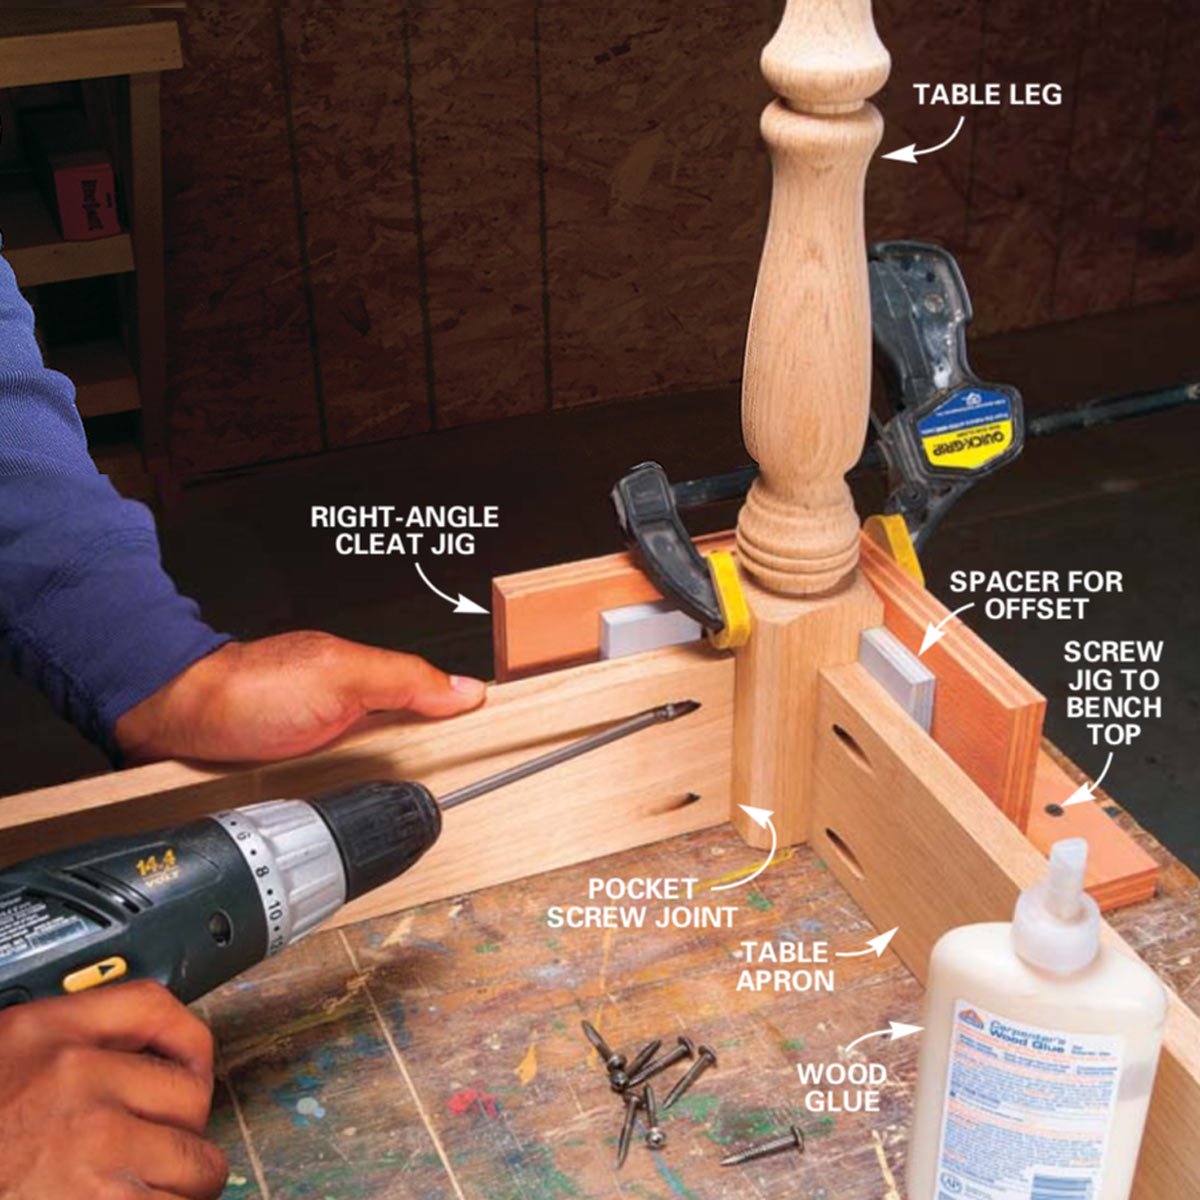
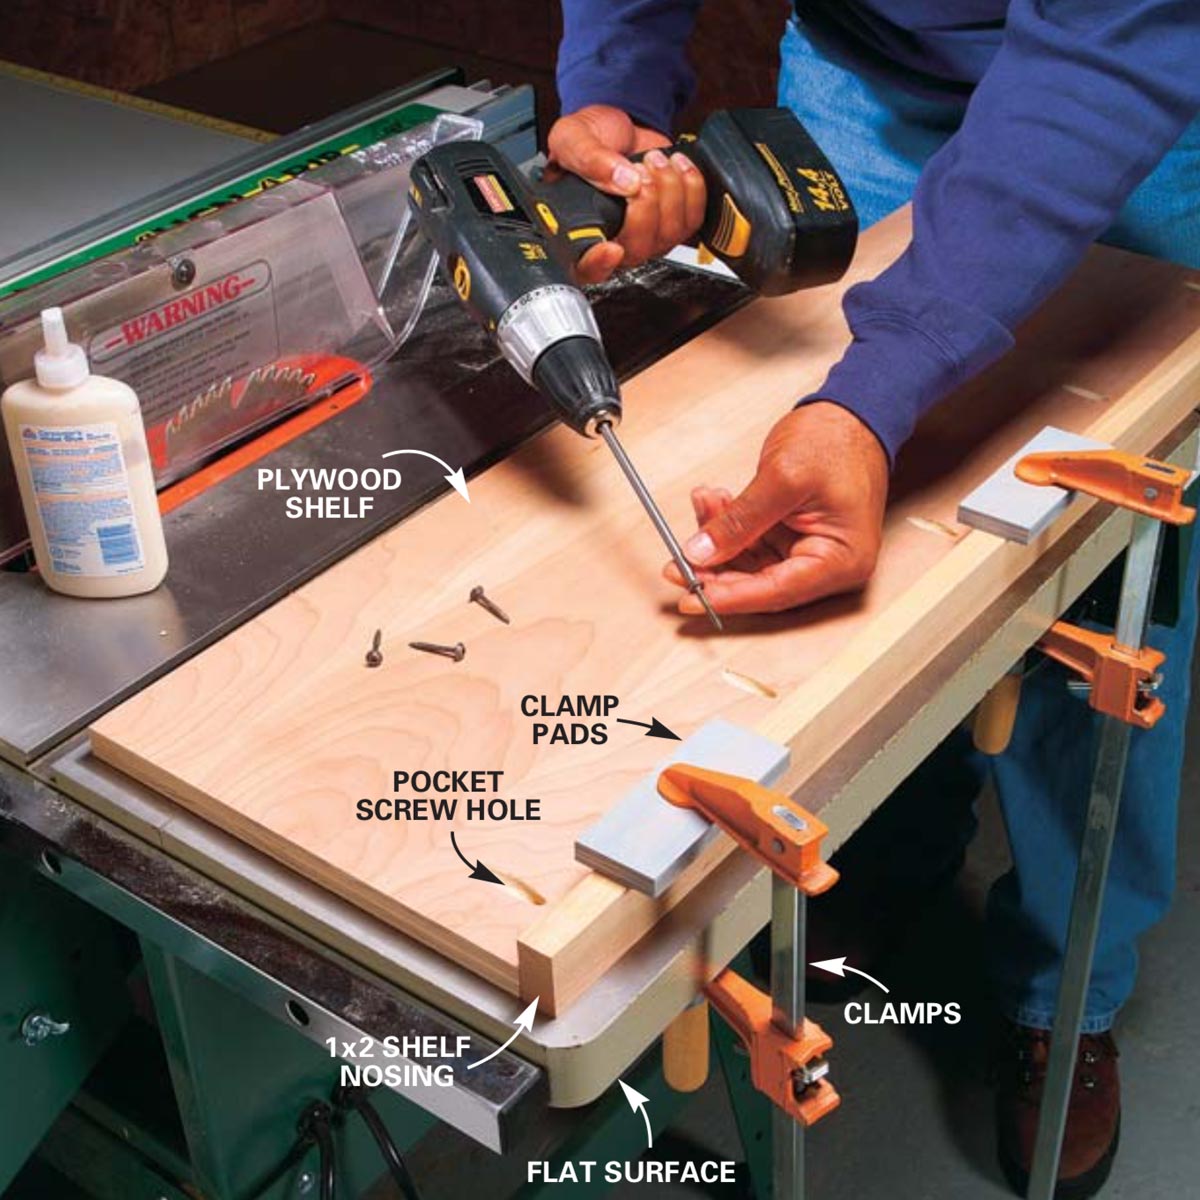
How a pocket hole jig works
You clamp the pocket hole jig onto your workpiece and drill 15 degrees angled holes with the special stepped drill bit. Then you align the two pieces to be joined and drive a pocket screw at an angle into the pocket to connect your pieces. The result is a tight joint that’s as strong as a doweled or mortise-and-tenon joint but takes a fraction of the time to assemble.
Sounds simple, right? Well, there is a bit more to it.
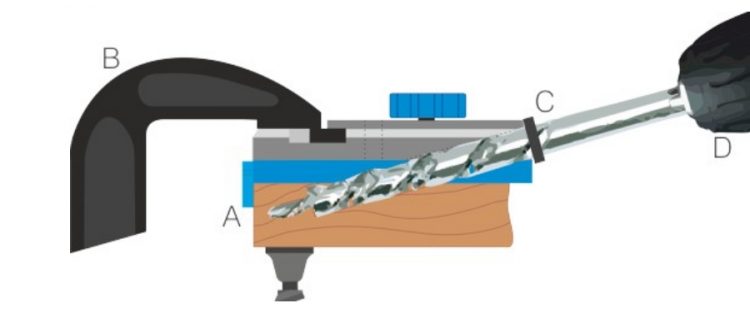
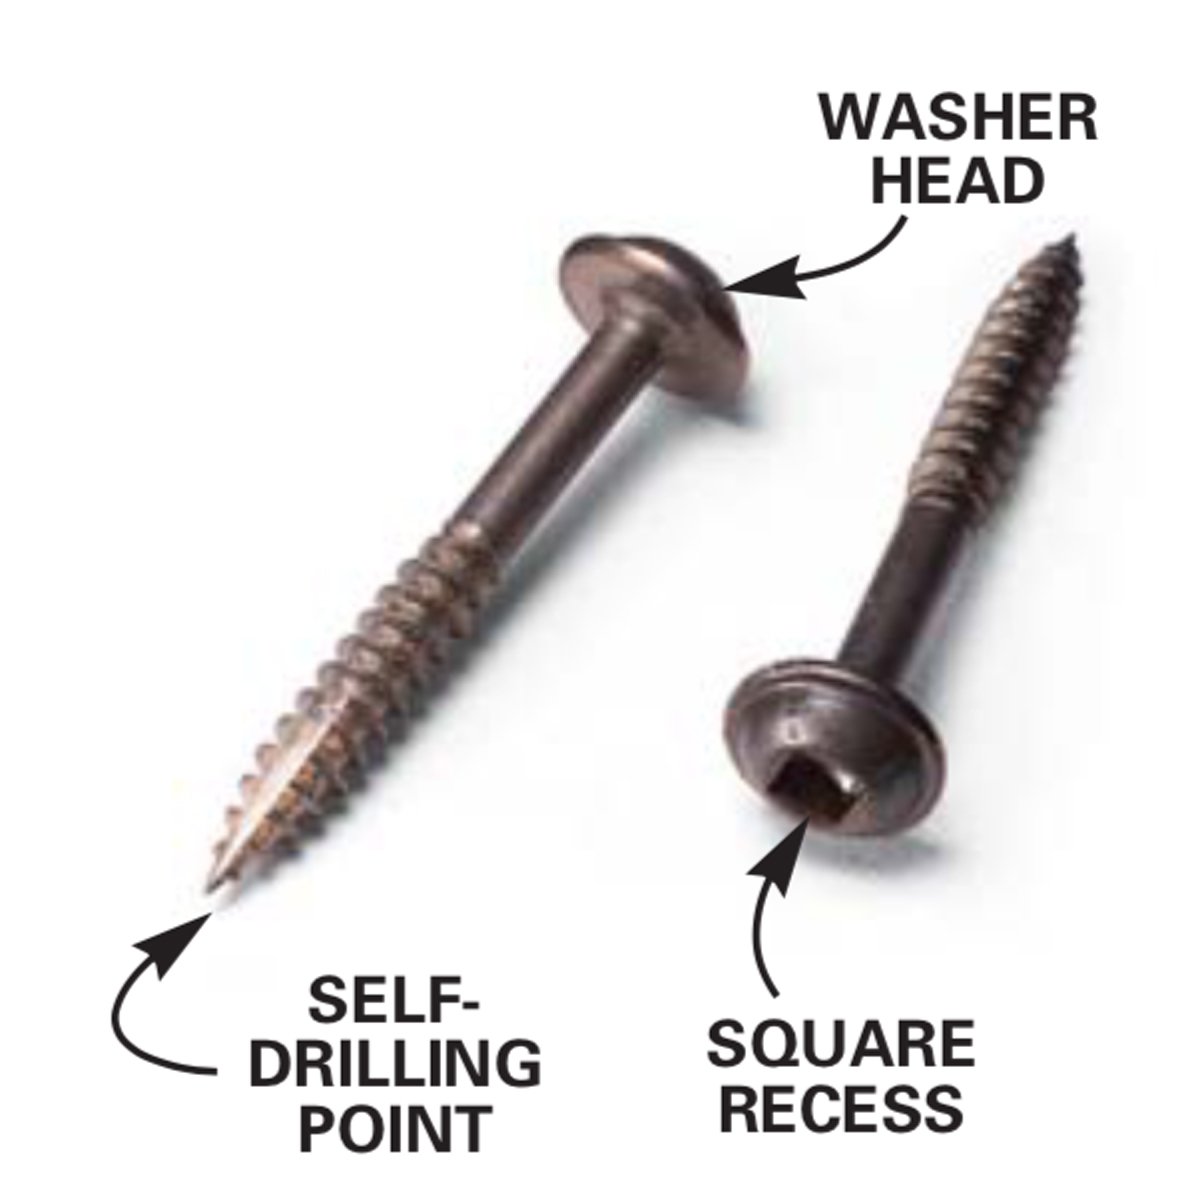
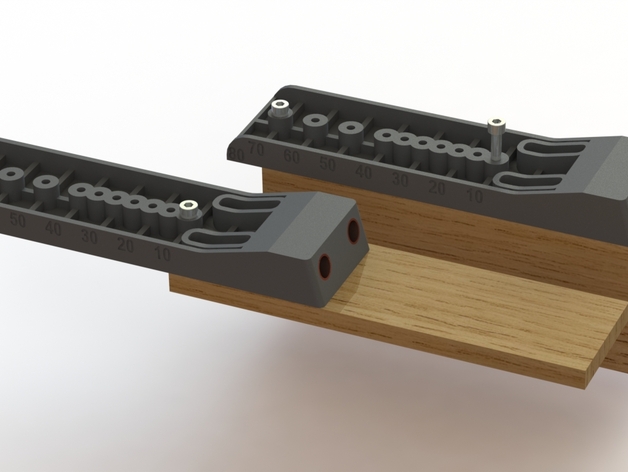
This is what we are trying to achieve. Note the large hole entering the wood, followed by a smaller short leading hole. Note also the flat head wood screw. These screws are not your standard countersunk wood screw with a tapered head.
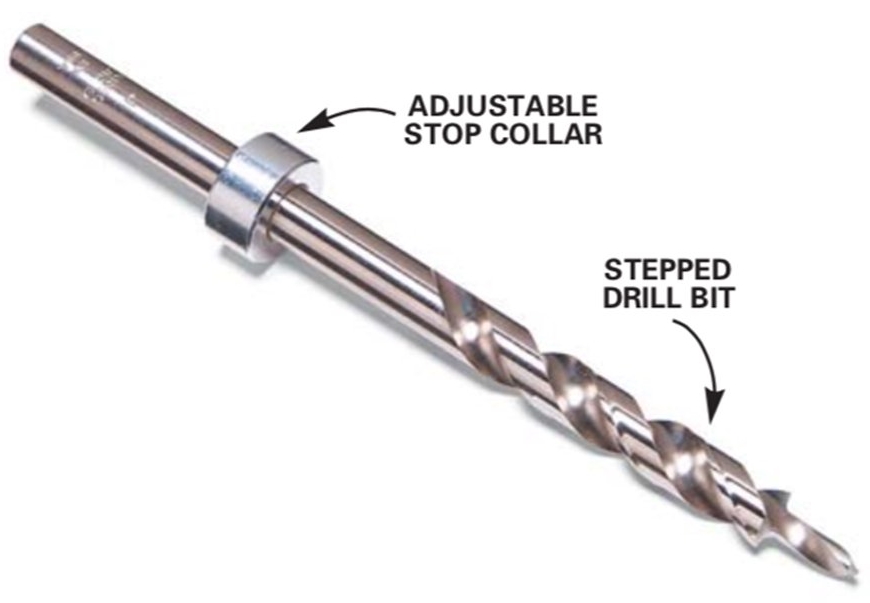
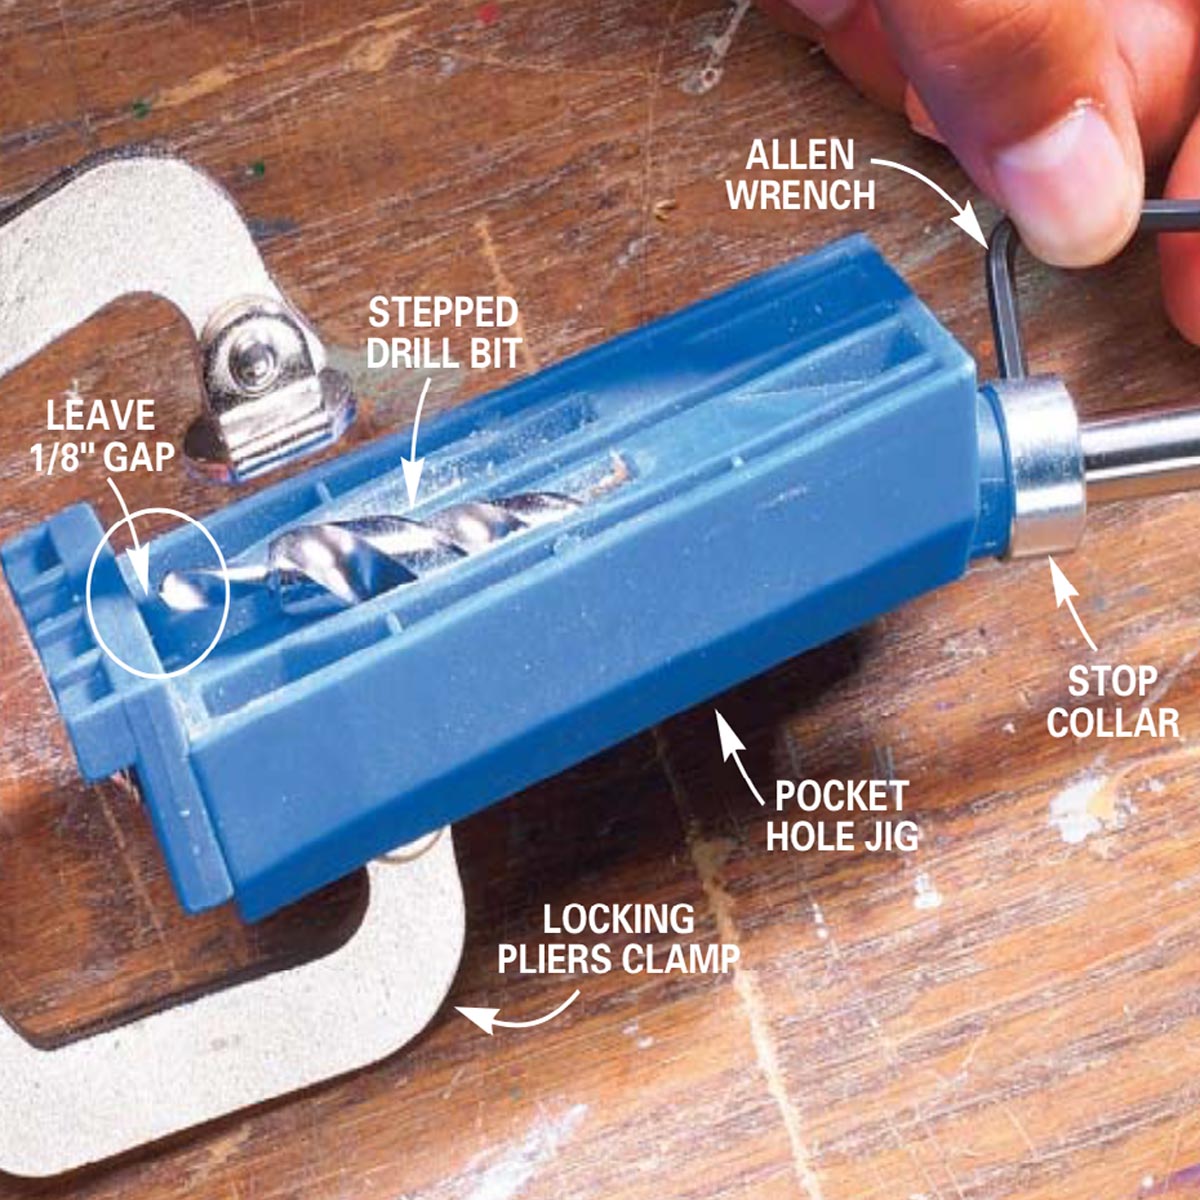
Stepped drill bit
The first thing we need is a special extra long stepped drill bit with an adjustable stop collar. The stepped drill bit drills a large diameter hole with a smaller diameter pilot hole at the tip. Note also you do not drill into both pieces; you only drill into the first of the two pieces you want to join.
Self drilling flat head screws
Pocket hole screws are different from your tapered head philips wood screws. If you use tapered screws there is a chance you will split the wood. You have to use flathead screws in pocket holes. As the pocket hole does not go all the way through into the second workpiece, self drilling screws are preferred. Self drilling screws can nibble at the material and do not require predrilling.
Adjustable stop collar
The angle of the hole guides is fixed at 15 degrees. The adjustable stop collar controls where the flat head of the screw will sit in the pocket hole. You basically always setup the adjustable stop collar as in the picture below. This will ensure the screw’s flat head will sit some distance away from the end of the material (1/8″ plus the length of the small pilot hole)
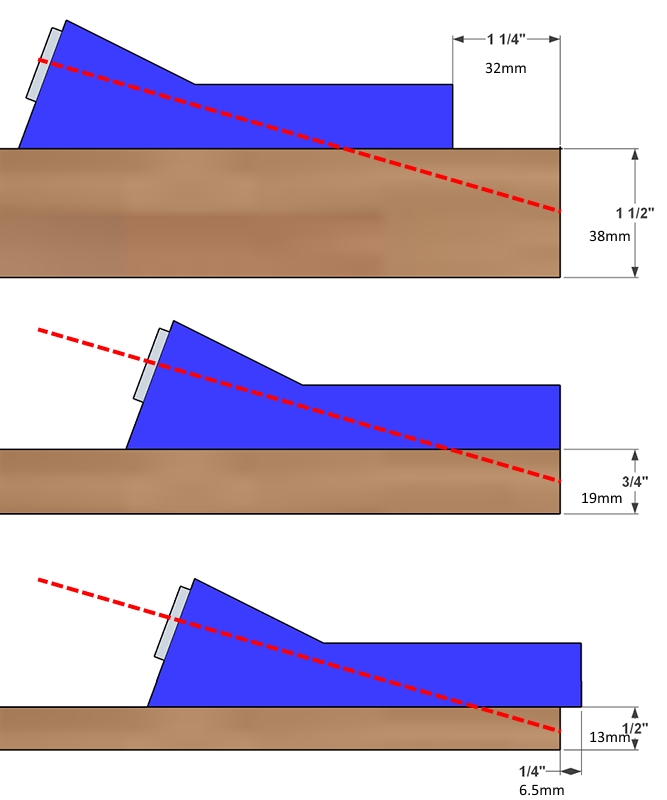
As the angle of a pocket hole jig is always 15 degrees, you have to move the jig closer to the end of a thin work piece and further away from the end of a thicker work piece if you want the screw to connect the two pieces at the center. You can insert a drill in the jig and hold it next to the work piece to check your measurements.
Idea: If you can find suitable copper sleeves, just make 3 different length jigs in different colors for various thickness workpieces.
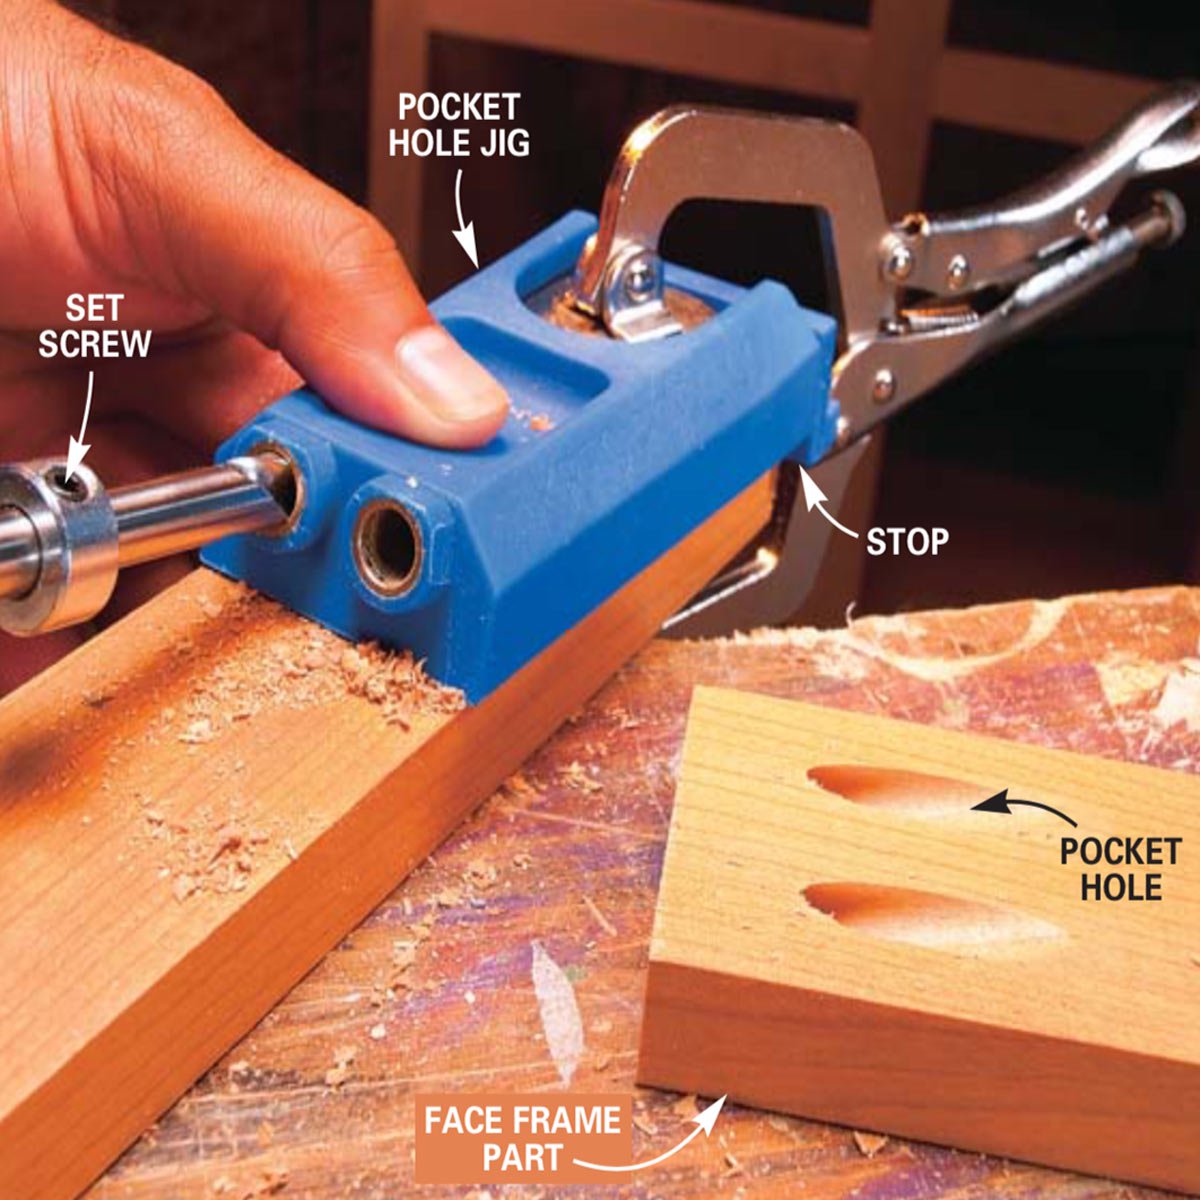
Drilling the hole
Once the adjustable collar is set, a suitable diameter drill bit is inserted into the appropriate hole of the pocket hole jig (some jigs have three different size holes) and the pocket hole jig is clamped to the work piece, you can drill the hole. This is where it gets easy.
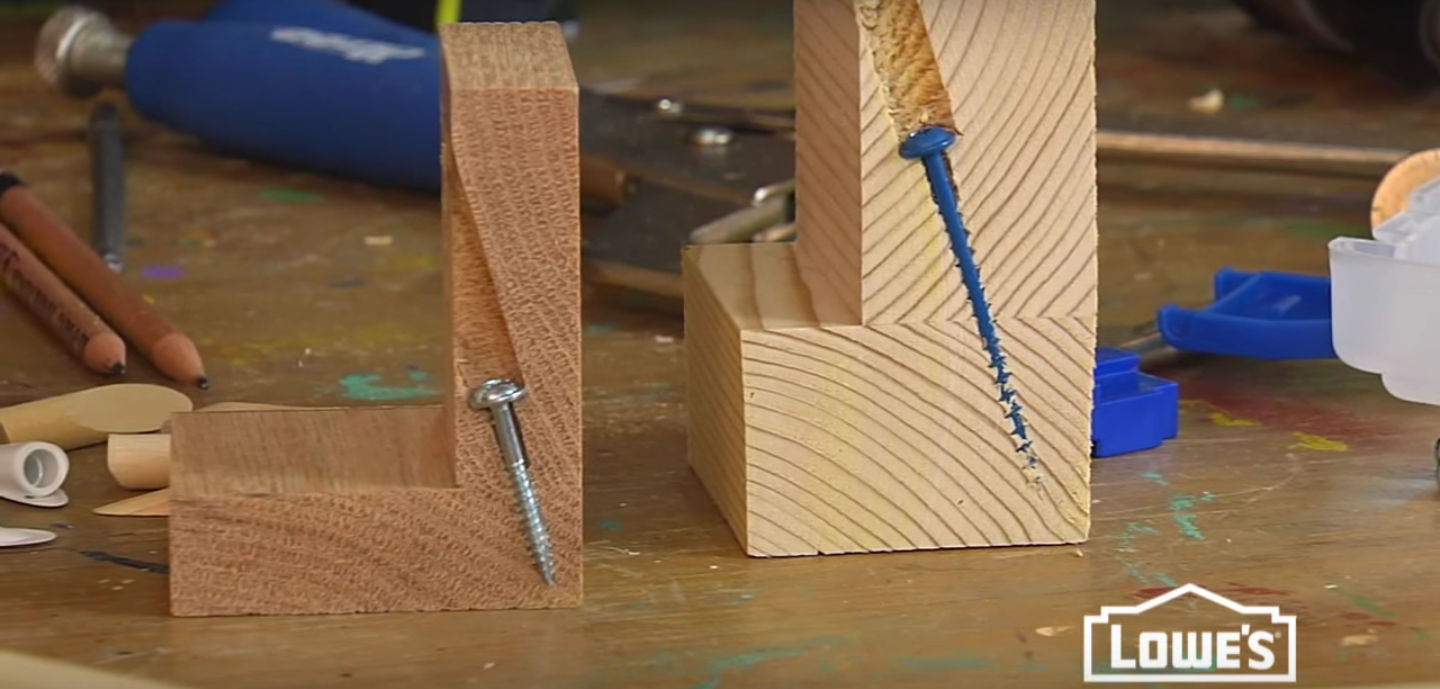
Screwing in the flathead self drilling screw
Like so:

Or like so:
Or like so:
Or like so:
So after 3D printing a simple pocket hole jig I discovered:
– I do not have (self drilling) flat head wood screws.
– I do not have a special step drill bit (with adjustable collar).
– I do not have the proper copper sleeve inserts.
– I do not have an extra long philips head screwdriver bit for my cordless drill.
– Here in Australia there is no such thing as a 11mm OD 1mm wall thickness copper tube connector to suit a 9.5mm pocket hole step drill (that I don’t have).
– You can buy a complete pocket hole jig in the shop for $30:

Interesting…it looks like countersunk or wafer head screws are okay to use. The risk of splitting wood as mentioned in forums is a bit over-exaggerated it seems.
Metal sleeve
I discovered 1/2″ (12.5mm OD) copper tube might be used as a sleeve. It has a 9.5mm nominal inner dimension (ID) to fit a wood drill bit.
Alternative drill bit
I will initially use the pocket hole jig with a standard length 9.5mm wood drill bit:

These wood drill bits will leave a perfect step for a flat head (or countersunk) screw unlike masonry drill bits or metal drill bits that leave a V-shape tapered hole.
Pilot hole
Forget about the pilot hole for now as this requires an extra long 2mm drill bit and separate metal sleeve. It may be possible to drill the small pilot hole by hand afterwards or print a separate jig for it. It’s sole purpose is to guide the screw at the correct 15 degree angle and to help vacate wood chip material when using self drilling screws; a 5 degrees deviation is not ideal, but should be okay. If you use non-self drilling screws, you can probably drill the pilot hole a bit deeper until it exits the work piece. Using an extra long 2mm pilot hole drill bit instead of an extra long 3mm pilot hole drill bit is preferred to leave some material for the screw thread to bite into without splitting the wood.
Screws
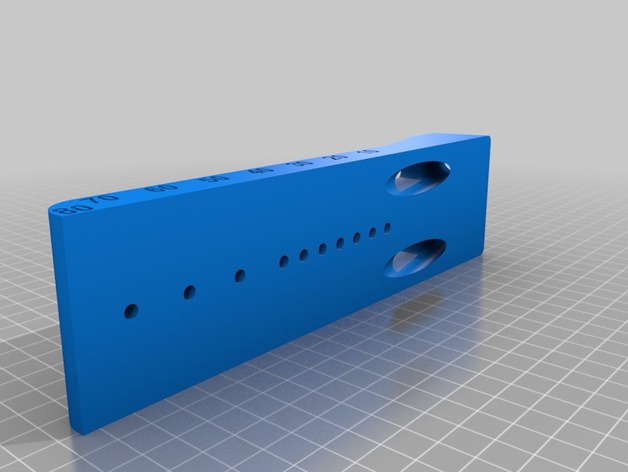
Pocket hole jig – updated version
This version of a pocket hole jig contains marks for various thickness materials and already is suited for 12mm (1/2 inch) outer diameter (OD) copper tube, which is great.
https://www.thingiverse.com/thing:1284533
Also need to look into clamps…I should really find a workshop I could use occasionally rather than doing this from scratch.