Boxcutter
https://blendermarket.com/products/boxcutter
Other great products:
- Decalmachine
- HardOps
Boxcutter documentation
https://boxcutter-manual.readthedocs.io/en/latest/hotkeys/
Thank you MasterXeon1001
https://www.youtube.com/user/masterxeon1001/videos
Quick start guide
Try this:
1. New scene.
2. Add cube.
3. [ALT-W] to switch to Boxcutter
4. Start Making a cut.
5. Press left mouse button when done.
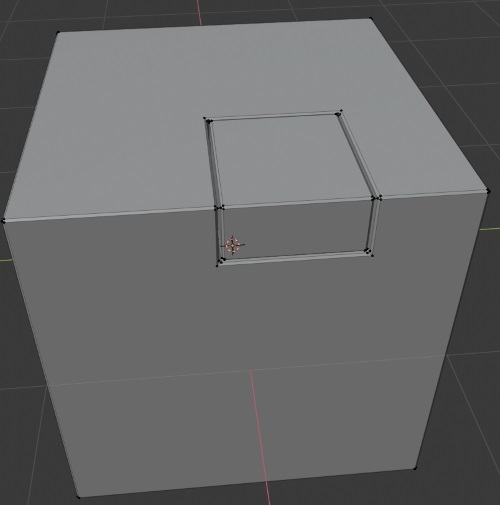
You just cut a hole.
1. New scene.
2. Add cube.
3. [ALT-W] to switch to Boxcutter
4. Start making a cut.
5. Press [T].
6. Press left mouse button when done.
You just cut the “stroke” rather than the “fill”.
What just happened? -> [T] adds a solidify modifier to your cutter object (think T for “thickness”) resulting in the edges of your cutter object receiving thickness.
Try this:
1. New scene.
2. Add cube.
3. [ALT-W] to switch to Boxcutter
4. Start making a cut.
Press [J] to switch join mode.
Press [X] to switch back to cut (= difference) mode.
Press [X] a second time to switch to slice mode.
Slice will do the same as cut, but with a twist. It will chop off the chunk of the model into a separate object. This is very useful for assigning different materials or to work on parts separately.
Try this:
1. New scene.
2. Add cube.
3. [ALT-W] to switch to Boxcutter
4. Make a few cuts.
5. Now press the magnet symbol in the toolbar (SNAP).
6. Press and hold [CTRL] before you start to make another cut. Dots will appear out of thin air. I kid you not.
7. Now hover close to a DOT. It will turn RED.
8. Finish making your cut as you normally would.
You have now perfectly aligned a cut using Snapping Dots.
Try this:
1. New scene.
2. Add cube.
3. [ALT-W] to switch to Boxcutter
4. Make a few cuts.
5. Now press the grid symbol in the toolbar (SNAP GRID).
6. Press and hold [CTRL] before you start to make another cut. A magical floating grid will appear. Seriously. Freakin’ awesome.
7. Hover close to a DOT. It will turn RED.
8. Finish making your cut as you normally would.
You have now perfectly aligned a cut using Snapping Grid Dots.
Whilst in Boxcutter drawing mode, try this:
[B] -> adds bevel (drag mouse left/right for offset amount, MOUSESCROLL for number of segments)
[V] -> adds array (+X,Y,Z for axis, MOUSESCROLL for amount, drag mouse left/right for spacing, [V]x2 for circular array)
[O] -> offset
[E] -> to go back to extrude
[C] -> cycle cutter
[T] -> solidify (thickness; cuts’ the stroke’ instead of ‘fill’)
[Z] -> Inset
Press [TAB] when confused (or to manipulate your cutter using Control Dots).
[LMB] to finish cut, [ESC] to cancel cut
Then learn about polygon cutter shape, custom cutter shape, extract mode, what holding CTRL / ALT / SHIFT does whilst in drawing mode, etc.
Then buy HardOps (HOPS) swiss army knife if not done so already to make the modifiers work for you instead of you working for the modifiers.
Hotkeys
[ALT-W] Select Boxcutter
“Activated”
Select an object
Hold LMB drag to draw a shape
“Drawing”
Release LMB to finalize shape and enter next step
“Extruding” [E]
[LMB] or [SPACE] to execute
[RMB] or [ESC] to cancel
[W] Exit Boxcutter tool
Before drawing, you can press [D] to select Box, Circle or Ngon cutter.
Draw starting from inside your object outward. If you start from the outside inward, auto ortho will kick in. Press [NUM5] to return to perspective view.
When you are Drawing or Extruding (= default), you can switch to:
Mode
Cutting [X] – Cut into object (“difference”)
Slicing [X] – Similar to cut. The cut part will be removed and become a separate object (“intersect”).
This is useful if you want to assign different materials to different parts of an object.
Insetting [Z] – Inset shape.
Joining [J] – Join cutter to object. Grows the object.
Using Knife [K] – Cutter verts and edges become part of object. Works best in Edit mode.
Making [A] – This is what happens if you don’t select an object first. Just creates boxes on the grid.
Extracting [Y] – This one is super cool but needs some explaining. Ignore for now.
Cycle cutter [C] = picks a different cutter when cutting
The default cutter shape is a rectangle. But you can use other shapes as well:
Shape
Rectangle
Circle
Polygon – [LMB] to draw a connect-the-dots shape by hand. [CTRL] for angle snap. Press [TAB] when done.
Custom – You can choose a specific cutter using the object picker or pick a collection for use with the [C] Cycle cutters feature. Ignore for now.
There are a number of additional operations you can perform whilst cutting:
Operation
( Drawing [D] )
Extruding [E] – Lower bottom of cutter. [E] toggles between Offsetting and Extruding.
Offsetting [O] – Raise top of cutter.
Array [V] – Repeat for circular array. Use scroll wheel to increase numbers. X,Y,Z for axis.
Solidify [T] – Gives the edges of the cutter “thickness”. When you use this with default cuts it will cut the “stroke” but not the “fill”.
Bevel [B] – [Q] sides only <> top/bottom also.
Mirror [1,2,3] – Mirror, Bisect mirror (= remove geometry if / where it overlaps) or No mirror for X, Y and Z.
Lock shape [TAB]
When you are in the middle of stuff, press [TAB] to lock the Boxcutter shape.
– Manipulate the Dots to Extrude, Offset, Bevel or change the shape.
– Use scroll wheel to rotate view.
– Press [CTRL-D] for popup menu. Only works when locked [TAB] and not hovering over a dot.
To exit menu, hover outside of menu. Menu will dissappear. Press [E] to continue (extruding).
Whenever I return to an active unfinished Boxcutter operation I like to press [TAB] to lock or [E] to resume (extruding). Do not press [LMB], [SPACE], [RMB] or [ESC] to resume as this will execute or cancel [!]
Drawing
[LMB] pull a corner.
[+SHIFT] keep square constraint.
[+ALT] keep center constraint.
[+SHIFT+ALT] keep square and keep center constraint
Boxcutter Snap options
Ignore Blender snap options; use Boxcutter snap when inside Boxcutter:
1. [ALT-W] to select Boxcutter tool.
2. Make a few random box cuts in a cube.
3. Snap
– Press button that looks like a Magnet symbol in Boxcutter toolbar.
– Select cube.
– Hold [CTRL] before cutting.
– Dots will appear on the selected object to help with aligning your cutter on the object.
– Hover over Dots. They will turn red once you are close.
– Hold [LMB] to start drawing.as per usual.
– Finish your cut.
– Turn off Snap (magnet symbol) just for now.
4. Snap grid
– Repeat the same process, but this time press button that looks like a grid in Boxcutter.
– Hold [CTRL] before you start drawing to see a floating Dots Grid appear to help with aligning your cutter on the grid.
In short:
Enable Boxcutter grid snap option(s).
Hold [CTRL] before cutting.
You should see Dots appear, either on the object or as a floating grid.
Hold [CTRL] when drawing to move in increments.
Hold [CTRL+ALT] to draw from center in increments(!)
Editing cutters
You can edit your cutter like any other shape.
Simply make visible in Outliner and modify in Edit mode.
[N] > Item tab > Transform > X, Y, Z values.
Move [G], Rotate [R], Scale [S] as per usual along axis [X], [Y], [Z] and use [+SHIFT] for XY, XZ, YZ plane.
Enter exact numeric values in popup when complete.
Use Blender snapping aides.
[ALT-Z] for X Ray mode + Face mode [3]
Creating a wedge shaped cutter
1. Create a box cut taking a bite out of the midpoint of an edge of a cube.
2. When finilizing, hold [SHIFT] to keep the cutter live (= visible in Outliner).
3. In Edit mode, dissolve an edge [DEL] of the cutter to create a wedge shaped cutter.
4. When boxcutting, use [C] to cycle your cutters and reuse the wedge shaped cutter.
Making a custom cutter
[~] or [R] to rotate.
https://www.youtube.com/watch?v=PYcmwFefOpk
Surface line art #1
1. Cube.
2. Add a Bevel of 0.01m.
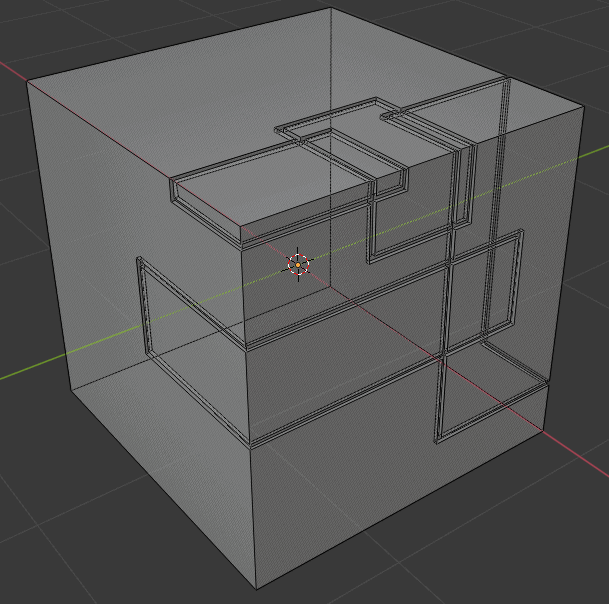
3. Boxcutter Cut a number of boxes.
4. Press ‘T’ (solidify, or ‘thickness’) to make the cutter hollow and only cut the wall thickness.
Note how the Bevel modifier is kept last in the stack. This is part of the workflow.
Note the box cutter goes through the interior of the cube.
Surface line art #2
If you want your surface line art to only sit on the surface, you will need to use Knife rectangle 2D shapes instead of Cutter 3D boxes:
1. Cube.
2. Edit mode.
3. Boxcutter Knife cut a number of random rectangles. The intersecting line art is imprinted onto the surface of the cube. Interior of the cube is not affected. Exit Boxcutter.
4. Select edge rings [ALT-LMB] + [SHIFT] of imprinted box line art.
5. Bevel [CTRL-B].
6. Extrude along normals to push in slightly.
Tip: Use Ngon instead of Rectangle shape.
Extracting [Y] – This one is super cool but needs some explaining.
This cuts out the cavity and saves it as a custom cutter named Extraction. It then loads this cutter into Boxcutter’s Custom shape option so you can cut the same complex cavity in another box (or in the same box multiple times).
Selecting a different cutter whilst drawing is super cool but also needs some explaining.
[C] to change to a different cutter shape whilst drawing. By default it will use the “Cutters” collection.
Works best if you have come different cutters other than just rectangle boxes i.e. mix of cutters that used rectangle shape, cylinder shape, some with Bevel, some with Array or some that were modified in edit mode resulting in custom shaped cutters. Then, what you do is this:
[ALT-W] Boxcutter
Select object
Draw rectangle and extrude.
[C] to cycle
[R] to rotate
[LMB]
-or-
Select object
Draw rectangle but not extrude.
[C] to cycle
Move mouse to extrude
R] to rotate.
[LMB]
Switch to Selection mode
Tip: You can always pause using [TAB] and grab a Dot if you want to make changes to the shape before finalizing.