Align to transform orientation
The most basic objects have their edges aligned with local / global X, Y, Z axes.
Then there are objects that have been rotated and you can move, rotate, scale along global or local X, Y, Z axes.
[G | R | S] [X | Y | Z] = Transform along global axes
[G | R | S] [XX | YY | ZZ] = Transform along local axes
[G | R | S] [SHIFT + X | Y | Z] = Transform along global axes in YZ, XZ, XY plane.
[G | R | S] [SHIFT + XX | YY | ZZ] = Transform along global axes in YZ, XZ, XY plane.
But what if rotation has been applied and the object is off axis? How do you work on a model that has faces oriented not aligned with any X, Y or Z axis?
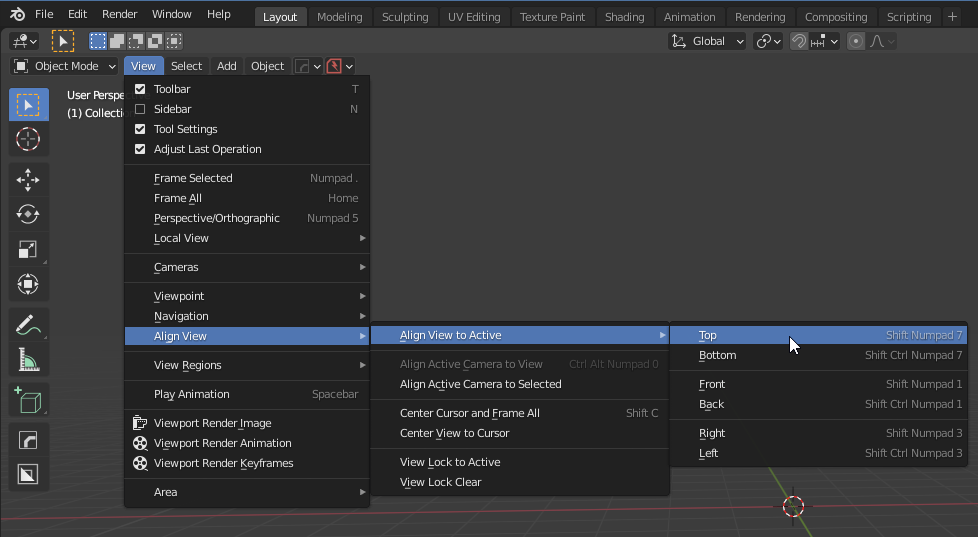
Align View (to a single face)
The first option is to align the view to a single face by pressing [SHIFT+NUM7].
Make sure you are in Ortho mode [NUM5] and set your Transform orientation to ‘View’
There are two annoyances with this approach:
- You can no longer rotate the view while working view aligned.
- ‘What face did I select to align my view with again ?’
Instead of rotating the view, we can also rotate the object transform orientation.
What is an object’s ‘transform orientation’ ?
An object’s 3D gizmo (X,Y,Z axes indicator) looks like this: ![]()
If you rotate this 3D gizmo, you mess with an object’s axes orientation a.k.a. ‘transform orientation’.
Most common are the Global (= world) and Local (= edit mode) transform orientation. We have seen the View transform orientation. It is also possible to create a custom transform orientation based on individual faces.
![]()
Align object (to a single face) a.k.a. ‘create a transform’ (Blender)
You can orient an object to match the orientation of another object’s face:
- [TAB] Select a face.
- Create face transform [+]
- Exit [TAB].
- Select another object
- Object > Transform > Align to Transform Orientation.
X, Y and Z orientation of the object are now aligned to the orientation of the face.
Combine with the tedious 3D cursor to not only align but also place the object onto the surface:
[SHIFT+A]
3D cursor to selection (source object face)
Set origin
3D cursor to selection (destination object face)
Selection to cursor (object) for instant placement:
[R] [X] [-90] (this may vary)
Man, I hate move cursor to selection + set origin + move cursor to different selection, move selection to cursor. Most of the time you don’t really need this; an XY move [G], [SHIFT+Z] will do just fine to position in place eyeballing it with a Z move to drop it. Can also use snapping.
The nice thing about creating a transform is it leaves the view free. You can orbit the view and look at things from different angles and still be able to move in X, Y and Z axis relative to the face.
The problem ‘What face did I select to align my view with again ?’ now becomes ‘What face did I base my custom transform on?’ or ‘which of these 10 custom transforms is the one that I need?’
Align object (to a single face) a.k.a. ‘create a transform’ (HOps)
You can place empties and press [SHIFT+NUM7] to orient the view to, or even better, create custom transforms for. HOps can do this a lot quicker:
With empties, you can always revisit and either a) create a transform or b) align the view.
Final notes
Stop being obsessed about off-axis / organic modelling. You have total freedom to angle geo as long as you model as loose parts. If you fuse every. single. object. together with perfect geo transitions you can’t animate anyway. There will be loose parts where there are joints. To start out you can block out rough shape by stacking primitives and fuse where need be or not (joints). Or model parts in world origin on-grid and move/rotate stuff around afterwards freely. Or duplicate an object, delete 99% and work of a single edge loop. Plus you now have got the skills to orient a) view b) objects to a face anyway. Doesn’t matter really as you can always align an object transform with world origin (place an empty or face in world origin to align objects to), parent object to an empty and move/rotate the object back where you found it, if you desperately need on-axis.
You can keep things relatively simple by rotating primitives along a single axis only initially. Rotate sub-parts (modelled in origin) any way you like when you move them in position.
Don’t rotate geo; parent to an empty and rotate the empty. Geo should have rotX, rotY, rotZ = 0 in [N] panel. You can then simply edit the empty and set rotation values to 0 to revert to modeling the sub-part on-axis. This is preferred over aligning the view to a face or empty using HOps Align View (to empty) or [SHIFT+NUM7]. Note: [SHIFT+NUM7] also works on empties, not just faces.
The real risk is “vis geo to mesh”. There is no undo for that. Keep copies of parametric stuff.
+ build kitbash / trimsheet geo portfolio. practice. practice. practice.