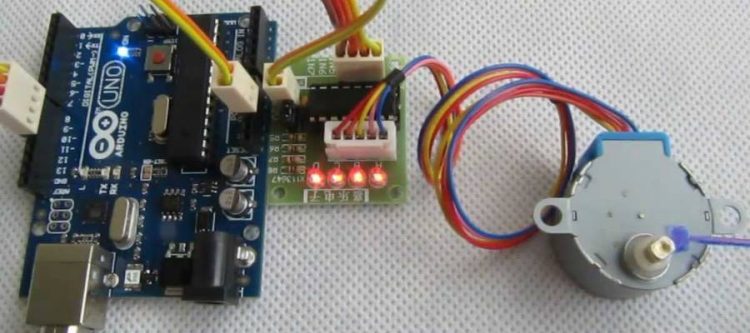
Arduino + Stepper (ULN2003A)
Description
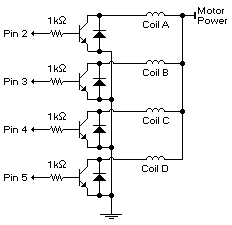
Unipolar stepper motors have 5, 6 or 8 wires. They do not require a dual H-bridge to drive them. Instead, you can use a transistor for each phase and a flyback diode to prevent voltage spikes when the power to the coil is turned off and the stepper motor acts like a generator briefly (back-emf).
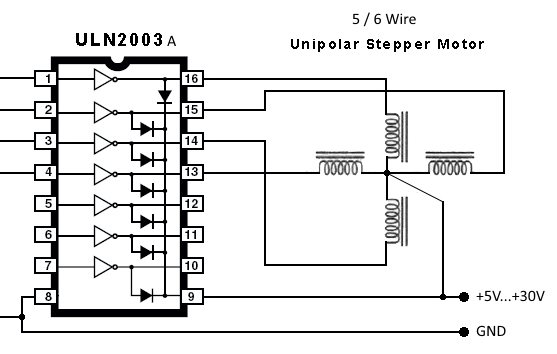
There are integrated circuits (chips) we can use that have all the required components on board. This example uses an ULN2003A chip to drive a unipolar 5,6 or 8 wire stepper motor.
ULN2003A
The ULN2003A is an array of seven NPN Darlington transistors capable of 500mA, 50V output. It features common-cathode flyback diodes for switching inductive loads.
The ULN2003 is known for its high-current, high-voltage capacity. The drivers can be paralleled for even higher current output. Even further, stacking one chip on top of another, both electrically and physically, has been done.
Main specifications:
- 500 mA rated collector current (single output)
- 50 V output (there is a version that supports 100 V output)
- Includes output flyback diodes
- Inputs compatible with TTL and 5V CMOS logic
Hardware Required
- Arduino board
- Arduino ULN2003A based stepper driver board
- 5, 6 (or 8) wire stepper motor (i.e. “28BYJ-48”)
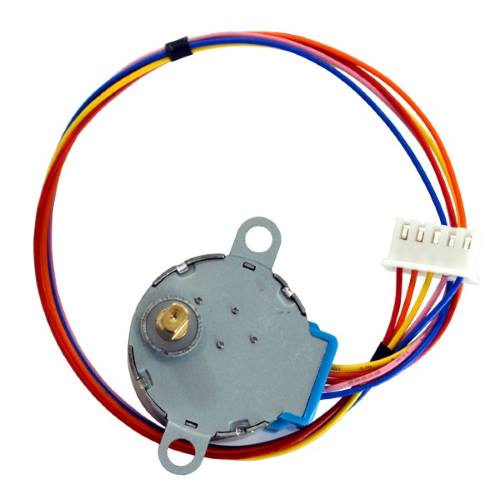
28BYJ-48 unipolar stepper motor
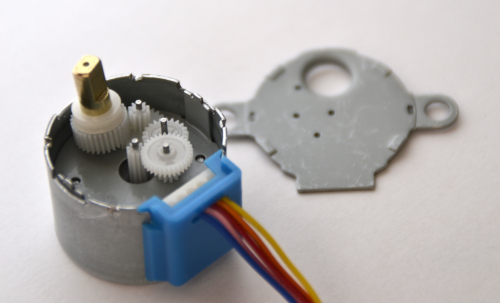
The 28YBJ-48 stepper motor operates on 5Vdc and has built-in reduction gears. It has good torque for its size, but has relatively slow motion. It is ideal for use with Arduino boards as the stepper motor can be powered from the Arduino and the connector fits straight into ULN2003A driver boards.
28BYJ-48 specifications
- 4 Phase 5 Wire.
- Voltage : 5V DC
- Current : 160 mA per winding (320 mA in 4-step mode) Measured: 250mA stopped, 200 mA running fast.
If powered directly from an Arduino output pin, the current provided will be far less. - Resistance : 30 Ω per coil winding from Red wire to any coil.
- Step Angle 8-Step sequence (Internal Motor without reduction gears): 5.625° (64 steps per revolution)
- Step Angle 4-Step sequence (Internal Motor without reduction gears): 11.25° (32 steps per revolution)
- Gear Reduction ratio: 1 / 64:
- 64*64 = 4096 steps per output shaft revolution in 8-step sequence.
- 32*64 = 2048 steps per output shaft revolution in 4-step sequence.
- Note: The Arduino “Stepper Library” runs in 4-step mode
- No-Load Pull-Out Frequency : 800pps
- No-Load Pull-In Frequency : 500pps
- Pull-In Torque : ≥ 78.4mN.m
- Wiring Instruction : A (Blue), B (Pink), C (Yellow), D (Orange), E (Red, Mid-Point)
- Weight : 30g
Wiring diagram for this model unipolar 5 wire stepper motor:
- Coil 1 = Blue / Pink wire
- Coil 2 = Yellow / Orange wire
- Red = Common (center tap)
ULN2003A driver boards
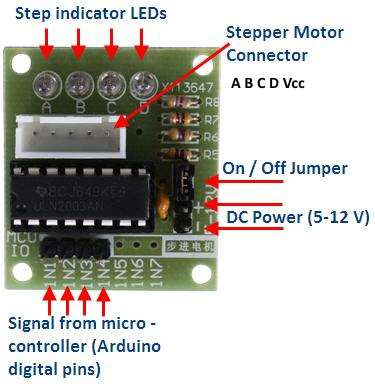
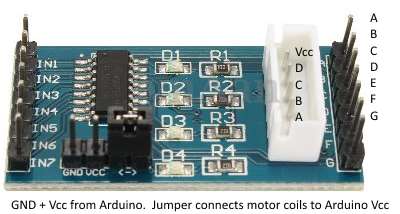
These are the two most common ULN2003A driver boards. You can use these boards to drive DC motors or unipolar stepper motors.
The advantage of the below board is that all 7 inputs (IN1..7) and all 7 outputs (A..G) of the ULN2003A are accessible.
Circuit
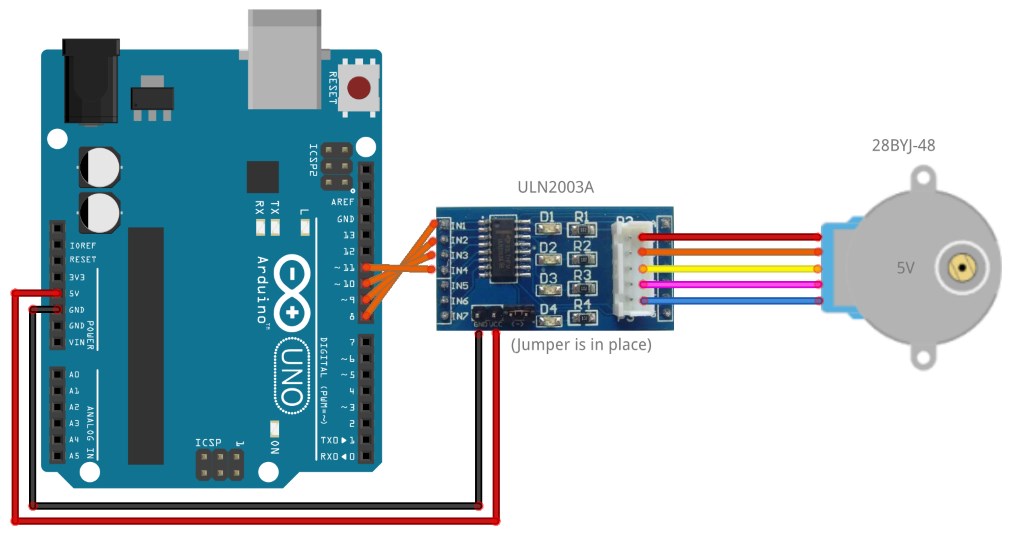
The 28BYJ-48 stepper motor plugs straight into the connector.
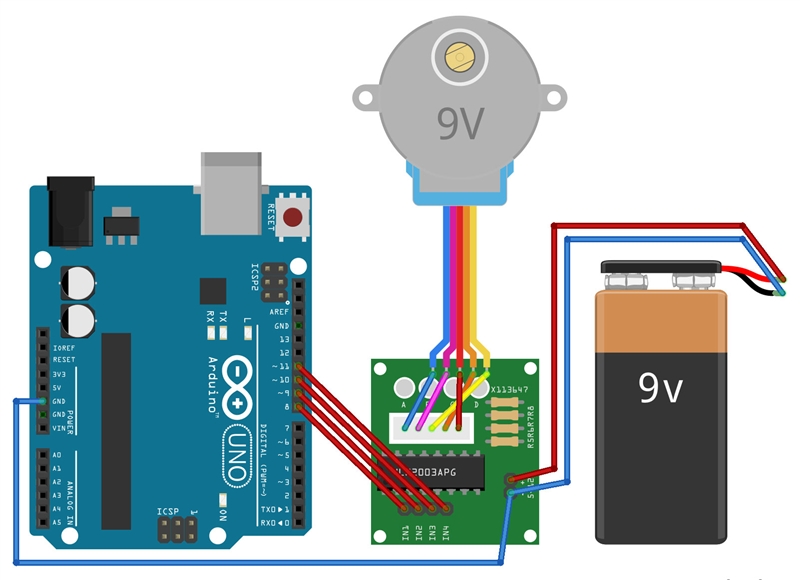
If you use a different stepper motor requiring an external power source you may need to wire differently like in the picture below. If the stepper motor vibrates instead of rotates, you may need to change the wiring sequence.
Code
Example 1
/* Stepper Copal
 * -------------
 *
 * Program to drive a stepper motor coming from a 5'25 disk drive
 * according to the documentation I found, this stepper: "[...] motor
 * made by Copal Electronics, with 1.8 degrees per step and 96 ohms
 * per winding, with center taps brought out to separate leads [...]"
 * [http://www.cs.uiowa.edu/~jones/step/example.html]
 *
 * It is a unipolar stepper motor with 5 wires:
 *
 * - red: power connector, I have it at 5V and works fine
 * - orange and black: coil 1
 * - brown and yellow: coil 2
 *
 * (cleft) 2005 DojoDave for K3
 * http://www.0j0.org | http://arduino.berlios.de
 *
 * @author: David Cuartielles
 * @date: 20 Oct. 2005
 */

int motorPin1 = 8;
int motorPin2 = 9;
int motorPin3 = 10;
int motorPin4 = 11;
int delayTime = 10;

void setup() {
  pinMode(motorPin1, OUTPUT);
  pinMode(motorPin2, OUTPUT);
  pinMode(motorPin3, OUTPUT);
  pinMode(motorPin4, OUTPUT);
}

void loop() {
  digitalWrite(motorPin1, HIGH);
  digitalWrite(motorPin2, LOW);
  digitalWrite(motorPin3, LOW);
  digitalWrite(motorPin4, LOW);
  delay(delayTime);
  digitalWrite(motorPin1, LOW);
  digitalWrite(motorPin2, HIGH);
  digitalWrite(motorPin3, LOW);
  digitalWrite(motorPin4, LOW);
  delay(delayTime);
  digitalWrite(motorPin1, LOW);
  digitalWrite(motorPin2, LOW);
  digitalWrite(motorPin3, HIGH);
  digitalWrite(motorPin4, LOW);
  delay(delayTime);
  digitalWrite(motorPin1, LOW);
  digitalWrite(motorPin2, LOW);
  digitalWrite(motorPin3, LOW);
  digitalWrite(motorPin4, HIGH);
  delay(delayTime);
}
Example 2
Connect a >10k Ohm potentiometer between +5V and GND with the slider connected to pin A0. This will be used to change the speed of the stepper motor.
/* Stepper Unipolar Advanced
 * -------------------------
 *
 * Program to drive a stepper motor coming from a 5'25 disk drive
 * according to the documentation I found, this stepper: "[...] motor
 * made by Copal Electronics, with 1.8 degrees per step and 96 ohms
 * per winding, with center taps brought out to separate leads [...]"
 * [http://www.cs.uiowa.edu/~jones/step/example.html]
 *
 * It is a unipolar stepper motor with 5 wires:
 *
 * - red: power connector, I have it at 5V and works fine
 * - orange and black: coil 1
 * - brown and yellow: coil 2
 *
 * (cleft) 2005 DojoDave for K3
 * http://www.0j0.org | http://arduino.berlios.de
 *
 * @author: David Cuartielles
 * @date: 20 Oct. 2005
 */

int motorPins[] = {8, 9, 10, 11};
int count = 0;
int count2 = 0;
int delayTime = 500;
int val = 0;

void setup() {
  for (count = 0; count < 4; count++) { pinMode(motorPins[count], OUTPUT); }
}

void moveForward() {
  if ((count2 == 0) || (count2 == 1)) { count2 = 16; } count2>>=1;
  for (count = 3; count >= 0; count--) {
    digitalWrite(motorPins[count], count2>>count&0x01);
  }
  delay(delayTime);
}

void moveBackward() {
  if ((count2 == 0) || (count2 == 1)) {
    count2 = 16;
  }
  count2>>=1;
  for (count = 3; count >= 0; count--) {
    digitalWrite(motorPins[3 - count], count2>>count&0x01);
  }
  delay(delayTime);
}

void loop() {
 val = analogRead(0);
 if (val > 540) {
    // move faster the higher the value from the potentiometer
    delayTime = 2048 - 1024 * val / 512 + 1;
    moveForward();
  } else if (val < 480) {
    // move faster the lower the value from the potentiometer
    delayTime = 1024 * val / 512 + 1;
    moveBackward();
  } else {
    delayTime = 1024;
  }
}
Example 3
Using the Arduino stepper library.
4 Step Sequence: AB-BC-CD-DA
This is what the Arduino STEPPER Library uses.
The 8-step sequence uses only 1 coil on, then 2, then 1… etc.
8 Step Sequence: A – AB – B – BC – C – CD – D – DA – A
| DRIVER LED LETTER |
MOTOR WIRE | MOTOR WIRE COLOR | step | step | step | step | step | step | step | step |
| 4-STEP | SEQUENCE | 1 | 2 | 3 | 4 | |||||
| 8-STEP | SEQUENCE | 1 | 2 | 3 | 4 | 5 | 6 | 7 | 8 | |
| 5 | red | + | + | + | + | + | + | + | + | |
| D | 4 | orange | 0 | 0 | 0 | 0 | 0 | 1 | 1 | 1 |
| C | 3 | yellow | 0 | 0 | 0 | 1 | 1 | 1 | 0 | 0 |
| B | 2 | pink | 0 | 1 | 1 | 1 | 0 | 0 | 0 | 0 |
| A | 1 | blue | 1 | 1 | 0 | 0 | 0 | 0 | 0 | 1 |
#include <Stepper.h>

// Number of steps per revolution of INTERNAL motor in 4-step mode
#define STEPS_PER_MOTOR_REVOLUTION 32

// Number of steps per revolution of OUTPUT SHAFT (= gear reduction; 2048 steps)
#define STEPS_PER_OUTPUT_REVOLUTION 32 * 64

// Declare 'small_stepper' variable
Stepper small_stepper(STEPS_PER_MOTOR_REVOLUTION, 8, 10, 9, 11);

// Declare 'Steps2Take' variable
int  Steps2Take;

void setup()
{
// Nothing  (Stepper Library sets pins as outputs)
}

void loop()
{
  small_stepper.setSpeed(5);   // SLOWLY Show the 4 step sequence
  Steps2Take  =  20;  // Rotate CW
  small_stepper.step(Steps2Take);
  delay(2000);

  Steps2Take  =  STEPS_PER_OUTPUT_REVOLUTION / 2;  // Rotate CW 1/2 turn
  small_stepper.setSpeed(500);
  small_stepper.step(Steps2Take);
  delay(1000);

  Steps2Take  =  - STEPS_PER_OUTPUT_REVOLUTION / 2;  // Rotate CCW 1/2 turn
  small_stepper.setSpeed(1000);  // 2000 a good max speed??
  small_stepper.step(Steps2Take);
  delay(2000);
}
Example 4
Using the AccelStepper library we can accelerate and decelerate stepper motors.
/*
Runs two 28BYJ-48 stepper motors with AccelStepper Library.
Motors accelerate and decelerate simultaneously in opposite rotations
NOTE: May need separate +5 power supply to power motors
*/

#include <AccelStepper.h>

#define FULLSTEP 4
#define HALFSTEP 8

#define motorPin1  4     // Blue   - 28BYJ48 pin 1
#define motorPin2  5     // Pink   - 28BYJ48 pin 2
#define motorPin3  6     // Yellow - 28BYJ48 pin 3
#define motorPin4  7     // Orange - 28BYJ48 pin 4
                        // Red    - 28BYJ48 pin 5 (VCC)

#define motorPin5  8     // Blue   - 28BYJ48 pin 1
#define motorPin6  9     // Pink   - 28BYJ48 pin 2
#define motorPin7  10    // Yellow - 28BYJ48 pin 3
#define motorPin8  11    // Orange - 28BYJ48 pin 4
                        // Red    - 28BYJ48 pin 5 (VCC)

// NOTE: The sequence 1-3-2-4 is required for proper sequencing of 28BYJ48
AccelStepper stepper1(HALFSTEP, motorPin1, motorPin3, motorPin2, motorPin4);
AccelStepper stepper2(HALFSTEP, motorPin5, motorPin7, motorPin6, motorPin8);

void setup()
{
  stepper1.setMaxSpeed(1000.0);
  stepper1.setAcceleration(50.0);
  stepper1.setSpeed(200);
  stepper1.moveTo(2048);  // 1 revolution

  stepper2.setMaxSpeed(1000.0);
  stepper2.setAcceleration(50.0);
  stepper2.setSpeed(200);
  stepper2.moveTo(-2048);  // 1 revolution
}


void loop()
{
  //Change direction at the limits
  if (stepper1.distanceToGo() == 0)
    stepper1.moveTo(-stepper1.currentPosition());
    if (stepper2.distanceToGo() == 0)
    stepper2.moveTo(-stepper2.currentPosition());

  stepper1.run();
  stepper2.run();
}
