
Swing
I am building a swing set similar to this:

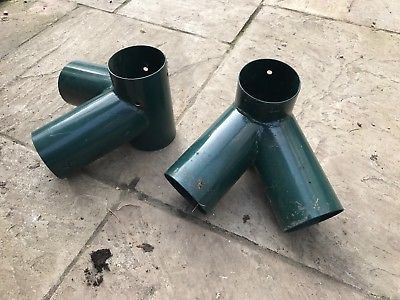
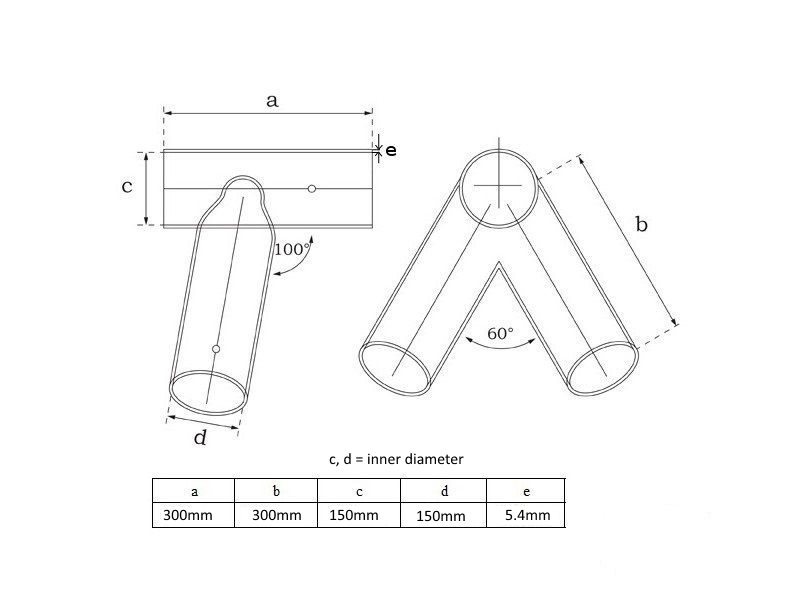
I came across these round metal pipe corner brackets that would give it a more traditional look and maximizes the frame height. Unfortunately they are not sold in Australia and do not come in 150mm diameter.


Timber posts
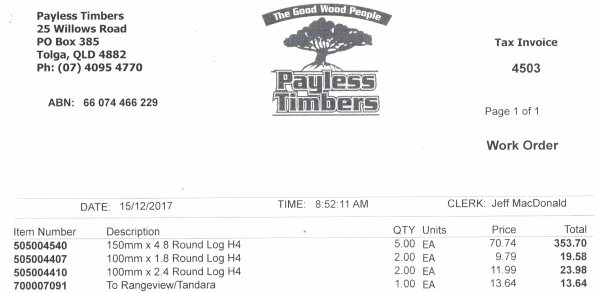
Step one is to get the posts ordered and delivered:
Step two is trying to source round metal pipe with an inner diameter that matches the timber posts.
Metal pipe
SHS = Square Hollow Section = Square cross-section tube.
RHS = Rectangular Hollow Section = Rectangular cross-section tube.
CHS = Circular Hollow Section = Round pipe.
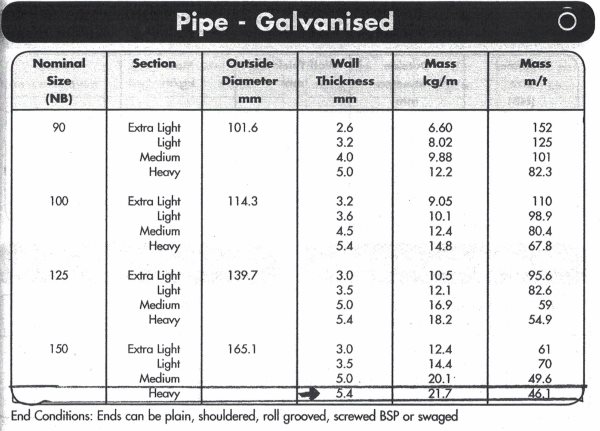
Nominal bore (NB) is the internal diameter of any pipe. The bore is the hollow centre of any pipe. Nominal is used in the sense of “in name only” or “putative”– approximate. I need an inner diameter of 150mm. This means I will need a pipe with an outside diameter of 165.1mm (which actually is 6.5 inch) it appears. The outer diameter is exact; the inner diameter is “nominal” or approximate and varies depending on the material wall thickness.
If I select 5.4mm wall thickness (“heavy”), this means the inner diameter is 165.1 – 5.4 – 5.4 = 154.3mm. This leaves a gap of 2.15mm around the post. This is not a perfect fit but should be acceptable.
Unfortunately this pipe only came in black steel and not zinc galvanised and was out of stock.
I ended up purchasing 5.0mm wall thickness (“medium”) pipe. This leaves a gap of 2.55mm, which is sort of okay. To compensate for the gap, I decided to use 400mm long sections instead of 300mm. I purchased 2.5m length ($130) which was cut in 6x 400mm sections with a 100mm off-cut.
This off-cut ‘ring’ was actually really handy as a template for measuring and marking each of the the 400mm sections as to keep each part identical.
The metal fabrication shops where closing down for Christmas and quoted 2 hours of work ($300+) which meant I would have to fabricate it myself.
Notching templates
Many thanks to the people who put up a notching calculator.
http://metalgeek.com/static/cope.pcgi
Notching templates are used to create a cutting pattern for a tube or a pipe to accurately fit it at an angle to another tube or pipe so that you can weld or braze it. This is a whole lot easier than eyeballing the cut and scribing it by hand, and if you do it right, both the grinding and welding are pretty easy. This process is also frequently called “tube notching” or “pipe notching”.
Diameter
This is the outer diameter of the pipe.
Offset
This is the distance between the two axes of the tubes. In other words, it moves one tube sideways in relation to the other tube.
Thickness
Specifying the tube’s wall thickness makes the cut fit to the inside diameter of the tube, which makes it easier to fit, and makes a nice notch for welding. If you’re trying to get a really snug fit, like for brazing a bicycle frame, you might want to try selecting a rather small number for the tube thickness. But if you get carried away with making it perfect, you’ll spend a lot more time grinding it down.
Sometimes it helps to specify a wall thickness that’s actually a tad smaller than it is in reality. Some experimentation may be necessary to get it just right, depending on your own techniques.
Notching at obtuse angles
I need to join 2 vertical pipes to 1 horizontal pipe. The pipes are not joined at straight angles (90 degrees) but instead at an obtuse (= other than 90 degrees) angle; the vertical posts have a 10 degree ‘lean’, meaning 80 degrees / 100 degrees instead of 90 degrees / 90 degrees.
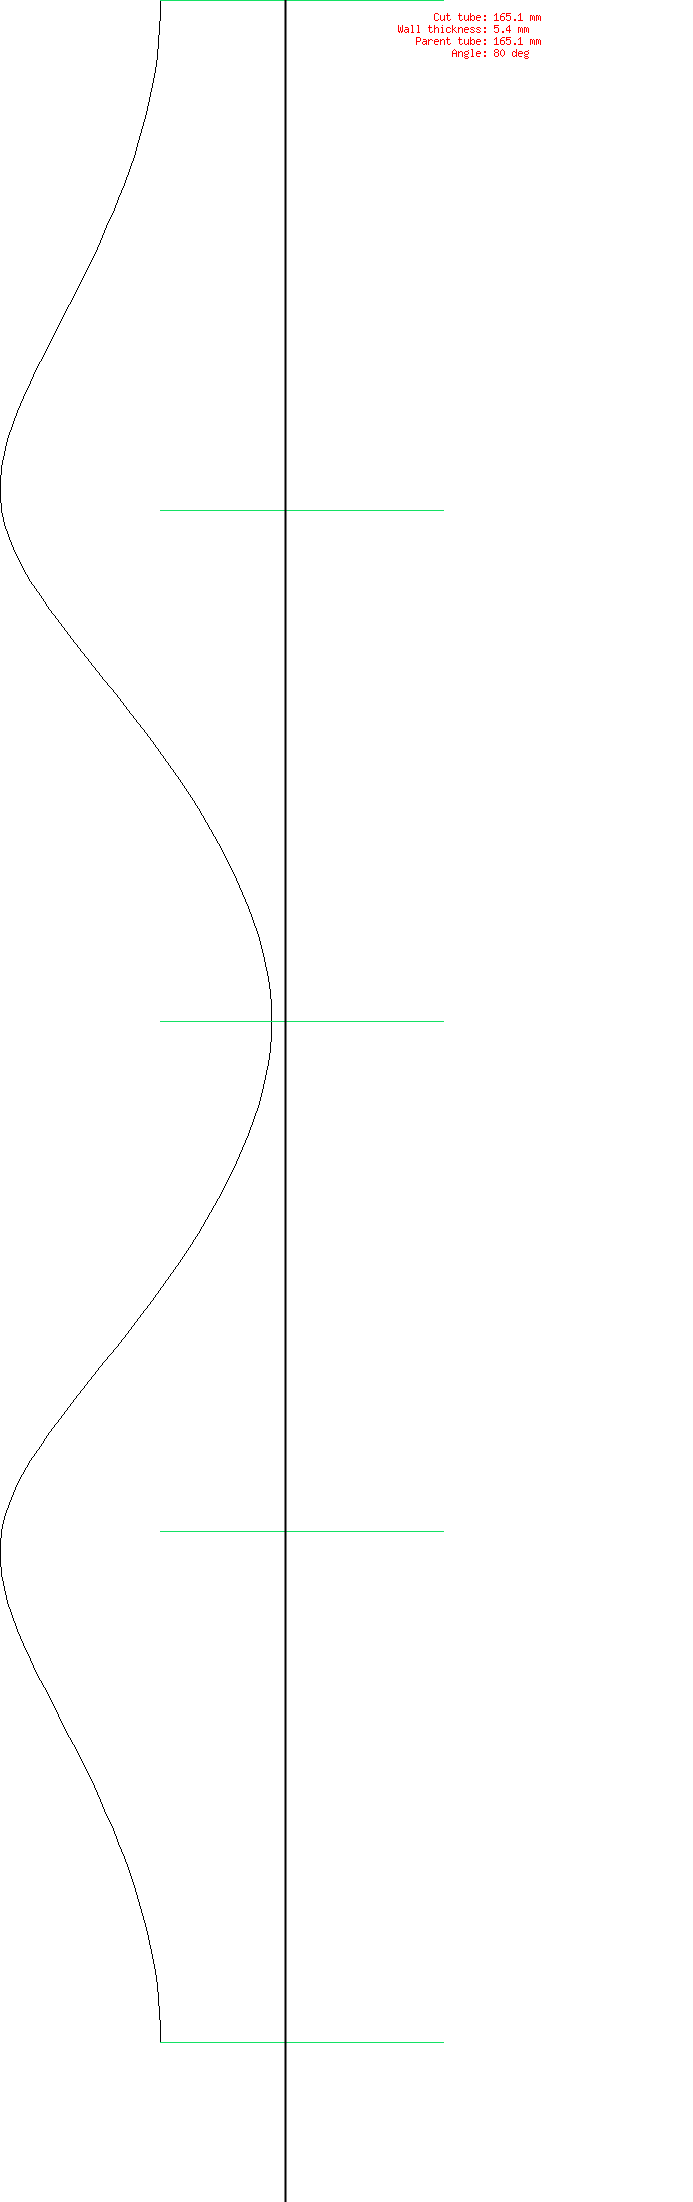
So in the notching calculator I had previously entered the following information:
“Cut tube 165.1mm diameter”
“Wall thickness 5.4mm”
“Parent tube 165.1mm diameter”
Angle 80 degrees” (you can’t enter values larger than 90 degrees; 100 degrees is not allowed)
I saved the PNG image as the PDF is limited to 1 page only. Click on image for 100% scale.
I then downloaded the most excellent utility PosteRazor to create a multi-page A4 size paper PDF document at 100% scale. I printed the multi page A4 document at 100% scale and cut out the template using scissors.
I test fitted the template and eventually sticky taped it to one of my 400mm pipe sections. I used a black marker (Sharpie) to trace the curve onto the metal pipe. Don’t forget to transfer the 0, 90, 180, 270 degree marks onto your pipe (shown as green lines in the image). This is helpful for aligning when assembling.
Using an angle grinder with a small diameter cutting disc I was able to cut through the metal pipe. Where the cutting disc could no longer follow the curve I simply skipped that section and cut straight across, cleaning up the metal that was left with a grinding disc later.
Horizontal pipe
For the horizontal pipe we need to put marks on the pipe for 0 degrees, 180 degrees and 30 degrees on either side of the 180 degrees mark (150 degrees and 210 degrees). This will give us 60 degrees as per the plan.
Many thanks to the people who put up a circle template generator:
https://www.blocklayer.com/circle-dividereng.aspx
I entered 6.5 inch diameter, with long marks every 5 and selected a protractor dial (not clock face).
I ended up with this PNG image:

I used the option at the bottom of the page to generate an A4 size PDF document. I transfered the 0, 150, 180 and 210 degrees marks to my off-cut ring. I then used this ring to transfer the measurements to two of the 400mm horizontal round metal pipe sections.
Hangers
I didn’t want to drill holes through the horizontal post, so I decided to make hangers like in the picture below.
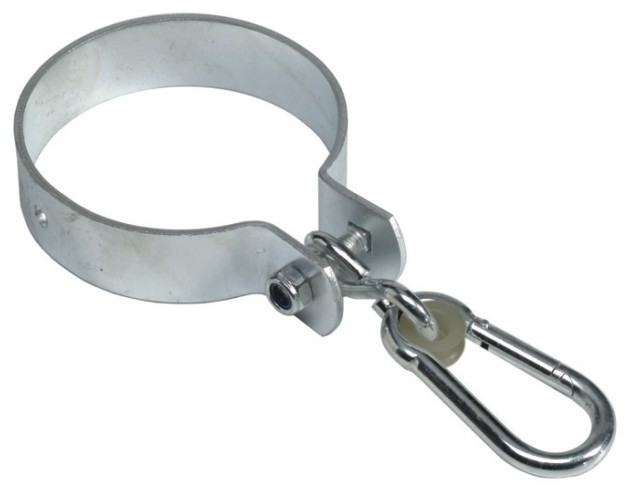
I used 3mm x 32mm x 600mm galvanised metal strips (4 meter length cut in 6x 600mm and 1x 400mm). I measured 65mm + 470mm + 65mm and used a bench vice and a hammer to create the 90 degree bends. Using 3 woodworking clamps I folded the metal around my offcut ring I used earlier to bend the metal in a circle shape. Using woodworking clamps I was able to force the ring in place on the horizontal post and put in the nut and bolt. I used two roofing screws to screw the ring in place.
Click here for photo gallery