Solution for when 3D printer won’t print first layer properly (under extruding)
Syptoms
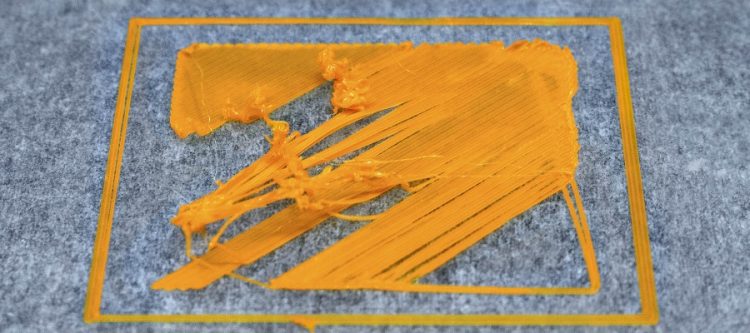
When I change the spool of PLA or PLA+ filament on my 3D printer or use the 3D printer after not having used it for a while, I am often having problems where the printer seems to be under extruding, where there is poor bed adhesion and where tuning the printer does not seem to affect things at all: the 3D printer simply won’t print anything half decent.
Cause
I have noticed often these type of problems are not related to a clogged nozzle, slipping extruder or poor quality filament. Instead, in my situation it is because I am printing too fast and as a result the extruder is having problems keeping up squeezing enough filament through the 0.4mm nozzle. If the temperature of the nozzle is too low, the filament does not flow and makes the problem worse.
Note
In CURA, there is a calculated parameter “Initial Layer Speed”. This value is usually set to 50% of your normal print speed. In my case normal print speed was set to 60mm/sec and initial layer speed was set to 30mm/sec. Travel speed was 100mm/sec and initial travel speed was 50mm/sec. I have not changed these parameter values as they have worked well in the past.
Solution
If you are noticing under extrusion (very thin skinny filament lines in your print) combined with poor bed adhesion, do as follows:
- Get a few spare 0.4mm nozzles. This is much easier and cheaper than wondering whether or not the nozzle is clogged. I have spent hours trying to learn how to unclog a nozzle properly when in the end the problem was not caused by a clogged nozzle at all. If in doubt, as a last resort you can change the nozzle. Don’t chang the nozzle just yet; let’s try this first:
- Take a piece of filament and bend it 180 degrees between your fingers. It should bend but not break. If it breaks, the filament is brittle, which is bad. This is common on the first meter of filament on a new spool. Cut off a length of filament and dispose of it. Repeat the test until the filament bends but does not break.
- Start a print and wait for the nozzle to start heating, just after the bed temperature reaches 60 degrees Celsius.
- Now tune the nozzle temperature and set it to a whopping 225 degrees Celsius instead of (in my case) 195 degrees Celsius. Ignore what the label on the filament spool says. If all else fails, bump up the temperature as one of the first things to try. Update: these days I print PLA+ by default at 210 degrees Celsius.
- Next tune the speed to 80%. This slows down the entire 3D printing process. Changing the speed affects X / Y / Z movement and filament flow both at the same time. This relieves pressure on the extruder which now has more time to push the same amount of filament through the nozzle. Slowing the speed down will improve the quality of your prints. I have found this to be the magic solution to most of my problems when I can’t get the printer to start printing anything half decent(!)
- You should now be able to start a print without problems. If the extruder starts making ‘ticking’ sounds it indicates the extruder is pushing more filament into the nozzle than it can handle. In this case you can tune the flow to 95% for a while until the pressure drops. If you replace the plastic extruder with an aluminium extruder you may be able to push more filament through with better grip / increased force without the filament pushing back making this ‘ticking’ sound.
- For slipping extruder motor (‘ticking sound’), check hobbed gear for plastic shavings or unclog / replace nozzle. Increase stepper motor current on stepper motor driver board (‘stepstick’), or replace stepstick altogether. Replace plastic extruder with cheap aluminium extruder. Update: increasing extruder stepper motor may cause overheating of stepper motor when printing, resulting in the filament melting on the extruder hobbed gear. I had to fine tune DRV8825 step stick voltage from 1.38V -> 1.13V -> 0.9 V. High quality PTFE tubing may help reduce friction. A separate extruder fan is sometimes needed. In the end I converted my 3D printer to direct drive, which proved beneficial both to extruder temperature and overal quality of prints.
- For improved bed adhesion, mix a tablespoon of water with a teaspoon of sugar and use a tissue to dab the mixture onto the heated glass bed in the print area at the last moment.
- For best bed adhesion, thoroughly scrub / clean your build plate with hot soapy water and wipe clean with some isopropyl alcohol. Optionally use cheap strong hairspray. Check the ingredients contain Acrylates and Copolymer. Here in Australia you can buy Schwarzkopf Professional Quality TAFT styling lacquer extra strong 4 (red spray can) or Woolworths homebrand hairspray. Works first time every time. Important: make sure there is no DRAFT in the room. If all else fails, print with a brim instead or a skirt.
Once you got your 3D printer producing decent layers, you can change speed back to 100%, followed by flow back to 100% followed by temperature back to its original lower value. If at any point your extruder starts making ‘ticking’ sounds, change the parameters back to their previous values.