Raspberry Pi – Internet connected garden sprinklers
The garden sprinkers will run daily using cron, but can also be controlled via a web page (LAMP).
A daemon running in the background will poll the MySQL database every 10 seconds.
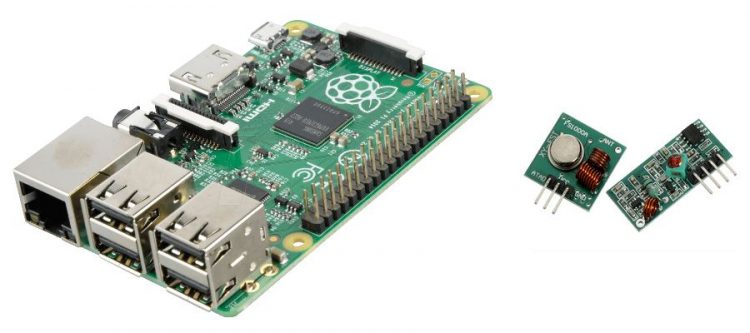
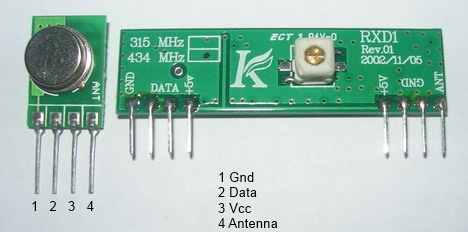
A 433Mhz TX transmitter connected to the Raspberry pi will send out a signal to nearby home automation remote controlled power outlets (Powertrans brand).
A solenoid valve (normally closed – NC) connected to the garden water tap feeds water to the garden irrigation system.
433 MHz has a wavelength of about 700mm; using a bit of wire of ¼ wave length (~173mm) is the simplest antenna although its radiation pattern will be omnidirectional. There are numerous other suitable types of antennas such as a simple directional Yagi antenna that can double the range.
I have added a cron job to have the sprinkler run on a timer. It temporarily disables the daemon during the interval when cron is driving the sprinkler:
Note: You can use “crontab -e” and “crontab -l” to manipulate a user’s crontab. Beware when using “sudo -i” as this will switch users (and crontabs). A failsafe option is to edit the system’s master crontab in “/etc/crontab” instead:
$ vi /etc/crontab
00 7 * * * root /root/on.sh
00 8 * * * root /root/off.sh
30 8 * * * root /root/off.sh
00 9 * * * root /root/off.sh
00 18 * * * root /root/on.sh
30 19 * * * root /root/off.sh
00 20 * * * root /root/off.sh
30 20 * * * root /root/off.sh
The multiple “off” statements are just in case of a glitch in the 433Mhz transmitter or if there is a power outage. Note that the solenoid valve is of the non-latching type; if the power fails, it should be normally-closed (‘NC’)
The only problem I can think of could be if the solenoid is set to ‘ON’ via the website / database; the daemon will ensure the tap is on every 10 seconds. It is up to the web user to ensure you turn it OFF if you turn it ON.
$ cat on.sh
#!/bin/bash
service gpio stop
/var/www/git/rcswitch-pi/sendtri 1 1
$ cat off.sh
#!/bin/bash
/var/www/git/rcswitch-pi/sendtri 1 0
service gpio restart
Apache/MySQL/PHP
SSH default logon:
user: pi
pass: raspberry
Proxy:
export http_proxy=”http://username:password@host:port/”
If you want this configured at boot time, add this line to the file /etc/environment
Special characters:
If your password is F@o:o!B#ar$ then set http_proxy as follows:
export http_proxy=”http://user:F%40o%3Ao%21B%23ar%24 @server1.cyberciti.biz:3128/”
# Update Raspbian
sudo dpkg-reconfigure tzdata
sudo apt-get update
sudo apt-get upgrade
sudo date –set=”30 December 2013 10:00:00″
sudo -i
# Web server
sudo apt-get install apache2 php5 libapache2-mod-php5
sudo service apache2 restart
-or-
sudo /etc/init.d/apache2 restart
Open web page in browser (type in IP address of Raspberry Pi)
webroot = /var/www
MySQL
sudo apt-get install mysql-server mysql-client php5-mysql
phpMyAdmin
sudo apt-get install phpmyadmin
# GPIO21
echo 21 > /sys/class/gpio/export #SELECT PIN
echo out > /sys/class/gpio/gpio21/direction #SET AS OUTPUT
echo 1 > /sys/class/gpio/gpio21/value #HIGH (3.3V)
echo 0 > /sys/class/gpio/gpio21/value #LOW (GND)
echo 21 > /sys/class/gpio/unexport #UNSELECT PIN
Don’t forget pull-up or pull down resister for when GPIO pins are undefined (floating).
GPIO via PHP
http://www.instructables.com/id/Web-Control-of-Raspberry-Pi-GPIO/?ALLSTEPS
sudo -i
cd /var/www
wget http://raspberrypi-gpio.googlecode.com/files/gpio.sql
wget http://raspberrypi-gpio.googlecode.com/files/GPIOServer.sh
chmod +x GPIOServer.sh
wget http://raspberrypi-gpio.googlecode.com/files/control.php
wget http://raspberrypi-gpio.googlecode.com/files/off.jpg
wget http://raspberrypi-gpio.googlecode.com/files/on.jpg
http://192.168.x.x/phpmyadmin
Create a new user + database + import gpio.sql
Edit MySQL user/pass in GPIOServer.sh + control.php
./GPIOServer.sh
http://192.168.x.x/control.php
Automatic start/stop script
mv /var/www/GPIOserver.sh /usr/sbin/gpiod
Add the following missing line to the start of the file: #!/bin/bash
Comment out the lines asking about the waitTime. Simply replace with: waitTime=5
vi /etc/init.d/gpio
——–
#!/bin/sh
### BEGIN INIT INFO
# Provides: gpio
# Required-Start: $network $remote_fs $syslog
# Required-Stop: $network $remote_fs $syslog
# Default-Start: 2 3 4 5
# Default-Stop:
# Short-Description: Start GPIO daemon
### END INIT INFO
PATH=/sbin:/bin:/usr/sbin:/usr/bin
. /lib/lsb/init-functions
DAEMON=/usr/sbin/gpiod
PIDFILE=/var/run/gpiod.pid
test -x $DAEMON || exit 5
case $1 in
start)
log_daemon_msg “Starting GPIO server” “gpiod”
start-stop-daemon –start –background –make-pidfile –pidfile $PIDFILE –startas $DAEMON — -p $PIDFILE > /dev/null 2>&1
status=$?
log_end_msg $status
;;
stop)
log_daemon_msg “Stopping GPIO server” “gpiod”
#start-stop-daemon –stop –pidfile $PIDFILE
kill -TERM `cat $PIDFILE` >/dev/null 2>&1
log_end_msg $?
rm -f $PIDFILE
;;
restart|force-reload)
$0 stop && sleep 2 && $0 start
;;
try-restart)
if $0 status >/dev/null; then
$0 restart
else
exit 0
fi
;;
reload)
exit 3
;;
status)
status_of_proc $DAEMON “GPIO server”
;;
*)
echo “Usage: $0 {start|stop|restart|try-restart|force-reload|status}”
exit 2
;;
esac
——–
To create /etc/rc?.d symbolic links for runlevels:
update-rc.d gpio defaults
To remove runlevel symbolic links:
update-rc.d -f gpio remove
/etc/init.d/gpio start
ps -ef | grep gpio
cat /var/run/gpiod.pid
/etc/init.d/gpio stop
ps -ef | grep gpio
reboot
sudo -i
ps -ef | grep gpio
Motion (webcam monitoring)
apt-get install motion
vi /etc/motion/motion.conf
daemon on
webcam_localhost off
#don’t save jpg
output_normal off
#don’t save swf
ffmpeg_cap_new off
vi /etc/default/motion
start_motion_daemon=yes
service motion start
http://192.168.x.x:8081
Static IP address for wired NIC
vi /etc/network/interfaces
#iface eth0 inet dhcp
iface eth0 inet static
address 192.168.1.81
netmask 255.255.255.0
network 192.168.1.0
broadcast 192.168.1.255
#gateway 192.168.1.254
gateway 192.168.1.1
#dns-nameservers 8.8.8.8 8.8.4.4 didn’t work for me
(8.8.8.8 8.8.4.4 = Google DNS server; you can also use 192.168.1.1)
vi /etc/resolv.conf
nameserver 8.8.8.8
nameserver 8.8.4.4
(depreciated) /etc/init.d/networking restart
reboot
sendtri
I have Arduino code and bitstreams for my 433Mhz kit. I need to port this to the Raspberry Pi.
Arduino code:
const int PIN = 0;
#include <RCSwitch.h>
RCSwitch mySwitch = RCSwitch();
mySwitch.enableTransmit(PIN);
mySwitch.setPulseLength(230); // 230 microseconds
mySwitch.sendTriState(“011100001000S”); // #1 ON
mySwitch.sendTriState(“001100001000S”); // #2 ON
mySwitch.sendTriState(“010100001000S”); // #3 ON
mySwitch.sendTriState(“000100001000S”); // #4 ON
mySwitch.sendTriState(“011000001000S”); // #5 ON
mySwitch.sendTriState(“001000001000S”); // #6 ON
mySwitch.sendTriState(“010000001000S”); // #7 ON
mySwitch.sendTriState(“000000001000S”); // #8 ON
mySwitch.sendTriState(“011100000000S”); // #1 OFF
mySwitch.sendTriState(“001100000000S”); // #2 OFF
mySwitch.sendTriState(“010100000000S”); // #3 OFF
mySwitch.sendTriState(“000100000000S”); // #4 OFF
mySwitch.sendTriState(“011000000000S”); // #5 OFF
mySwitch.sendTriState(“001000000000S”); // #6 OFF
mySwitch.sendTriState(“010000000000S”); // #7 OFF
mySwitch.sendTriState(“000000000000S”); // #8 OFF
where TriState logic translates to the following low level signal pattern:
Sync: H, 31 x L
0: H,L,L,L,H,L,L,L
1: H,H,H,L,H,H,H,L
WiringPI
Using wiringPi to control GPIO and rcswitch-pi to drive 433Mhz TX/RX module.
https://github.com/WiringPi/WiringPi
https://github.com/r10r/rcswitch-pi
sudo apt-get install git-core
cd /var/www/git
git clone git://git.drogon.net/wiringPi
git clone https://github.com/r10r/rcswitch-pi
cd /var/www/git/wiringPi/
./build
cd /var/www/git/rcswitch-pi
make
Example:
sudo send a 1 1
I have added a “sendtri.cpp” file to send TriState pulse commands:
———–
Makefile:
———–
all: send sendtri
send: RCSwitch.o send.o
$(CXX) $(CXXFLAGS) $(LDFLAGS) $+ -o $@ -lwiringPi
sendtri: RCSwitch.o sendtri.o
$(CXX) $(CXXFLAGS) $(LDFLAGS) $+ -o $@ -lwiringPi
clean:
$(RM) *.o send sendtri
————-
sendtri.cpp
————-
/*
Usage: ./sendtri <unitCode> <command>
UnitCode is 1 for unit 1, 2 for unit 2,…8 for unit 8
Command is 0 for OFF, 1 for ON
*/
#include “RCSwitch.h”
#include <stdlib.h>
#include <stdio.h>
int main(int argc, char *argv[]) {
/*
output PIN is hardcoded for testing purposes
see https://projects.drogon.net/raspberry-pi/wiringpi/pins/
for pin mapping of the raspberry pi GPIO connector
*/
int PIN = 29; // Pi B+ GPIO21
int unitCode = atoi(argv[1]);
int command = atoi(argv[2]);
char* on1 = “011100001000S”;
char* on2 = “001100001000S”;
char* on3 = “010100001000S”;
char* on4 = “000100001000S”;
char* on5 = “011000001000S”;
char* on6 = “001000001000S”;
char* on7 = “010000001000S”;
char* on8 = “000000001000S”;
char* off1= “011100000000S”;
char* off2= “001100000000S”;
char* off3= “010100000000S”;
char* off4= “000100000000S”;
char* off5= “011000000000S”;
char* off6= “001000000000S”;
char* off7= “010000000000S”;
char* off8= “000000000000S”;
if (wiringPiSetup () == -1) return 1;
RCSwitch mySwitch = RCSwitch();
mySwitch.enableTransmit(PIN);
mySwitch.setPulseLength(230); // 230 microseconds
switch(unitCode) {
case 1:
if (command == 1) {
printf(“Sending TriState code [%s]\n”, on1);
mySwitch.sendTriState(on1);
} else {
printf(“Sending TriState code [%s]\n”, off1);
mySwitch.sendTriState(off1);
}
break;
case 2:
// you get the idea…
break;
default:
printf(“unitCode[%i] is unsupported\n”, unitCode);
return -1;
}
return 0;
}
Testing
Connect a LED and a 220Ohm resistor in series between GPIO21 and GND.
gpio readall
gpio export 29 out
gpio write 29 on
The LED should be lit
gpio readall
Note the change in the pin logical level (0 > 1)
gpio write 29 off
The LED should not be lit
gpio readall
Note the change in the pin logical level (1 > 0)
gpio unexportall
./sendtri 1 1
Sending TriState code [011100001000S]
Using 2 remote shell windows:
while true ; do ./sendtri 1 1 ; done
while true ; do gpio readall ; done
You should see the LED flicker. You should see ‘gpio readall’ show the logical level of the GPIO pin flickering.
I have created a fork here:
git clone https://github.com/telleropnul/rcswitch-pi

