Inkscape – Path operations & alignment
Inkscape has a number of commands to form new paths from two or more preexisting paths. The z-order of the paths is important. It does not matter if you click object A first and then object B, or vice versa – it is the order of the parts i.e. which part sits on top that matters.
For some operations, the top path can be thought of as operating on the bottom path; that is, part of the bottom path remains and the top path is thrown away.
In all cases except for the Cut Path command, the Fill and Stroke of the new path is inherited from the bottom path.
This is explained in more detail for each operation that it applies to below. All commands are accessible under the Path menu.
Any open paths are, for the purpose of these commands, closed by a line between the path’s end points.
Shape objects and text objects are automatically converted to paths.
 Union (Ctrl++): Union of one or more paths. One new path is created, containing all the areas of the original paths. A union of one path removes self-intersections, creating individual sub-paths for each section. Note that this is different from the Path Combine command where no nodes are lost or created.
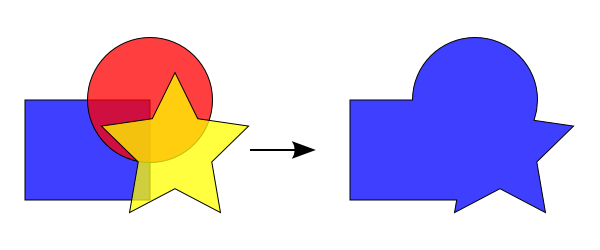
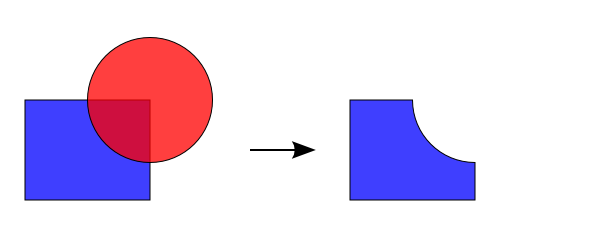
The path Union operation. Difference (Ctrl+-): Difference of two paths. The area of the top path is removed from the bottom path.
The path Difference operation. Intersection (Ctrl+*): Intersection of two or more paths. The new path encloses the common area of the original paths.
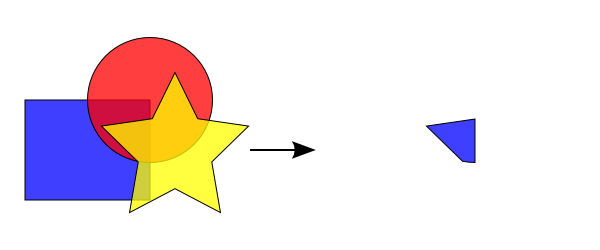
The path Intersection operation. Exclusion (Ctrl+^): Exclusion of two or more paths. One new path consisting of multiple sub-paths is created according to an Even-Odd Fill rule. Inkscape v0.46 and earlier allowed only two paths to be used.
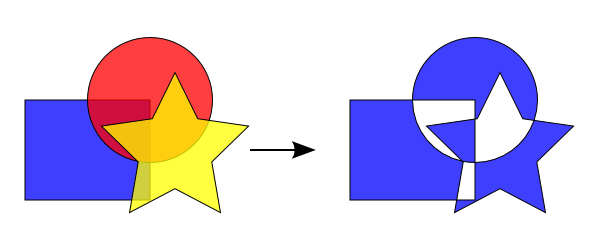
The path Exclusion operation. Division (Ctrl+/): Division of two paths. The first path is split by the second path. Two or more new paths are created.
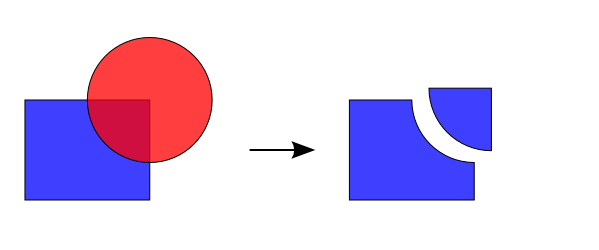
The path Division operation. The upper-right corner of the “After” illustration has been shifted to show the two new paths clearly. Cut Path (Ctrl+Alt+/): Cutting by two paths. The first path is cut by the second path. Two or more new paths are created. The new paths do not have any Fill.
The path Cut Path operation. The path in the upper-right corner of the “After” illustration has been shifted to show the two new paths clearly.
Align
The alignment of objects is with respect to an anchor. The anchor can be an object or be defined by the selection, drawing, or page; the choice of what is used is set in the pull-down menu Relative to. The object may be specified to be the first or last object selected. If multiple objects are selected at the same time, this is equivalent to the top or bottom object in z-order. Alternatively, the object can be specified to be the biggest or smallest item, where size is determined by the size of the bounding box, the width for vertical alignment and the height for horizontal alignment. The bounding box sides are used as the reference points for alignment except for text, where the baseline is used.
When the Treat selection as group: box is checked, all selected objects are treated as if they were in a Group. This saves on having to group and ungroup the selected objects when you wish to align them together to the Page or to the drawing. Alignment relative to other criteria is unpredictable.
The various alignment options are:
- Horizontal:
-
 Align right sides to left side of anchor.
 -
 Align right sides to right side of anchor.
 -
 Align horizontal centers to center of anchor.
 -
 Align left sides to left side of anchor.
 -
 Align left sides to right side of anchor.
 -
 Align baselines of text to anchor, horizontally. As of v0.48, text anchor position depends on alignment and orientation of text (e.g. the anchor box will be on the right for right-aligned text).
-
- Vertical:
-
 Align top sides to bottom side of anchor.
 -
 Align top sides to top side of anchor.
 -
 Align vertical centers to center of anchor.
 -
 Align bottom sides to bottom side of anchor.
 -
 Align bottom sides to top side of anchor.
 -
 Align baselines of text to anchor, vertically.
-
[Quick Tip !] To select a shape underneath another shape use ALT-LMB to cycle through all the underlying shapes.
Examples
The following videos contain excellent examples of path operations:
1a. Primitive shapes to paths:
- Draw a circle, rectangle or star primitive.
- Set a stroke width of 20 pixels.
- Either convert the entire object to path (= preserves the fill) or convert stroke to path (= thick width stroke becomes a path; fill is lost).
1b. Attaching a difference or intersection to one of the original shapes.
- Create 2 overlapping path shapes (“originals”) i.e. a rectangle and a circle, both objects converted to path.
- Select both shapes using SHIFT.
- Duplicate both shapes using CTRL-D.
- Use either difference or intersection to create a unique smaller shape.
- Optionally: If the original shapes fully overlapped, you can use Break Apart to split into separate shapes.
- Select the smaller shape and use it to attach to one of the original shapes.
2. Cut a shape in half.
- Draw a circle.
- Convert object to path.
- Draw a rectangle roughly covering the entire left half side of the circle.
- Duplicate the rectangle using CTRL-D
- CTRL-LMB to drag to the right.
- Make sure “Relative” is set to “Last selected”.
- LMB click on the right hand side rectangle (= shape to align).
- SHIFT-LMB click on the left hand side rectangle (= anchor).
- Align left sides to right side of anchor.Note: You can select multiple shapes. The last shape selected will act as the anchor.
- The right hand side rectangle will be moved so that its left side aligns with the right side of the left hand side triangle. The shapes will sit together side-by-side.
- Group the shapes.
- LMB click the grouped shape (= shape to align).
- SHIFT LMB click the circle (= anchor).
- Align horizontal centers to center of anchor.
- Align vertical centers to center of anchor.
- The grouped rectangles will be centered over the circle.
- Ungroup the rectangles.
- Remove one of the two rectangles.
- Select the circle and the one remaining rectangle.
- Difference (Ctrl+-): Difference of two paths.
- You now have a perfect half circle.