
FFmpeg
Blender versus FFMPEG
Using FFmpeg is preferred over Blender Video Sequence Editor (VSE) as it runs mean and lean from a command prompt, does not need to render images prior to encoding, encodes multi-processor and offers many encoding options. Use Blender VSE for multi track video editing.
Links
https://ffmpeg.org/download.html
https://trac.ffmpeg.org/wiki/Encode/H.264
https://trac.ffmpeg.org/wiki/Encode/H.265 (required HEVC hardware decoder)
https://trac.ffmpeg.org/wiki/Encode/VP9 (Apple mobile devices do not playback VP9 videos)
H.264 is not royalty free for hardware manufacturers / software developers and patented by MPEG LA consortium. VP9 is royalty free patented by Google.
Use H.264 with MP4 container (not MKV) when in doubt.
Setup
1. Download FFMPEG and place ffmpeg.exe in C:\tmp\ renamed as _ffmpeg.exe
2. Create a file in C:\tmp\ named _encode_h264.cmd with the following contents on a single line :
_ffmpeg -r 24 -f image2 -s 1920x1080 -i %%04d.png -vcodec libx264 -crf 17 -pix_fmt yuv420p 0001.mp4
The above script converts a sequence of PNG images (0001.PNG, 0002.PNG, etc.) to a H.264 encoded MP4 file.
Note the width of the input images needs to be a value divisible by 2 when using -pix.
Note the need for double percentage symbols when run from a script. Use a single percentage symbol when executing manually from the command prompt as an instruction rather than calling the script.
As a fail-safe you can use the following alternative:
_ffmpeg -r 24 -f image2 -i %%04d.png -vcodec libx264 0001.mp4
3. Create a file in C:\tmp\ named _encode_animated_gif.cmd with the following contents on a single line:
_ffmpeg -i 0001.mp4 -vf "fps=24,scale=1024:-1:flags=bitexact,split[s0][s1];[s0]palettegen[p];[s1][p]paletteuse" -loop 1 0001.gif
The above script converts an MP4 file (0001.MP4) into an animated GIF file reduced to 1024px width.
Simply double click either file to start the encoding process or run from a command promt with [1] + [TAB] or [2] + [TAB] followed by [ENTER]
Syntax
-i specifies the input file name(s)
-vf specifies encoding arguments (framerate, scale, compression algorithm).
note: split is used to generate intermediate images needed for animated GIF generation so you can perform the process in a single instruction. palettegen/use specifies a color palette details.
-loop 0 is not looping, 1 is looping.
%04d means that zeros will be padded until the length of the string is 4 i.e 0001…0020…0030…2000 and so on. If no padding is needed use something similar to pic%d.png or %d.png.
–f image2 sets the input format to image sequence. should not be needed as ffmpeg autodetects.
-r is the framerate (fps)
-crf is the quality, lower means better quality, 17-25 is usually good. 0 is lossless encoding.
-s is the resolution
-pix_fmt yuv420p specifies the pixel format, change this as needed. can be omitted.
Reversing an image sequence
If you want to reduce your Cycles render time in half, you may be able to use this trick:
- Use a Bounce camera instead of a Turntable camera.
- Render only the first half of frames.The second half of frames are identical to the first half but will simply need to be renamed so they are in reverse order.
Suppose we have end frame set to 240. You rendered the first half as PNG images. We need a way to process these as follows:
0120.PNG -> 0121.PNG
0119.PNG -> 0122.PNG
0118.PNG -> 0123.PNG
….
0003.PNG -> 0238.PNG
0002.PNG -> 0239.PNG
0001.PNG -> 0240.PNG - Download and install Bulk Rename Utility: https://www.bulkrenameutility.co.uk/Download.php
- Configure Bulk Rename Utility as follows:
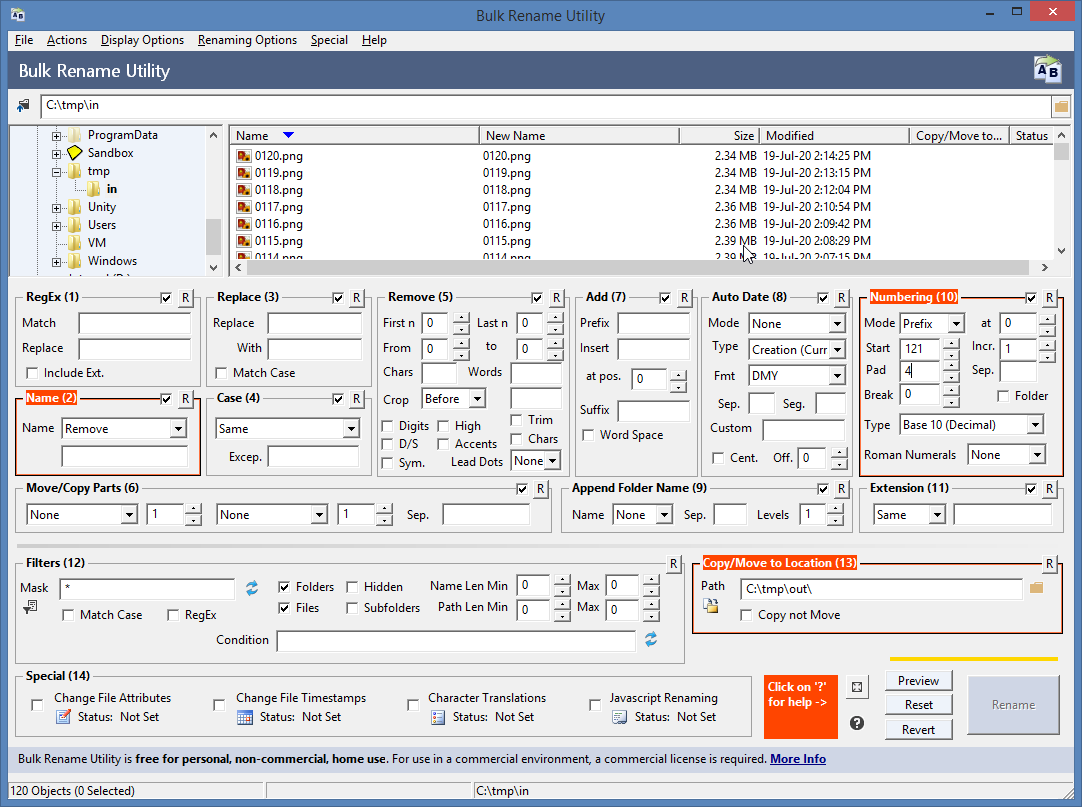
- Place PNG images [0001-0120].PNG in [C:\tmp\in]
- Open Bulk Rename Utility and browse to the folder containing the images.
- Click on the Name column to sort in descending order.
- Select all files in this folder.
- Name(2) > Select Remove
- Numbering(10) > Select Mode: Prefix + Start: 121 + Pad: 4
- Optional: Copy/Move to Location(13) > Select [C:\tmp\out] to avoid “file already exists” duplicate file names conflicts. Tick the Copy checkbox if so inclined.
- Press the Rename button to start the file renaming process.
You can now place all PNG files in a single folder and use FFMPEG to render as a single video file.
Note this trick doesn’t work if you have animated parts to have continuous clockwise / counterclockwise rotation…reversing frames won’t work then.