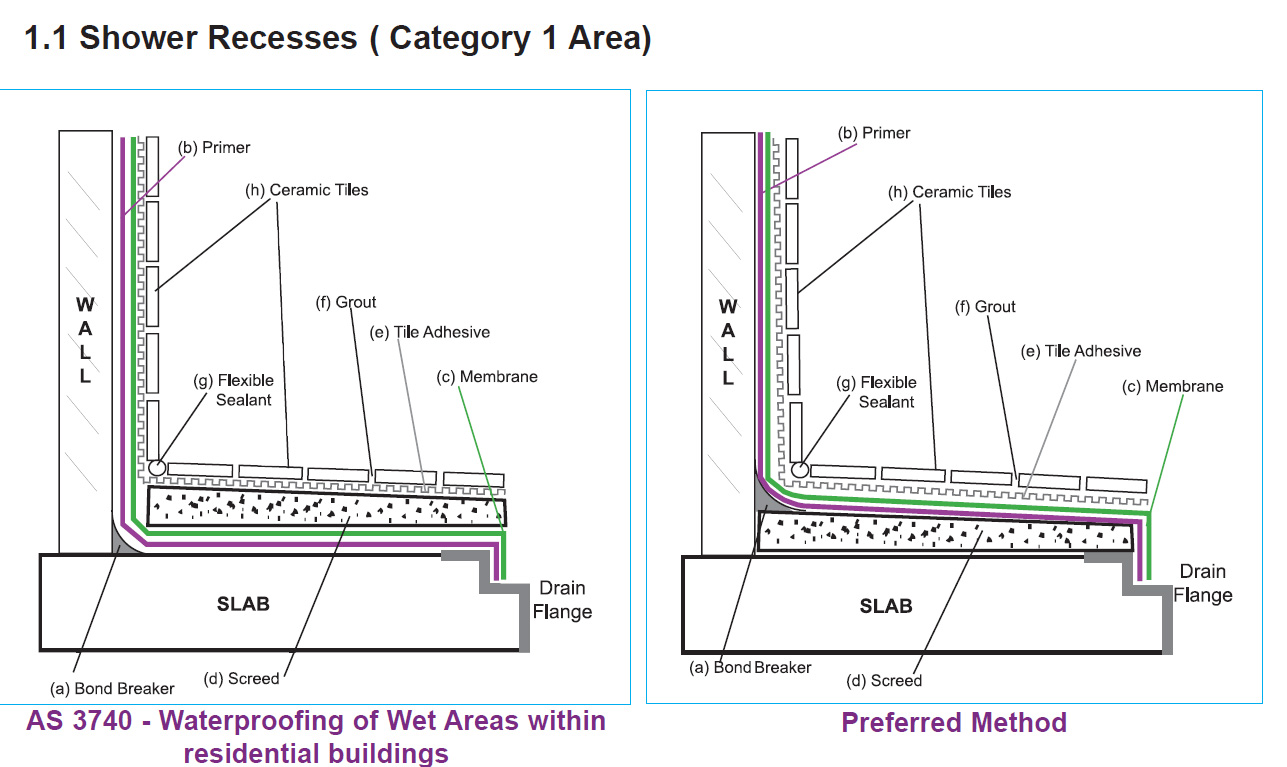
AS 3740 – Waterproofing of domestic wet areas
https://www.architectureanddesign.com.au/features/list/bathroom-waterproofing-step-by-step-guide
Australian Standards AS 3740 states that:
- In the shower, the whole floor must be waterproof and the shower walls should be waterproofed to at least 1800mm.
- Bathroom walls need to be waterproofed to at least 150mm.
- If the bathroom floor is made of or contains wood or if the bathroom is on the second story or higher, the whole floor must be waterproofed to at least 100mm.
So what does this look like for a typical bathroom?
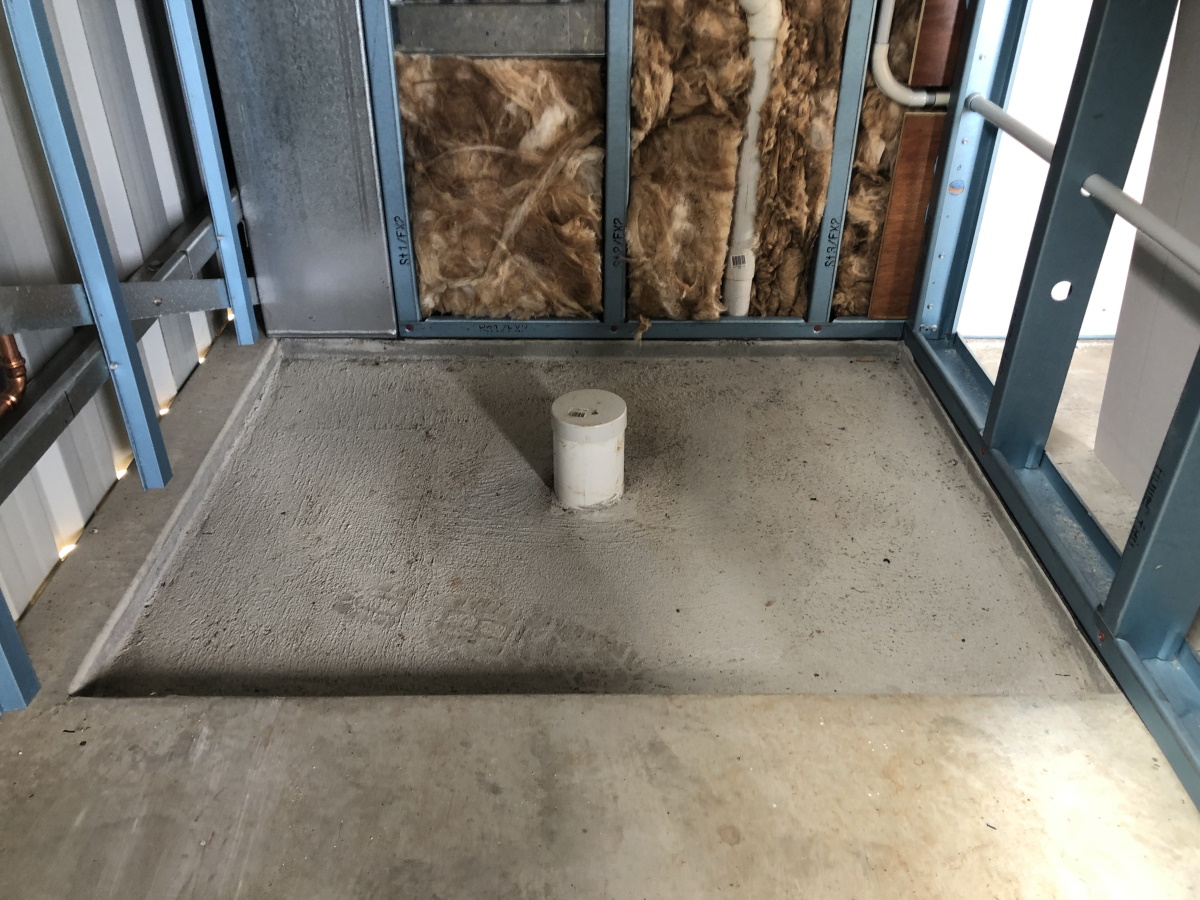
Bathroom shower base drain

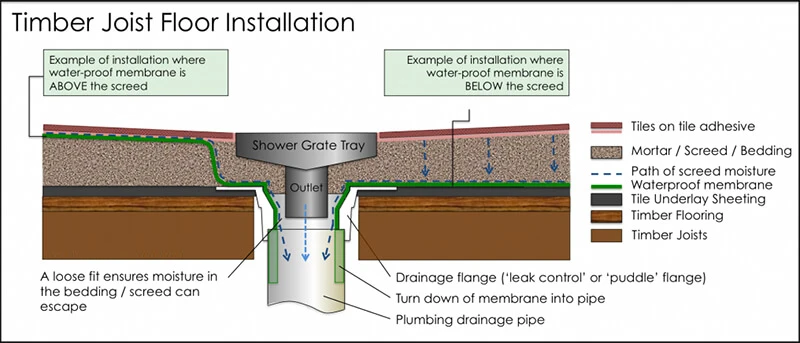
[IMPORTANT] Note you ALWAYS need a puddle flange installed into concrete slab irrespective of whether you waterproof over the screed, under the screed or both (preferred). If there is no fall to drain, don’t just waterproof under the screed – do over the screed or both (preferred). Secure with Sikaflex 11fc and use pvc glue into drain pipe. Don’t need to secure with screws if you weigh it down while Sikaflex cures.
Recommended minimum fall is 1:80, or 12.5mm over 1 meter. A pingpong ball should roll towards the drain.
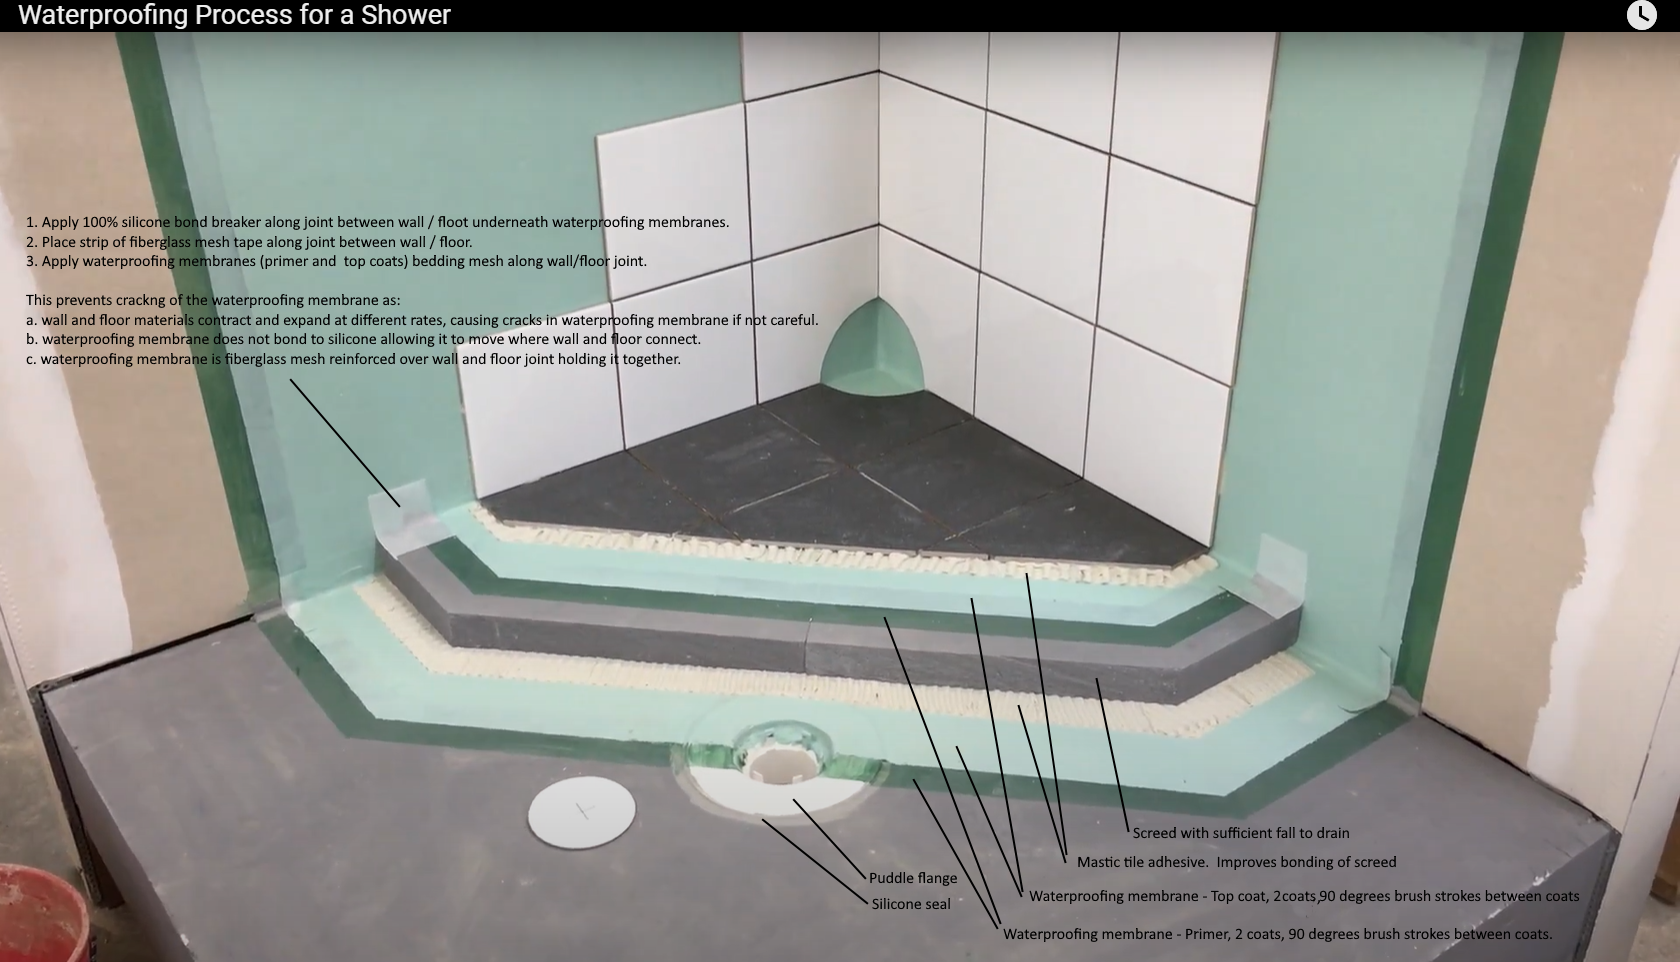
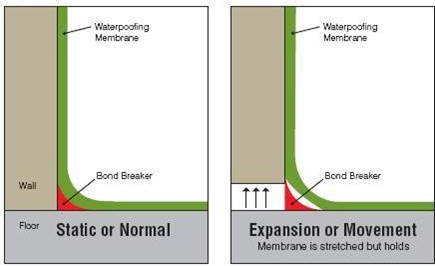
Bond breaker
The principle of a bond-breaker system is to cater for building joint movement without breaching the waterproofing membrane. The objective is to maintain the waterproofing membrane system so that it remains an impervious barrier.
Movement joints (wall-floor, wall-wall) need a bond breaker applied before the class III waterproofing membrane is applied.- run a bead of 100% pure silicone.
There is no need to embed waterproofing tape into first layer of waterproofing membrane. You get better adhesion if you instead apply multiple coats of waterproofing membrane without the use of tape.
Shopping
Davco 5L PrimeX Surface Primer I/N: 6650246 Aisle 54, Bay 2 $68.18
Davco 20L Green K10 Plus Waterproofing Agent I/N: 0960052 Aisle 7, Bay 14 $227.76
3x Davco 20kg Ultraflex Ceramic Tile Adhesive coverage about 12m2 I/N: 6656384 Aisle 54, Bay 12 $36.90
3x Bellessi “Portabello” item# 2669758 acrylic shower panel 1x 1180×2300 + 2x 950×2300 -> 1220 x 2440 x 6mm standard size sheets B7768 $739 excl GST
No, go with a solid white acrylic panel, not a transparent panel with print / paint back layer.
No, go with tiles, but use epoxy grout. Use grey grout color, not white.
Shower base door
12mm Notched trowel + plastic tile adhesive spreader
Tile levelling clips from eBay
1.5mm cross plastic spacers
3mm cross plastic spacers
UNI-Pro microfibre roller 3 pack
Fence brush
Dunlop 3.25kg Slate Grey Easy Clean Epoxy Grout Kit
– don’t use rubber
– mix small batch
– have one person grout and one clean
– surface remains sticky
– haze can be removed with 3000grit drill / orbital sander paper or buffing compound or razor.
Score then cut with angle grinder ceramic disc. Use a continuous non-segmented disc to prevent chipping. Cut a notch into the end of the tile first before starting the cut to prevent chip-out when you reach the end and exit the tile.
Tiles
1247017_ProductSpecification.pdf
$43/m2 1.44m2/pack
4 x 6.5 = 26m2 + 15% = 30m2
30 x 2.78 / 4 = 20.85 packs
Add 1 pack for added security
22 packs x 1.44 = 31.68m2
1247018_ProductSpecification.pdf
$43/m2 1.44m2/pack
3 x 1.2 = 3.6m2 + 15% = 4.2m2
4.2 x 2.78 / 4 = 2.92 packs
Add 1 pack for added security
4 packs x 1.44 = 5.76m2
1259655_ProductSpecification.pdf
$29/m2 1.8m2/pack
(3+4+1.2+1.2) x 2.33 = 21.9m2 + 15% = 25.2m2
25.2 x 5.56 / 10 = 14.01 packs
14 packs x 1.8 = 25.2m2
Stone and porcelain tiles are the best for the shower floor. Avoid glazed ceramic tiles in this spot, as they tend to be slippery. Also, remember that non-vitreous tiles are not suitable for the shower floor. Only impervious or vitreous tiles should be used in the shower area, as they are relatively more waterproof.
https://www.perini.com.au/are-polished-tiles-slippery-in-your-home/
https://www.beaumont-tiles.com.au/blogs/tile-material-and-finish-explained
Porcelain polished / mat rectified edge.
The tile installation principle is that the tiled wall ‘hangs’ over the tiled floor. The best way to achieve this outcome is by first tiling the floor so that the wall tile will then seem to be ‘sitting’ on the bathroom floor.
Trowel size
https://www.rubi.com/en/blog/trowel
600×600 floor tiles = 12mm U trowel = 6mm layer of flattened tile adhesive.
ALWAYS apply tile adhesive in straight lines as air needs to be pushed out. No hollow tiles.
For large / floor tiles, always butter the tile. Lift first tile to check tile adhesive coverage.
Instructions
Apply waterproofing coats in different orientation (left/right <> up/down) to properly seal very small holes.
Build Log
40mm deep 1200 x 900 shower base recess with a 100mm ID PVC waste pipe (110mm OD).
Cut drain pipe flush.
Chip out puddle flange. Start with SDS hammer drill 6mm and follow up with hammer and chisel.
Test fit puddle flange and cut down drain pipe to fit. Used a multitool. Block drain pipe with a rag.
Prime and glue puddle flange to drain pipe.
Fill underneath with Sikaflex®-11 FC.
Put a weight on it to hold it down whilst curing = no screws needed.
Clean
Davco PrimeX walls, ceiling, shower base, floors.
Davco K10 green shower base 2 coats criss-cross.
Timber 40mm to 15mm, 670mm long.
Screed (plaster sand to portland cement 3:1)
Silicone bondbreaker touching shower base walls.
Dunlop wet area tape bondbreaker between plasterboard wall to floor (large gap – not suited for silicone).
Dunlop wet area tape bondbreaker cut hole to fit around taps (fill cavity with silicone first)
No need for waterproofing wall to wall joints outside of shower area.