Welding
Acronyms
D/C or DC = direct current = (~180 max typically) = most common. used for welding steel / stainless.
A/C or AC = alternating current = optional extra, used for welding aluminium, often has pulsed mode.
Duty cycle = percentage of time that a machine will safely operate without overheating, within a certain time period, at a given amperage. 200 Amps @ 30% means that it will operate at 200A for 3 minutes within a 10 minute time period. For the remaining 7 minutes, the machine will switch to thermal overload to cool down.
SMAW = Shielded Metal Arc Welding = stick electrode = think ‘sparkler stick’ that gets shorter as you use it.
GMAW = Gas Metal Arc Welding = MIG = Metal Inert Gas Welding = Co2 or Ar/Co2 gas shielded wire-feed torch welder = think ‘point & shoot’ welding everything in sight.
FCAW = Flux Core Arc Welding = gasless wire-feed welder. Requires a basic DC capable MIG welder unit and is cheapest to run for frequent and varied welding jobs.
Note: FCAW does not require shielding gas. Instead, flux-cored wire shields the arc from contamination.
GTAW = Gas Tungsten Arc Welding = TIG = Tungsten Inert Gas = Argon gas shielded tungsten electrode = think ‘soldering with hot molten lava’.
TIG features:
-
- Lift = touch metal, press button to start and then lift torch to initiate arc.
- HF = high frequency start; press button when close to metal to initiate arc.
- 2T = press and hold button for duration of weld.
- 4T = Press and release button to start, weld without holding the button, stop by pressing and releasing the button again. This is particularly useful when doing long weld runs.
Welding wisdom
“If you have to grind your welds to look pretty then you are a grinder not a welder.”
“A grinder and paint make you the welder you ain’t”
“Tack so you can go back”
“If it has slag, drag.”
“Be weary of definitive answers about welding.”
Auto darkening helmet
You can adjust the brightness / darkening level by adjusting the DIN wheel. As the DIN number increases, the lens becomes darker and blocks more light. I have set mine to a lower DIN value so I can better see what I am doing. Some helmets have a DIN wheel that ‘clicks’ into an off position that can be used for when using an angle grinder. You can also adjust the delay. This controls how quickly the darkening helmet kicks in and starts to darken.
DCEN or DCEP
Stick (MMA): DCEP. DCEN for light penetration if electrode supports both polarities.
MIG gasless (fluxcore): DCEN
MIG shielding gas: DCEP
MIG spool gun: DCEP
TIG: DCEN
Direct Current Electrode Negative (DCEN)
Electrons flow from negative to positive (ground clamp = positive here). The positive point is always the hottest point of the arc. DCEN is for when we want the hottest point of the arc to be in/near the material. Deep penetration.
Direct Current Electrode Positive (DCEP)
Electrons flow from negative to positive (torch electrode = positive here). The positive point is always the hottest point of the arc. DCEP is for when we want the hottest point of the arc to be at the torch tip.
Light penetration and a smoother weld with less flicker.
Bit more weld splatter as torch is hottest and not the material.
Pulls impurities towards torch electrode, so have to clean tip frequently.
For stick welding (only), electrons flowing from the negative work to the positive electrode (DCEP) help to deposit the metal at a regular pace and, though it is counter-intuitive, it actually helps to increase penetration in this case.
Push or drag
Stick (MMA): Drag
MIG gasless (fluxcore): Drag
MIG shielding gas: Push
MIG spool gun: Push
TIG: Push
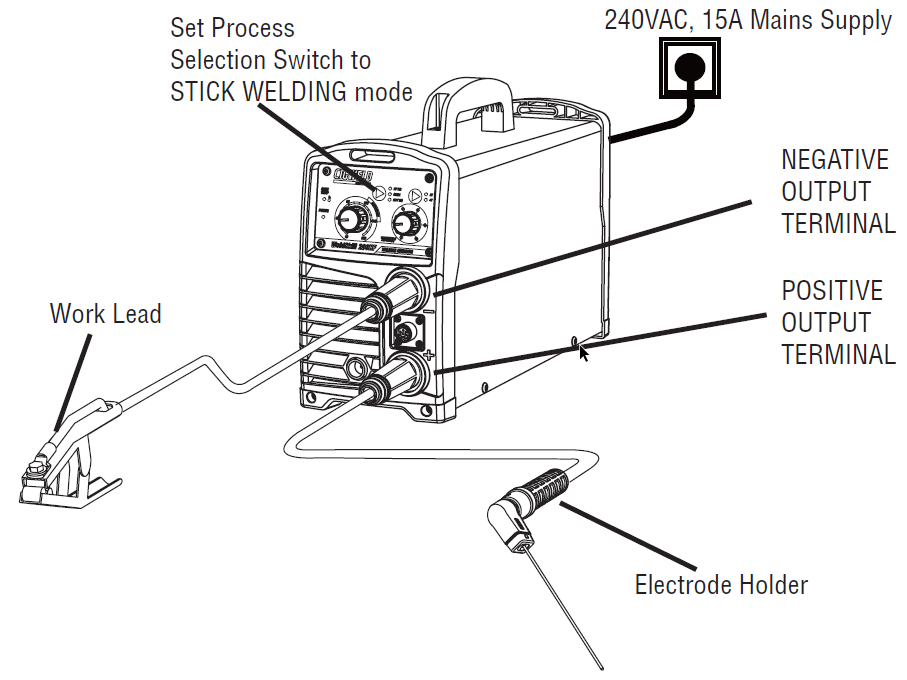
Stick
Stick welding setup
Stick welding electrodes
TIG welding uses a tungsten electrode in the torch and filler rods in the weld pool. MIG uses a spool wire-feed. Stick welding uses sacrificial stick welding electrodes.
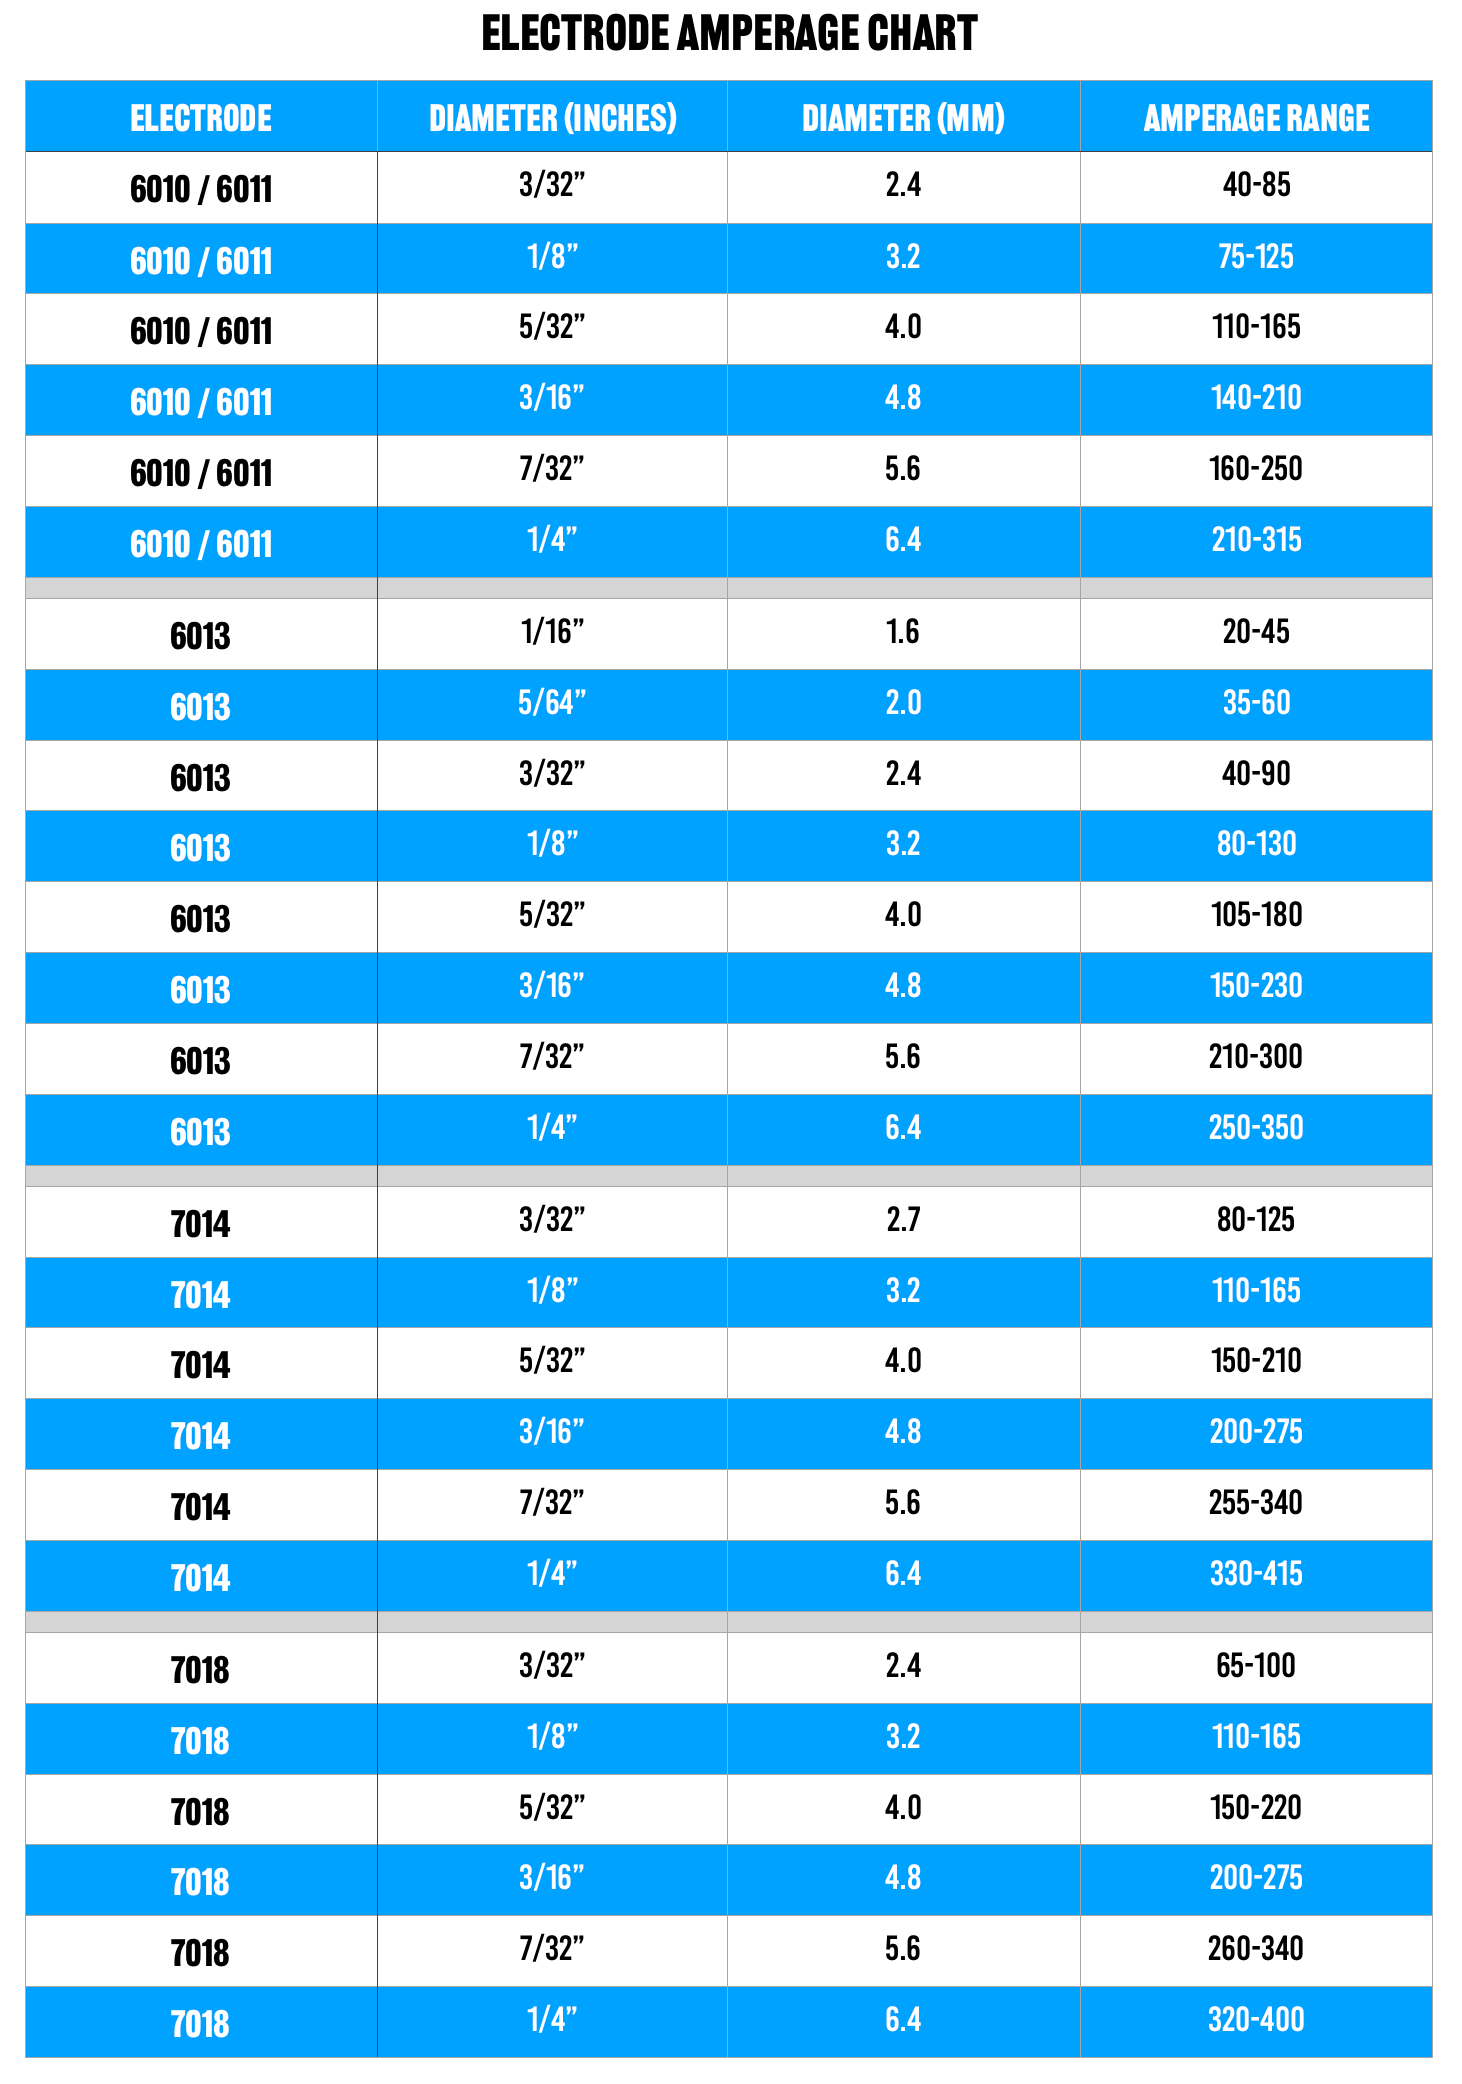
Common electrodes used in Stick welding are 6010, 6011, 6013, 7018 and 7024 with the most common diameters ranging from 1/8- to 5/32-in. Each of these electrodes offers all-position welding capabilities (except 7024).
The first two digits of a stick electrode represent the “as welded” minimum tensile strength: 6010 provides 60,000 psi tensile strength, for instance.
The third digit represents the acceptable welding positions for each electrode (1 = all positions, 2 = flat or horizontal only, 3 = flat, horizontal, vertical down and overhead).
The fourth digit refers to the coating type and the type of welding current (alternating current (AC)/direct current (DC)) that can be used with the electrode. Here’s a brief rundown of each electrode typically found in this application (courtesy of Hobart Brothers):
6010: All position electrode only suitable with DC power sources. It delivers deep penetration and has the ability to dig through rust, oil, paint and dirt. This electrode features an extremely tight arc, which can make it difficult for inexperienced welders. Excellent for penetration on joints with a tight fit-up. All position electrode for use with AC and DC power sources. It produces a deep, penetrating arc that cuts through corroded and unclean metals – ideal for maintenance and repair. Excellent for penetration on joints with a tight fit-up.
6011: All position electrode with a soft arc and minimal spatter, moderate penetration and easily removable slag. Suitable with AC or DC power sources, this electrode is better served on newer and clean materials, thinner materials and wide root openings.
7018: All position electrode with a thick flux and high iron powder content, which makes it one of the easiest electrodes to use. These electrodes produce a smooth, quiet arc with minimal spatter and medium arc penetration. Produces strong welds with high impact properties (even in cold weather) and can be used on carbon steel, high-carbon, low-alloy and high-strength steel base metals. Suitable with AC and DC power sources.
7024: For flat or horizontal welding with an AC or DC power source, this electrode contains a high iron powder content that helps increase deposition rates. Performs well on steel plate that is at least ¼-in. thick and can be used on metals that measure over ½ in.
MIG
I got a Unimig Viper 182 Mk II 180Amp MIG & Arc Welder bundle. Fits a 5kg spool.
VIPER-182-Mk-II-Info-Sheet.pdf
VIPER-182-Mk-II-Manual.pdf
Wire speed tension
Set the wire feed tension low to prevent bird nests. Wipe the torch contact tip with a wire brush regularly as fluxcore / splatter will clog the inside of the copper tip over time. If wire feed tension is set low, feed wire will just slip on the feed roller and not create a bird nest. When you notice no wire feeds out, simply remove torch tip, unscrew the 0.7mm-1.2mm copper contact tip, trigger feed some fresh wire, clean copper contact tip with bit of wire, screw contact tip back in and continue. No need to adjust spool / wire feed.
Shielding Gas
100% Co2 or 75% Argon / 25% Co2 mix. Argon has lower thermal conduction than Co2, and the outer edges of the arc remain cool. This means with pure Argon you would get narrow, reduced penetration with less fusion. 75/25 makes for a nicer weld than pure Co2. If the boss buys it, you will need 75/25, if you buy it, Co2 will do.
Typical spools are either ER70S-6 Mild Steel or 316LSi stainless.
Gasless (flux cored)
Get a spool of 0.9mm 5kg E71T-11 flux cored wire. Don’t buy E71T-GS.
TIG
[!] Clean your metal first. seriously. clean it.
[!] Indoor use only. Shielding gas is susceptible to drafts / breeze.
I got a Cigweld 200HF.
Weldskill_200HF_Brochure.pdf
Weldskill_200HF_Manual.pdf
Best. Video. Ever.
TIG welding setup
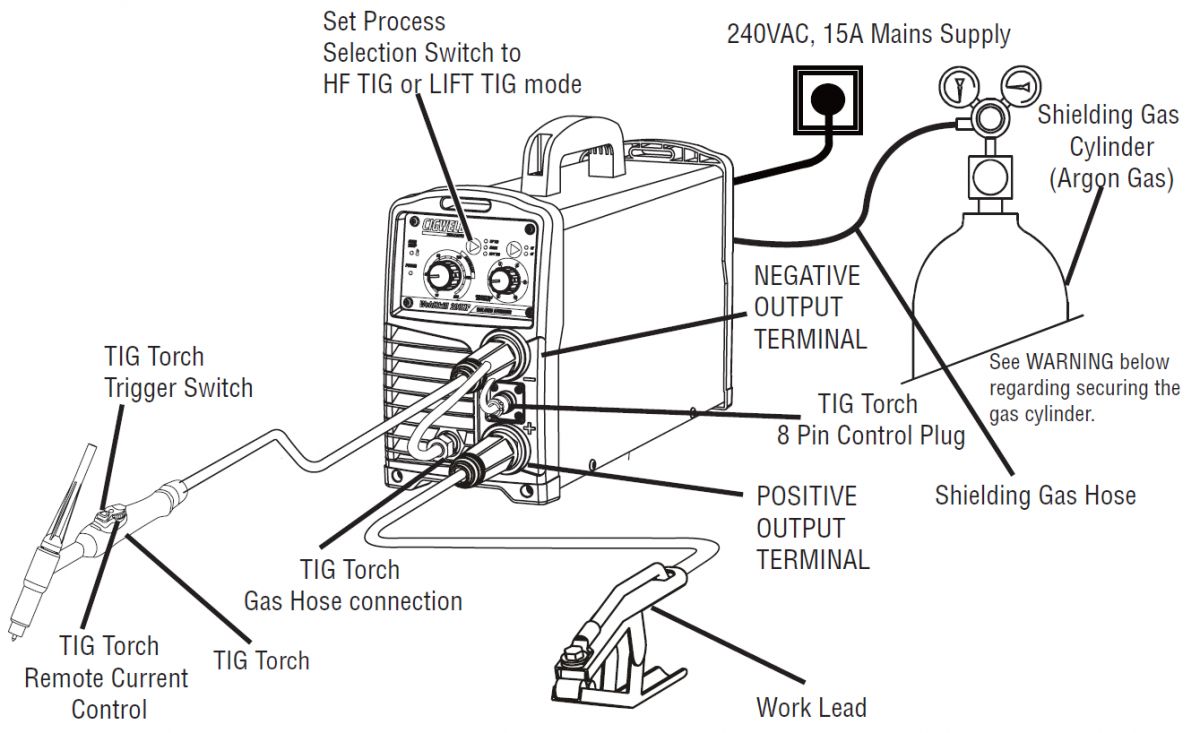
TIG Torch (17 & 26 series air cooled torches and 18 series water cooled- torches)
Electrode connects to negative terminal i.e. DC Electrode Negative (DCEN; also referred to as Straight or DC-). Comes with a shielding gas pigtail that needs to be connected to the front panel as well. Ground clamp connects to Positive terminal.
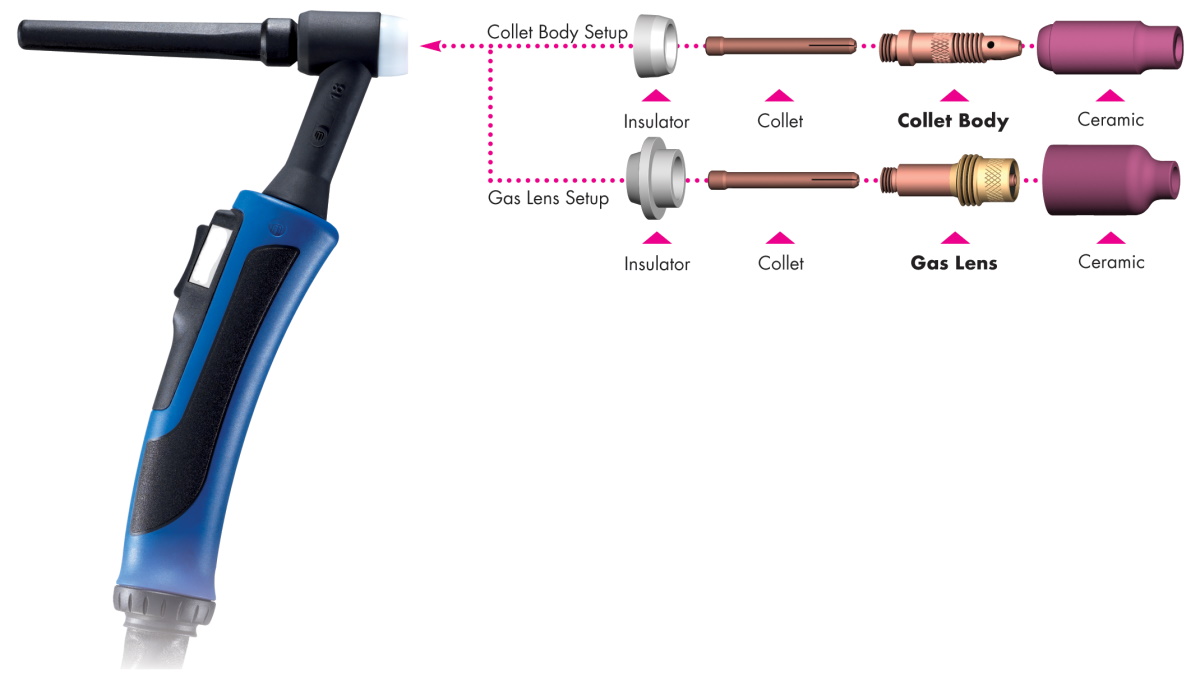
Basic kits typically come with collet body only.
Screw in collet body in front of torch snug fit.
Insert collet from rear of torch.
Insert tungsten electrode rod from rear of torch.
Screw ceramic cup in front of torch snug fit.
Slide electrode so it protrudes about 5-6mm from the cup (‘stickout’).
Lastly screw in back cover and tighten. This is what locks the electrode in place.
Note: stubby clear borosilicate glass (‘Pyrex’) gas lenses requires a stepped insulator and comes with O rings. Comes in 1.6mm, 2.4mm and 3.2mm to match electrode diameter.
I will use 2.4mm electrodes exclusively and order a Pyrex gas lens kit to match.
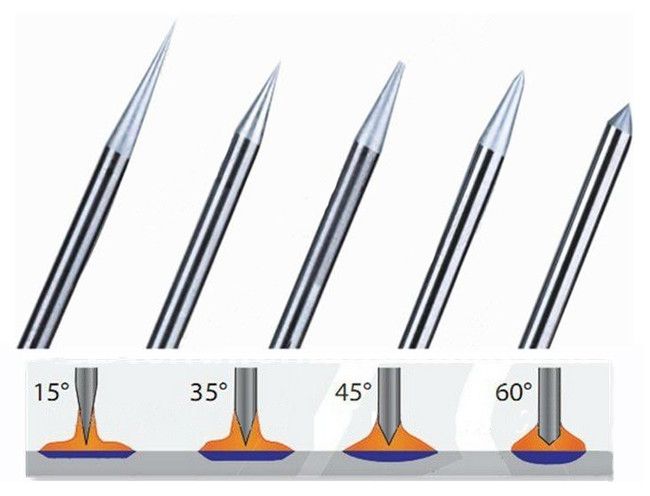
Electrode needs to be sharpened like a pencil to generate a clear arc.
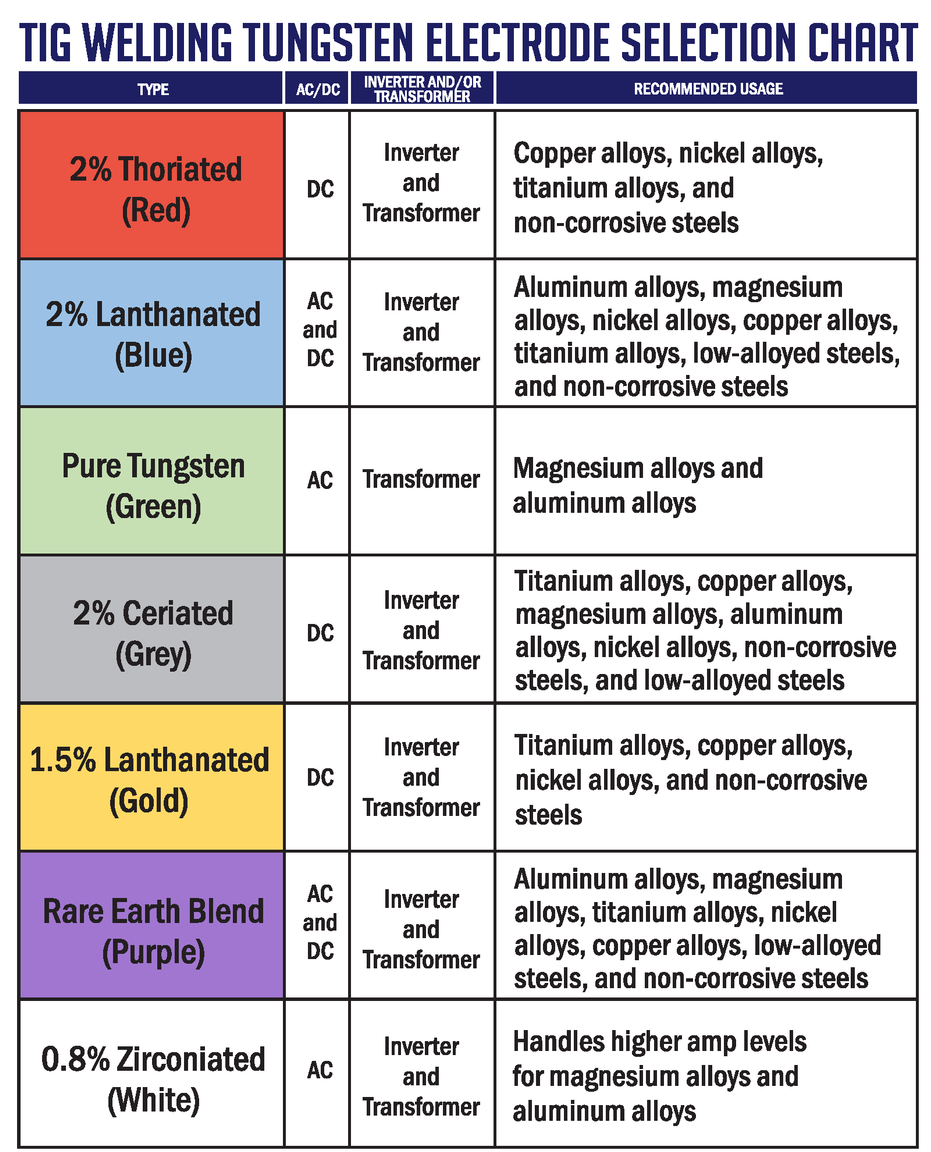
All you need is pure tungsten (for aluminium) and either thoriated or ceriated tungsten (for steel and stainless). My WeldSkill 200HF came with grey electrodes (1x 1.6mm and 1x 2.4mm diameter) and matching torch copper collet body and collet.
TIG Cups
The whole purpose of the different cup sizes is a) to provide proper coverage in relation to heat input vs. material size b) to allow access to the joint. My welder came with size 4,5 and 6 pink ceramic cups. Some people prefer clear glass Pyrex stubby cups for improved visibility and to get into small spaces.
TIG Filler wire
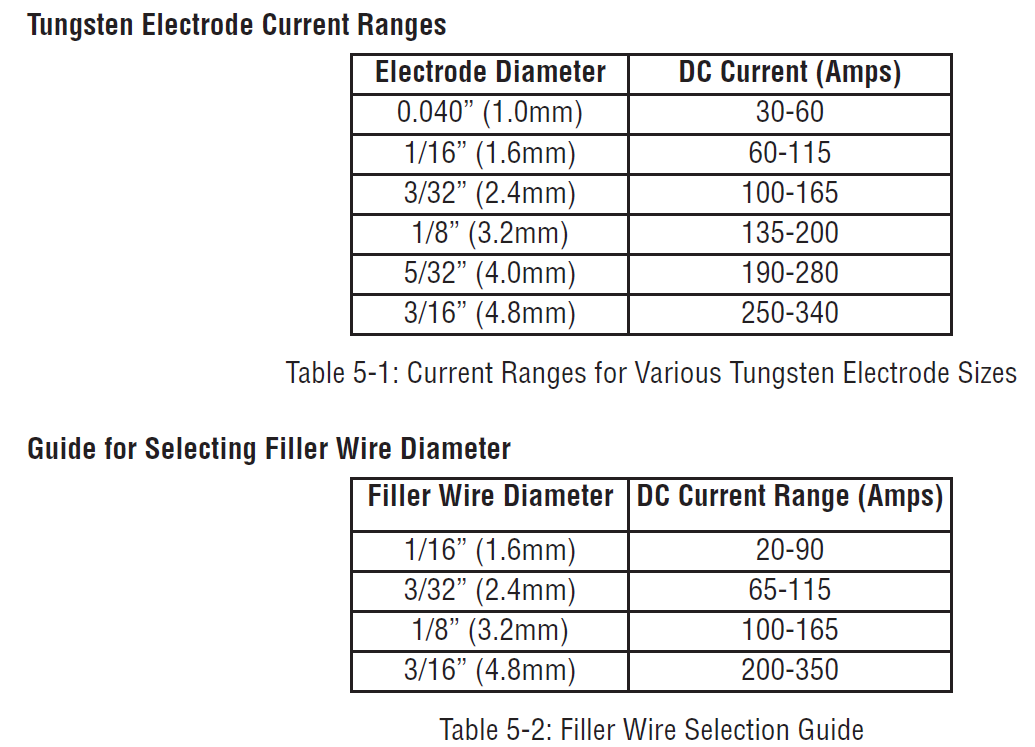
Use a filler rod that has a slightly smaller diameter than the material you are welding. Thicker filler wire will take more time to heat up / melt, requiring you to stay in one spot with the torch longer. Staying too long in one spot with the torch may result in punching holes in the material. My welder came with copper coated low carbon mild steel 1.6mm 70S-6 (Cigweld partno WTM1016) and stainless 1.6mm 316L (Cigweld partno WTS1016) filler rods.
TIG Welding Techniques
- TIG welding requires your material to be super clean.
- Argon is required as a shielding gas. Without a shielding gas you will burn the Tungsten electrode, contaminate the weld, and won’t get any penetration into the work piece.
- Push, not pull. This ensures good shielding gas coverage and prevents porous welds.
- The angle of the torch should be 15 to 20 degrees away from the direction of travel. This increases visibility of the area and allows easier access for the filler material.
- The filler metal should be brought in at as low an angle as possible to help avoid touching the tungsten electrode and contaminating it.
- The torch melts the base material, and the molten puddle melts the filler rod. Resist the urge to melt the filler material directly.
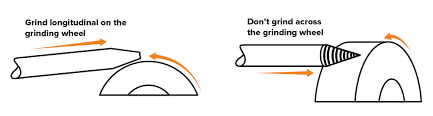
- For preparing the tungsten rod tip, using a diamond grinding wheel will give you the best results for a sharp point. Tungsten should be held in line with the direction that the wheel is turning rather than perpendicularly. This will ensure the grind marks run the length of the tungsten, which assists the flow of the electric current as it travels down the electrode. Turn the tungsten as you hold it against the wheel, as if you are sharpening a pencil. For welding aluminum, you should then grind a flat spot at the very tip by holding the point flat against the grinding wheel.
- For welding stainless steel, be cautious of applying too much heat. The coloring of the weld should range from a flaxen to a salmon color. If the color is darker gray and looks dirty and heavily oxidized, too much heat is being applied. If too much heat is applied, the metal could warp. To correct this problem in the future, reduce the amperage and increase travel speed. You may also try reducing the diameter of the filler material, as that will take less energy to melt.
TIG tack welding
To prevent metal warping and shrinking when it cools down, you need to clamp everything onto a flat surface. Weld sequencing using tack welding is used to fit everything together before running bead welds. Tack welding corners gives best results. Use 90 deg ‘welding arrow’ magnets in corners. Use clamps to secure corner magnets. Clamps! clamps! clamps!
You can TIG tack without filler. It helps to put a bit of leftover filler rod in the vicinity of the needed tack to ‘fuse’ it in.
Aluminium
https://unimig.com.au/spool-gun-vs-push-pull-gun/
https://unimig.com.au/how-to-set-up-your-mig-welder-for-aluminium-without-a-spool-gun/
https://unimig.com.au/how-to-weld-aluminium/
https://weldguru.com/tig-welding-aluminum/
1st Choice: Pulsed MIG welding as it is much faster and approaches TIG quality.
https://www.weldclass.com.au/blog/94-what-is-a-pulse-mig-a-how-why-guide-to-pulse-mig-welding
There’s a big difference between a machine that has been designed ‘from the ground up’ to be a pulse MIG, and a machine that is primary designed as a conventional MIG with pulse as an added feature.
‘Professional’ pulse MIGs traditionally start at around $4,000-$6,000 (reputable brand, made in Europe or USA).
2nd Choice: AC TIG welder because AC current can penetrate the high temperature resistant oxide layer on top of aluminium better than DC. You can sort-of weld aluminium on a DC welder by swapping the leads so the electrode is connected to the positive terminal i.e. DC-Electrode Positive (DCEP or DC+) but this will burn up your Tungsten electrodes in a heartbeat (!)
- AC frequency (20 – 200Hz)
- AC duty cycle (30% positive; cleaning, 70% negative; heat in weld pool)
- Foot pedal (aluminium heats up fast; less amps needed halfway during weld)
- 100% Argon.
I have neither AC TIG nor Pulse MIG because $$$. Aaargh.
ER5183 = for 5083 aluminium = high tensile strength, high magnesium content for salt corrosion resistance, marine environments, below water line.
ER5356 = for 5056 aluminium = extrusions, bike frames, canopies. interior.
Below alloys often have a heat number of H3, which means they have been strain hardened and stabilized.
5052
All 5000 alloys use magnesium as the principal alloying element. This makes the aluminium easier to weld, which is important for construction. It’s generally the “softest” of the four, and because of this it’s also considered the most workable. This aluminium alloy is not as susceptible to cracking during the forming process and is also the least expensive of the common marine alloys. 5052 is generally used for interior parts of the boat such as cabins, decks, and gunwales.
5083
Aluminium alloy 5083 is commonly used by the US Navy. It’s stronger than 5052, yet it’s still formable and easily welded. This aluminium alloy is widely used in chemical and marine environments where corrosion resistance is crucial and can also withstand extremely cold temperatures without becoming brittle. But, all these great properties come at a higher cost than 5052, and although 5083 is stiffer than 5052, it’s also more prone to cracking. 5083’s corrosion resistance and toughness make it a great choice for hull bottoms and side sheets.
5086
Considered the superior alloy for marine environments, 5086 has similar characteristics of 5083, but with added strength. This alloy is so close to its 5083 brother that the two are arguably interchangeable. In fact, 5086’s strength increases when it is cold worked. The main benefit of this aluminium alloy is its increased corrosion resistance properties, especially in salt water. It is the most popular choice for hull bottoms and side sheets.
6061
This is a great general-purpose alloy. 6061 aluminium alloy can be used for structural components, as it has more strength than the other three listed above. It also has excellent finishing characteristics, so it can be used in areas that are highly visible to increase the aesthetics of the project. This added strength comes at a cost though, as this alloy is not as easily formable, is more prone to fracturing, and is only available in limited sizes. 6061 is commonly used for extrusions or exterior hull reinforcement, such as keel linings.