VertexWeight + Mask modifier
Source Files
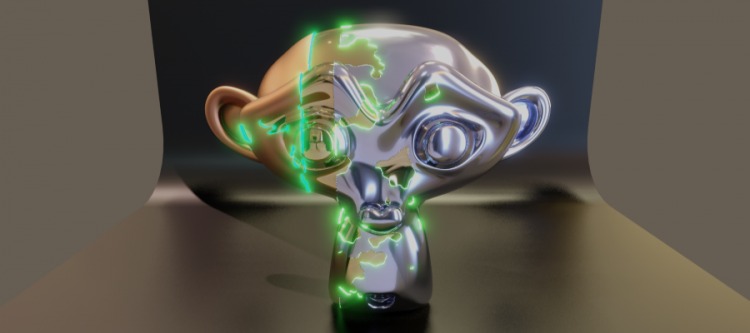
Render
Notes
The downside of using vertices > weight painting > mask to create a dissolve / appear effect is that the effect requires a serious subdivision amount to look hi-res. An animated shader is better suited for this task.
Empty.001
Suzanne.001
Create vertex group 'Gradient'

Subdivision modifier
  Render: 4-6
  Viewport: 3
  Quality: 3

View3D switch from Object Mode to WeightPaint Mode (object appears blue)

VertexWeightEdit modifier
  Vertex Group: Gradient
  Tick 'Group Add'
  Falloff Type: Custom Curve  X=0.001 Y=0.9
  Texture Mask: New (Gradient)
  Texture Coordinates: Object
  Object: Empty.001

This will place the vertex weight texture over the object based on the origin of the empty.
You move the empty, you move the vertex weight gradient over Suzanne.

  Gradient texture:
    Type: Blend
    Color Ramp: RGBA 0000 to RGBA 1111

You can play with Contrast to manipulate the gradient.

Mask modifier
  Vertex Group: Gradient
  Threshold: 0.25

Solidify modifier
Thickness: 0.01
Offset: 1.0
Note: The Falloff curve is a bit tricky to edit. Remove all points and simply drag the bottom left point upwards or enter the desired value directly (X=0, Y=0.9).
If you untick ‘Show in Viewport’ the Mask modifier, you should see the vertex weights change from blue to red in the 3D viewport when in WeightPaint Mode when you move the Empty.001 along the X axis. You can make changes to the gradient texture to affect the width of the ‘seam’,
If you enable the Mask modifier you can play with the threshold slider to affect where along the seam the mesh starts to become hidden.
Duplicate Empty.001 to Empty.002 and move -0.5 Xpos
This will be used to create a gap between the two objects' seams using the vertex weight modifier:
Duplicate Suzanne.001 to Suzanne.002
VertexWeightEdit modifier > Texture > invert the Color Ramp
This will cause the object to appear rather than dissolve
  Texture Coordinates: Object
  Object: Empty.002
We now have one object dissolving and one object appearing. There is a gap in between the seams as the Empty objects are located in different positions. You can move the empties along the X axis together to animate the effect.
Copy Suzanne.002 to Suzanne.003
Keep only Subdivision and Solidify
Change Solidify > Offset from 0.01 to 0.009 to make it slightly smaller.
This is so it can 'hide' inside the other Suzanne objects.
This one will appear in the gap between the dissolving and appearing Suzanne objects.
To add noise to the gradient:
Add a second VertexWeightEdit modifier using a Clouds Texture to both Suzanne.001 and Suzanne.002
Texture Coordinates: Local.

Add a VertexWeightMix modifier just before the Mask modifier
  Vertex Group A: Gradient
  Vertex Group B: Clouds
  Mix Mode: Add
Note that the noise does not move over the surface with empties as the gradient does.
To add the glow:
Suzanne.001 + Suzanne.002 > Solidify modifier
Tick Fill Rim
Tick Only Rim
Material index Offset: Rim=1
Add a second material to each object i.e. Rim.001, Rim.002 using an emission shader with strength=250.
You can use (slightly) different colors for each for added effect.