Kerbal Space Program – How to get to orbit
In a nutshell, first we initiate a Gravity Turn. We make sure not to exceed Terminal Velocity. Then we need to get to orbit. Learn to use the Navball. When coming down we use Aerobraking. That’s it, class dismissed.
Gravity Turn

Terminal Velocity

How to Get into Orbit

Navball

Aerobraking
Gravity Turn
Getting to space and getting to orbit are two very different things. Getting to space means you simply go straight up and leave Kerbin’s atmosphere by going above 70 kilometers. Getting to orbit involves starting with an arc trajectory attempting to gain sufficient vertical velocity as well as lateral velocity (speeding up side-ways) to counteract gravity.
On Kerbin it is good practice to launch your rockets into an anti-clockwise orbit (an eastward gravity turn) as this will let the planets rotational velocity add to your orbital velocity.
Also for beginners, use Time Warp to launch in the day time rather than at night to better see what you are doing.
Terminal Velocity
Step out of an airplane without parachute. You will fall. Faster. And faster. The speed at which you fall keeps increasing; you keep accelerating. However, drag increases. You still keep falling faster and faster, but in smaller increments now. You are still falling faster but the speed at which you fall seems to now approach a constant velocity. Interesting. At this point the Force of Drag is equal to the Force of Gravity. You keep falling at the same speed now. You have reached Terminal Velocity.
Now we are a rocket. Instead of Gravity we have Thrust and we go up instead of down. The principle is the same. For an efficient ascent we should not exceed Terminal Velocity or we’ll generate excessive turbulence and heat.
Kerbin Terminal Velocity table
| Altitude (m) | Approximate Terminal Velocity (m/s) |
| 500 | 105 |
| 1000 | 110 |
| 2000 | 120 |
| 3000 | 130 |
| 5000 | 160 |
| 6000 | 180 |
| 7000 | 200 |
| 8000 | 220 |
| 10.000 | 260 (Remember to start your turn) |
Note that with the new aerodynamic model, determining the optimal and maximum speed for a given altitude is somehwat difficult because it greatly depends on how aerodynamic the vessel is as a whole. Also, the orientation of the vessel now matters. As a general rule of thumb, if you see turbulence or heat buildup, you are going too fast and need to reduce thrust.
I think now is a good time to talk about Orbits, Navball and Markers first.
Orbit
Apoapsis
Apoapsis is the highest point in your orbit and is marked in the map view by ‘Ap’. You can hover over the marker to see its altitude or you can click on it to see it without having to hover over it.
Periapsis
Periapsis is the lowest point in your orbit and is marked in the map view by ‘Pe’.
Circularizing a parabolic orbit
Coast till you reach your Apoapsis. ‘Coasting’ just means ‘hit time warp!’. You will want to warp to your Apoapsis for your next burn. Here it is most efficient to perform our circularization burn. At this point you will be changing your sub-orbital parabolic trajectory into a circular orbital trajectory. We need to raise our Periapsis. You will do this by pointing ‘Prograde’ and burning till your Periapsis reaches 70km-80km (similar to your Apoapsis). You may start your burn early as it will be a long one.
If you don’t yet know about Prograde / Retrograde, let’s have a quick look at the Navball first:
Navigation Gimball (‘Navball’)
Control
Pitch and roll are controlled with W, A, S and D on your keyboard. Yaw is controlled with Q and E. SAS [T] acts like a steering dampener and in the most basic mode tries to maintain stability . SAS should always be switched ON. RCS [R] maneuvering thrusters should only be switched ON during take-off and docking.
Markers
The following markers will appear on your navball. Some will only appear once you reach orbit.
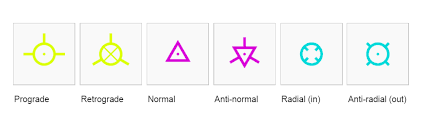
Prograde means ‘forward’.
Retrograde means ‘reverse’.
Radial means ‘lower orbit; inward’.
Anti-radial means ‘higher orbit; outward’.
Normal means ‘going up; climbing; positive rate of ascend, positive inclination’.
Anti-normal means ‘going down; descend; negative rate of ascend, negative inclination’
Prograde and Retrograde (and more)
Gravity Turn using the navball
For lightweight (low-mass) craft it is important to pitch over slowly when performing a gravity turn. We move away from the prograde indicator gently in small increments. This will reduce the amount of fuel you will need to gain altitude. At some point gravity will start pulling the trajectory down – we will automatically ‘fall’ towards a 90 degree pitch. Keeping the orange level indicator close to the slowly moving green circle of the Prograde marker towards 90 degree pitch will result in the most fuel efficient trajectory.
Heavyweight (high-mass) craft will be sluggish to respond to changes in direction. You will have to pitch more aggressively early to get the nose pointing in the right direction.
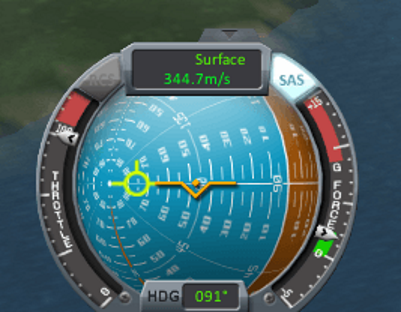
The green “prograde” indicator shows the actual direction of travel.
The orange level indicator shows the current heading.
The 45–45–45, 90–90–90 and 135–135–135 lines indicate heading [HDG] (north, east, south and west).
The 10-20-30-40-50-60-70-80-90 lines indicate rate of climb (‘inclination’).
When in lower atmosphere the blue area resembles the sky (positive rate of climb; going up) and the brown area resembles ground (negative rate of climb, going down).
Aerobraking
For efficient re-entry don’t go straight down; use a proper curved trajectory instead. By skimming and spiraling down through the atmosphere we can use drag to slow down. This is called aerobraking. If you launched using a gravity turn and aimed for reaching orbit, your re-entry will automatically be one that uses aerobraking; no action required.
Simply burn retrograde (at your Apoapsis for maximum efficiency) until your Periapsis reaches about 20km or less for re-entry. For high gravity and thick atmosphere planets like Kerbin it is a good idea to dump all remaining stages to lose mass before re-entry.
Aerobreaking
Here we go
Let’s put the theory to practice shall we:
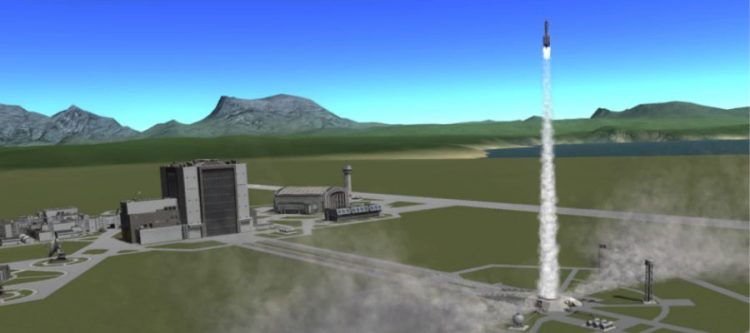
0m – 1000m Launch
- Full thrust [Z]
- Enable SAS [T]
- Toggle Map view. [M]
Tilt the view so that it look straight down to the north pole, which will give a clear view of the trajectory.
Zoom in (a lot). Unhide the navball.
Press [M] to return to the normal view. - Launch! [SPACE]
- Accelerate to 100m/s at 1000m.
- Quicksave [F5]
- Whatever happens next is irrelevant as you can now Quickload [F9] from here.
1000m – 10.000m Terminal Velocity & Initiate Gravity Turn
- Pitch 10 degrees from vertical towards the east
Keep holding the [W] key and disable SAS [T] momentarily if need be. - Reduce thrust if need be:
- 100m/s+ at 1000 meters.
- 150m/s+ at 5000 meters.
- 200m/s+ at 7500 meters.
- 250m/s+ at 10.000 meters.
- Quicksave [F5]
10.000m – 18.000m Lower Atmosphere
Expect turbulence and heat buildup at around 500m/s. This is related to our speed, not altitude. As the atmosphere is getting thinner this is okay.
- Full thrust from here.
- Pitch 45 degrees from vertical towards the east.
- Decouple stage when empty [SPACE]
- Ignite next stage [SPACE]
- Switch to map view.
- Quicksave [F5]
18.000m – 69.000m Upper Atmosphere
From here there is little we can do to change the trajectory. If anything, it will be very inefficient.
- Pitch 90 degrees from vertical towards the east. Temporarily disable SAS [T] if you need more responsiveness.
This comes at a cost of increased instability, so do enable SAS [T] when done. - Decouple /ignite stages as needed [SPACE]
- Press X to kill engines when Ap reaches 70km.
- Gravity will pull the trajectory down and by now the Prograde indicator will have slowly moved towards the 90 degrees from vertical angle.
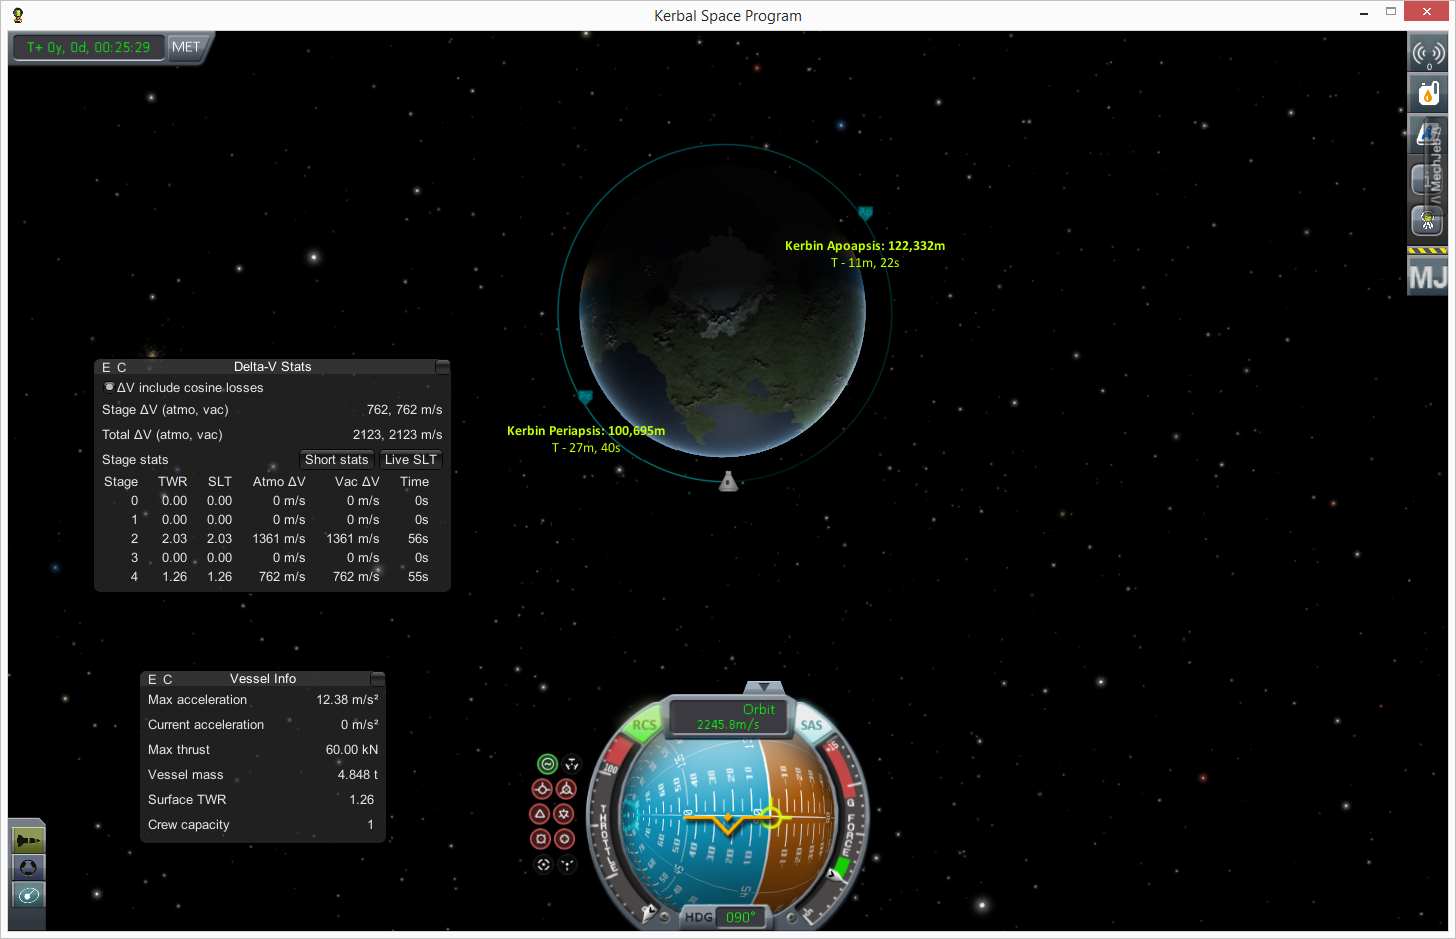
70.000m Space near Kerbin
Kerbin’s atmosphere stops at 70km and space begins. There is music here. Our forward speed now counters the pull of gravity. There is no atmosphere, no drag, only gravity. Time to circularize our orbit.
- Coast to Ap.
- Full thrust Prograde to raise Pe – this will be a long burn; so start early.
- Press X to kill engines when Pe reaches 70km.
70.000m – 0m Re-entry
When we come in fast on re-entry the thin atmosphere gets thick enough to see heat buildup starting at altitudes of 50km depending on your speed.
- Coast to Ap.
- Full thrust Retrograde.
- Press X to kill engines when Pe dips below 20km.
- Dump any remaining stages to expose heat shield on command pod.
- Make sure craft remains oriented perfectly Retrograde for even heat spread.
- When heat changes to turbulence and speeds drop below 500m/s aerobraking was successful.
- Deploy parachute at 250m/s.
From here we can build a moon lander slingshot to the Mun using Hohmann transfers. Or perhaps learn about Onion or Asparagus fuel line staging. Or we can build a space station. Start using spaceplanes. Build satellites. Practice aligning orbits and executing docking maneuvers. Use maneuver nodes to calculate burns. Unlock Mechjab features and learn how to use them to make life easier.