Battlezone Combat Commander [BZ:CC] modding guide
First of all, buy this awesome game on GOG or Steam if you have not already done so!
Many thanks to Nielk1, Katherlyn, Aegeis, General BlackDragon, Ded10c in no particular order for their invaluable help!
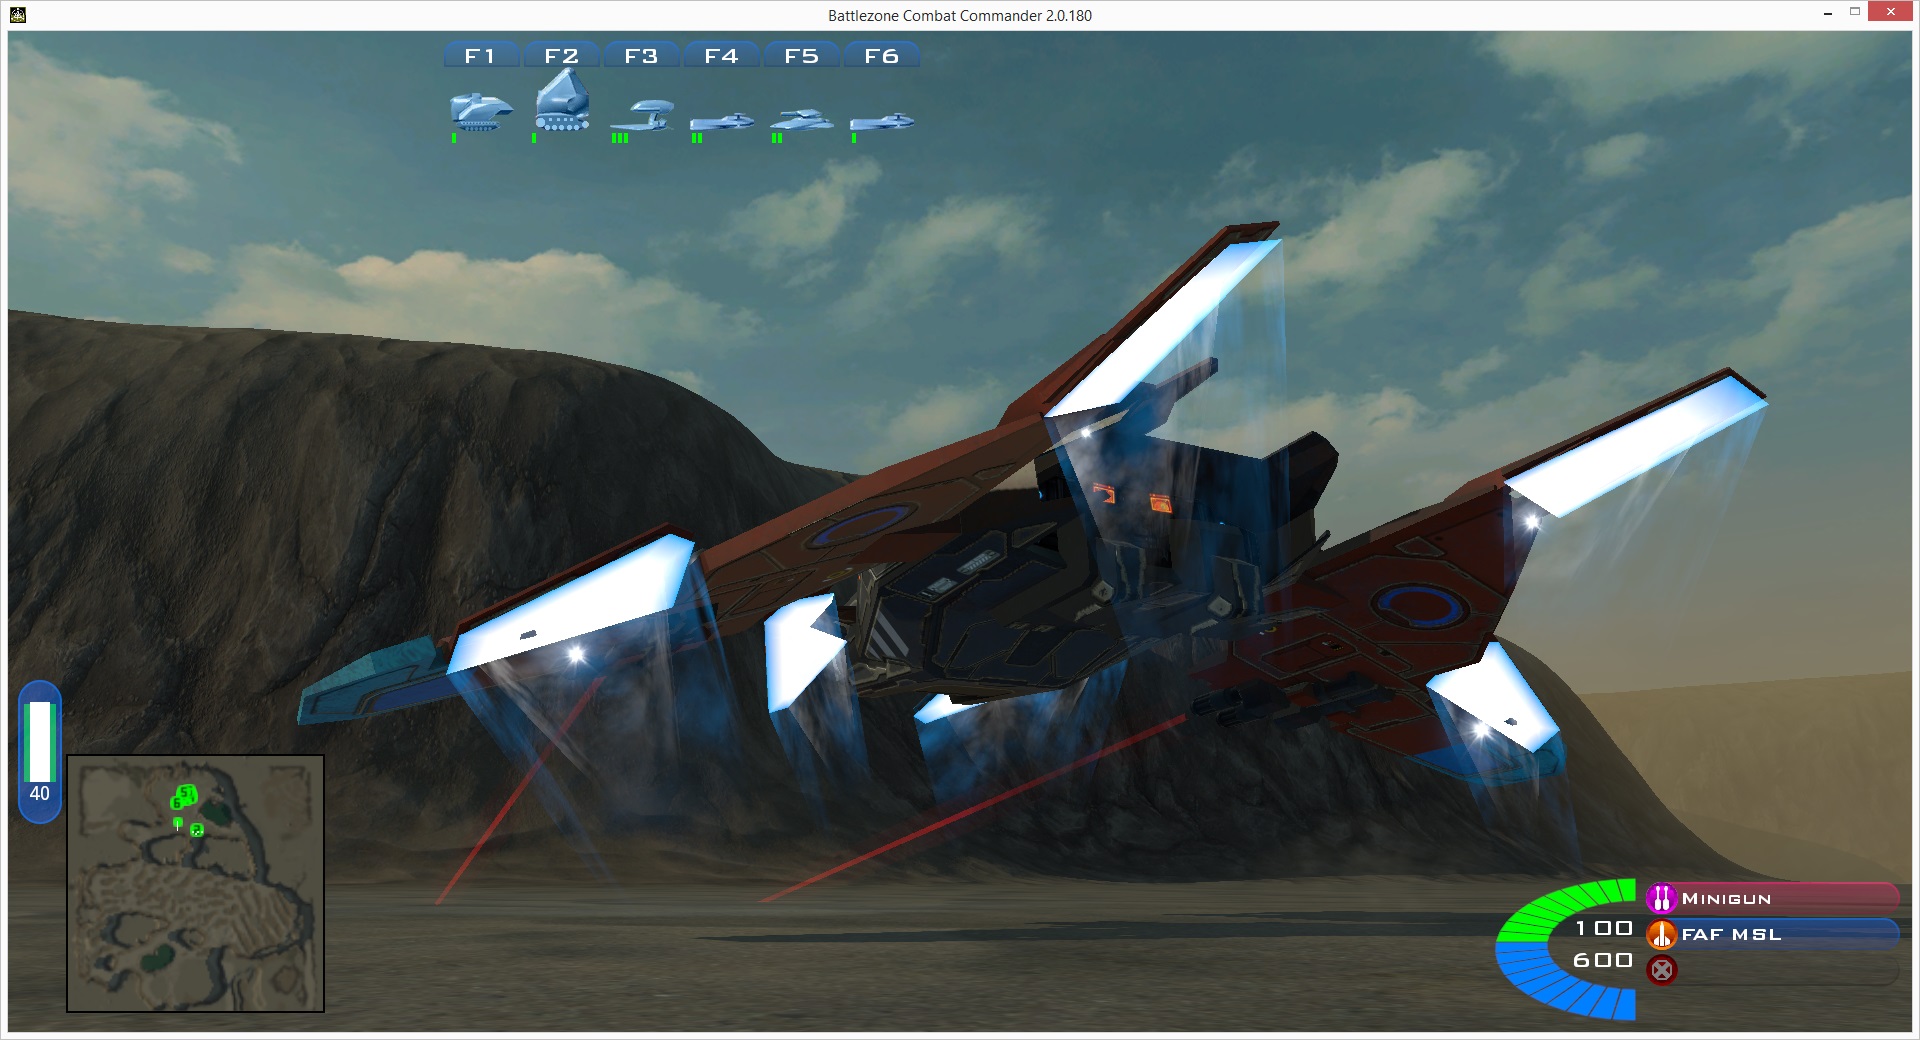
This is what we will be making – view in 1080p60 HD in Full Screen:
Source files can be found at the bottom of this web page.
Create a folder “addon” in “…\My Documents\My Games\Battlezone Combat Commander\”.
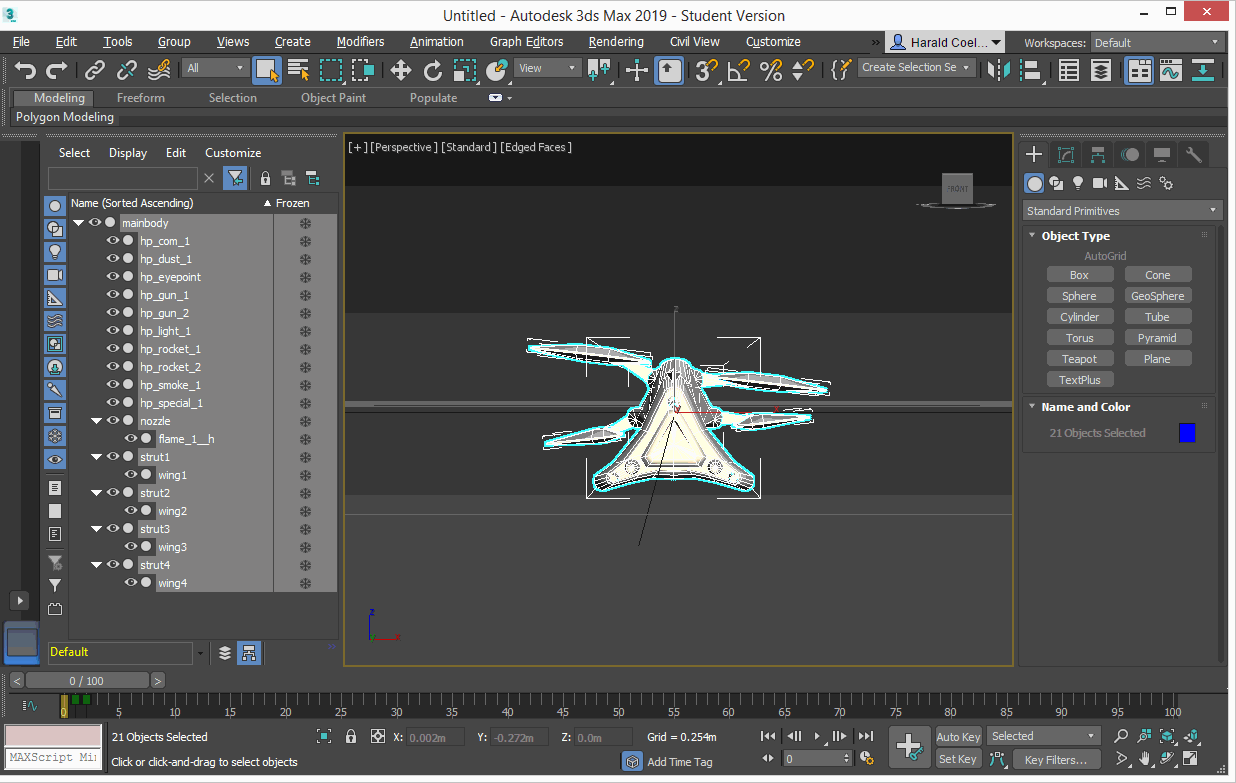
We will use an ISDF Scout vehicle [ivscout] as the basis for our vehicle. This game model consists of the following files:
ivscout.inf
ivscout.odf

ivscou00.tga
ivscou00_c.tga
ivscou00_e.tga
ivscou00_n.tga
ivscou00_s.tga
ivscout00.fbx

ivscou00.dds
ivscou00_c.dds
ivscou00_e.dds
ivscou00_n.dds
ivscou00_s.dds
ivscout00.msh
ivscout00_1.material
ivscout00_3.material
File naming syntax requires ISDF vehicle files to start with “iv”and for textures to end in _c, _e, _n and _s. You should only rename the scou(t)00 part of the file name.
The [.inf] and [.odf] files have short, simple and unique file names. Even though some textures in the game still use win95 style “8.3” short file names, long file names are fully supported.
As game models can have different meshes, animations and textures applied at times, referenced files often use numbers like 00, 01, 02…99 for different versions of a file or phrases like “cockpit, crash, fly, open, takeoff” to indicate a specific purpose or an animation.
We will name our ISDF vehicle ‘Ronin’.
[.inf]
Game object information file [*.inf]. This file is located in the localization folder tree [bz2r_loc].
[BZ2R\bz2r_loc\bz2r_fr\ivscout.inf] contains:
ÉCLAIREUR FOUDRE ISDF
Supports :
- 2 fusils
- 1 missile
- 1 arme spéciale

Fabriqué par : Recycleur
Conditions :
- Aucune
[BZ2R\bz2r_loc\bz2r_en\ivscout.inf] contains:
ISDF THUNDERBOLT SCOUT
Hardpoints:
- 2 Guns (C)
- 1 Missile (C)
- 1 Special

Built by: Recycler
Requirements:
- None
Place a copy of the English localization of “ivscout.inf” to your addon folder, rename the file “ivronin.inf” and make the following changes in bold:
ISDF RONIN
Hardpoints:
- 2 Guns (C)
- 1 Missile (C)
- 1 Special

Built by: Recycler
Requirements:
- None
If this file is missing, you will receive the following in-game warning:
Interactable ODF 'ivronin.odf' attempted to use info 'ivronin.inf' which does not exist
[.odf]
Object definition file. This file is located in the resources folder tree [bz2r_res].
[BZ2R\bz2r_res\baked\ISDF\vehicles\ivscout.odf] contains:
[GameObjectClass]
baseName = "ivscout"
geometryName = "ivscout00.fbx"
cockpitName= "ivscout_cockpit.fbx"
animCount = 3
animName1 = "forward"
animFile1 = "ivscoutsf.fbx"
animName2 = "neutral"
animFile2 = "ivscoutsn.fbx"
animName3 = "reverse"
animFile3 = "ivscoutsr.fbx"
classLabel = "wingman"
scrapValue = 15
scrapCost = 50
customCost = 50
buildTime = 15.0
customTime = 15.0
maxHealth = 1800
maxAmmo = 1500
addAmmo = 1
unitName = "Scout"
aiName = "ScoutFriend"
aiName2 = "ScoutEnemy"
...
...
Place a copy of object definition file”ivscout.odf” in your “addon” folder and name it “ivronin.odf”.
Make the following changes in bold:
[GameObjectClass]
baseName = "ivronin"
geometryName = "ivronin00.fbx"
[.fbx]
FBX is a proprietary file format developed by Kaydara and owned by Autodesk since 2006. It is used to provide interoperability between applications. .FBX files store wireframe mesh, materials, texture files, animations, etc.
When you load a map / mission, the game will load all objects. The game will read the object definition files [*.odf] and parse its contents. For every [*.fbx] 3D asset file reference it finds inside each of the object definition files, the game will generate a matching [*.msh] mesh object file and [*.material] material file, if not present. This process is referred to as ‘baking (assets)’.
The game ships without [*.fbx] 3D asset files to protect the game studio’s intellectual property. Only the baked [*.msh] and [*.material] files are shipped. The game studio has kindly made a select number of source 3D asset files available to support the modding community:
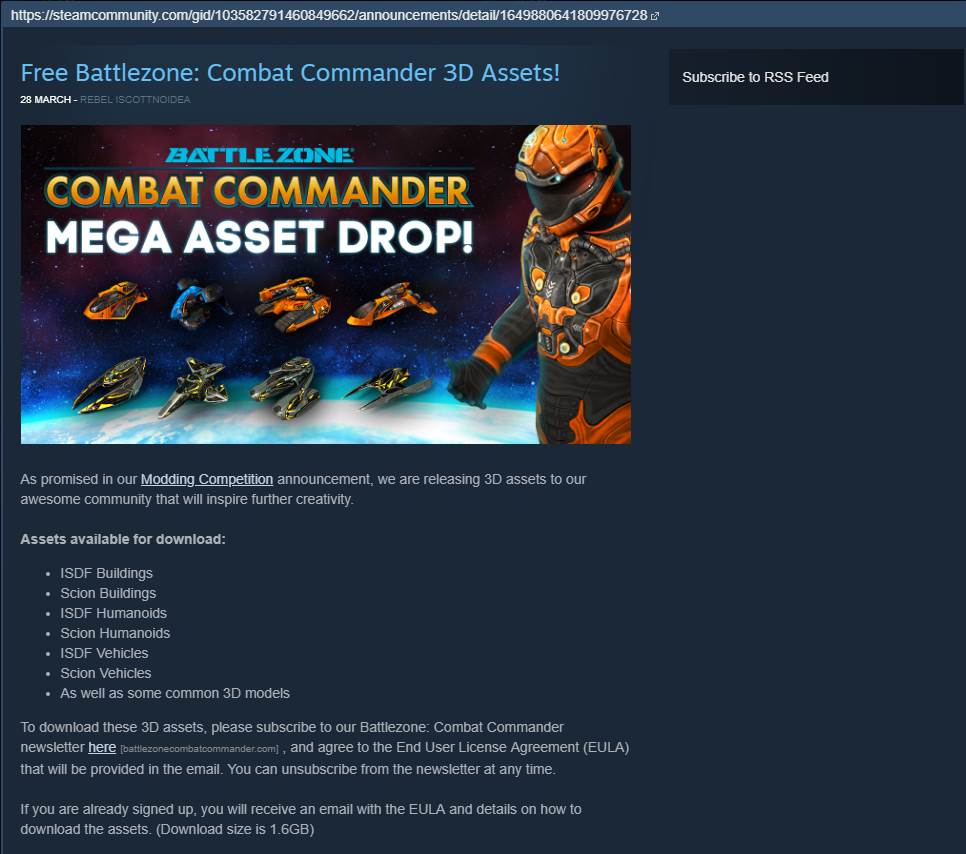
Sign up to the newsletter and accept the End User License Agreement (EULA) to gain access to a 1.6GB asset bundle by using the following link: http://battlezonecombatcommander.com/en/sign-up
To insert custom game objects, we first have to learn about the Game Editor and Baking Assets.
Inserting a custom game object using the Game Editor
Launch Battlezone Combat Commander.
Select Instant Action.
Choose a map (Alien Dunes) and click on the launch button.
Open the console using [CTRL][~].
Let’s enable the game editor.
game.cheat bzeditor
Press [CTRL][~] to exit the console and return to the game.
Open the game editor using [CTRL][E].
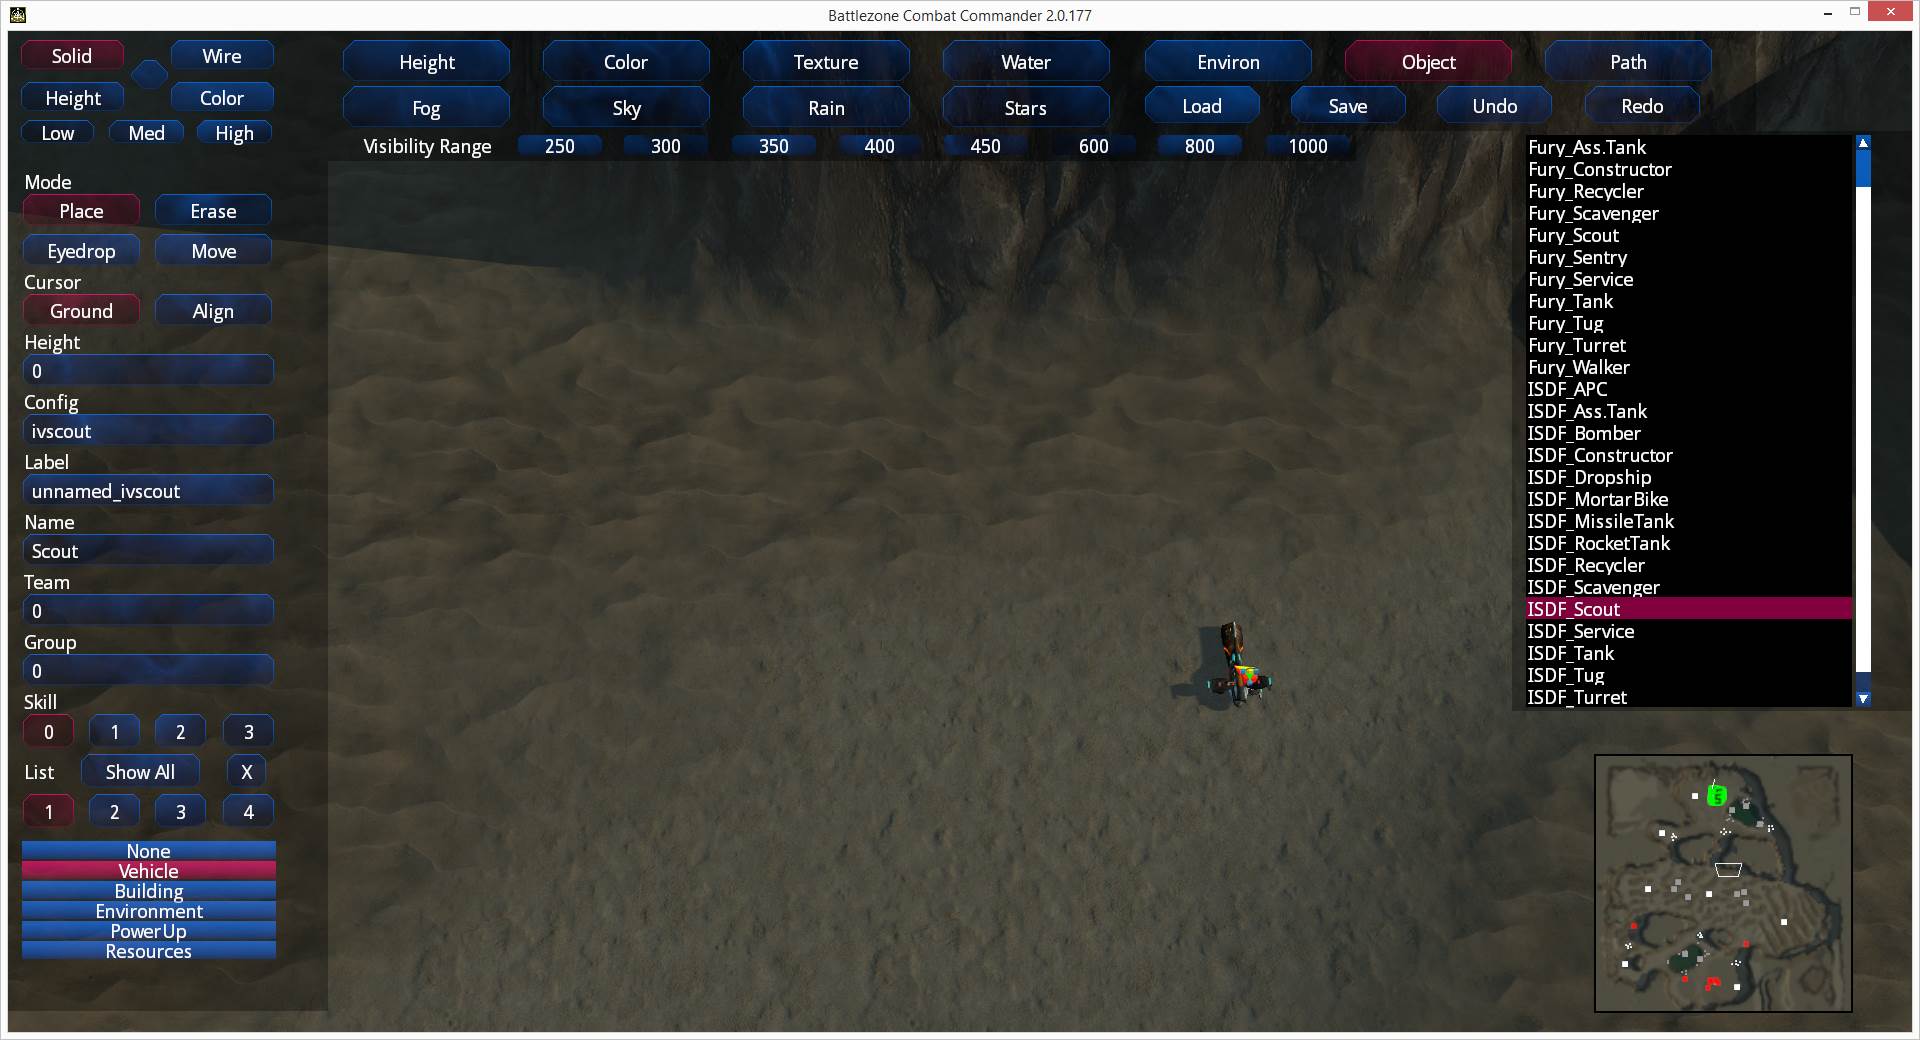
Select the [Object] tab.
Click on the [Vehicle] button.
Select “ISDF Scout” from the pick list. Use the middle mouse wheel to scroll.
You can now place the standard ISDF Scout vehicle on the map.
If you left click on the minimap you can move to the location on the map where the player object is located.
If you now left click in the main map area you can place ISDF Scout vehicles close to your position.
Exit the game editor by pressing [CTRL][E] or by pressing [ESC] twice.
You should now see a number of ISDF Scout vehicles in the game.
Press [ESC] to access the game options menu. Select “Restart” to restart the mission.
Access the editor and select the [Object] tab.
This time, in the [Config] field, enter “ivscout” and press [Enter]
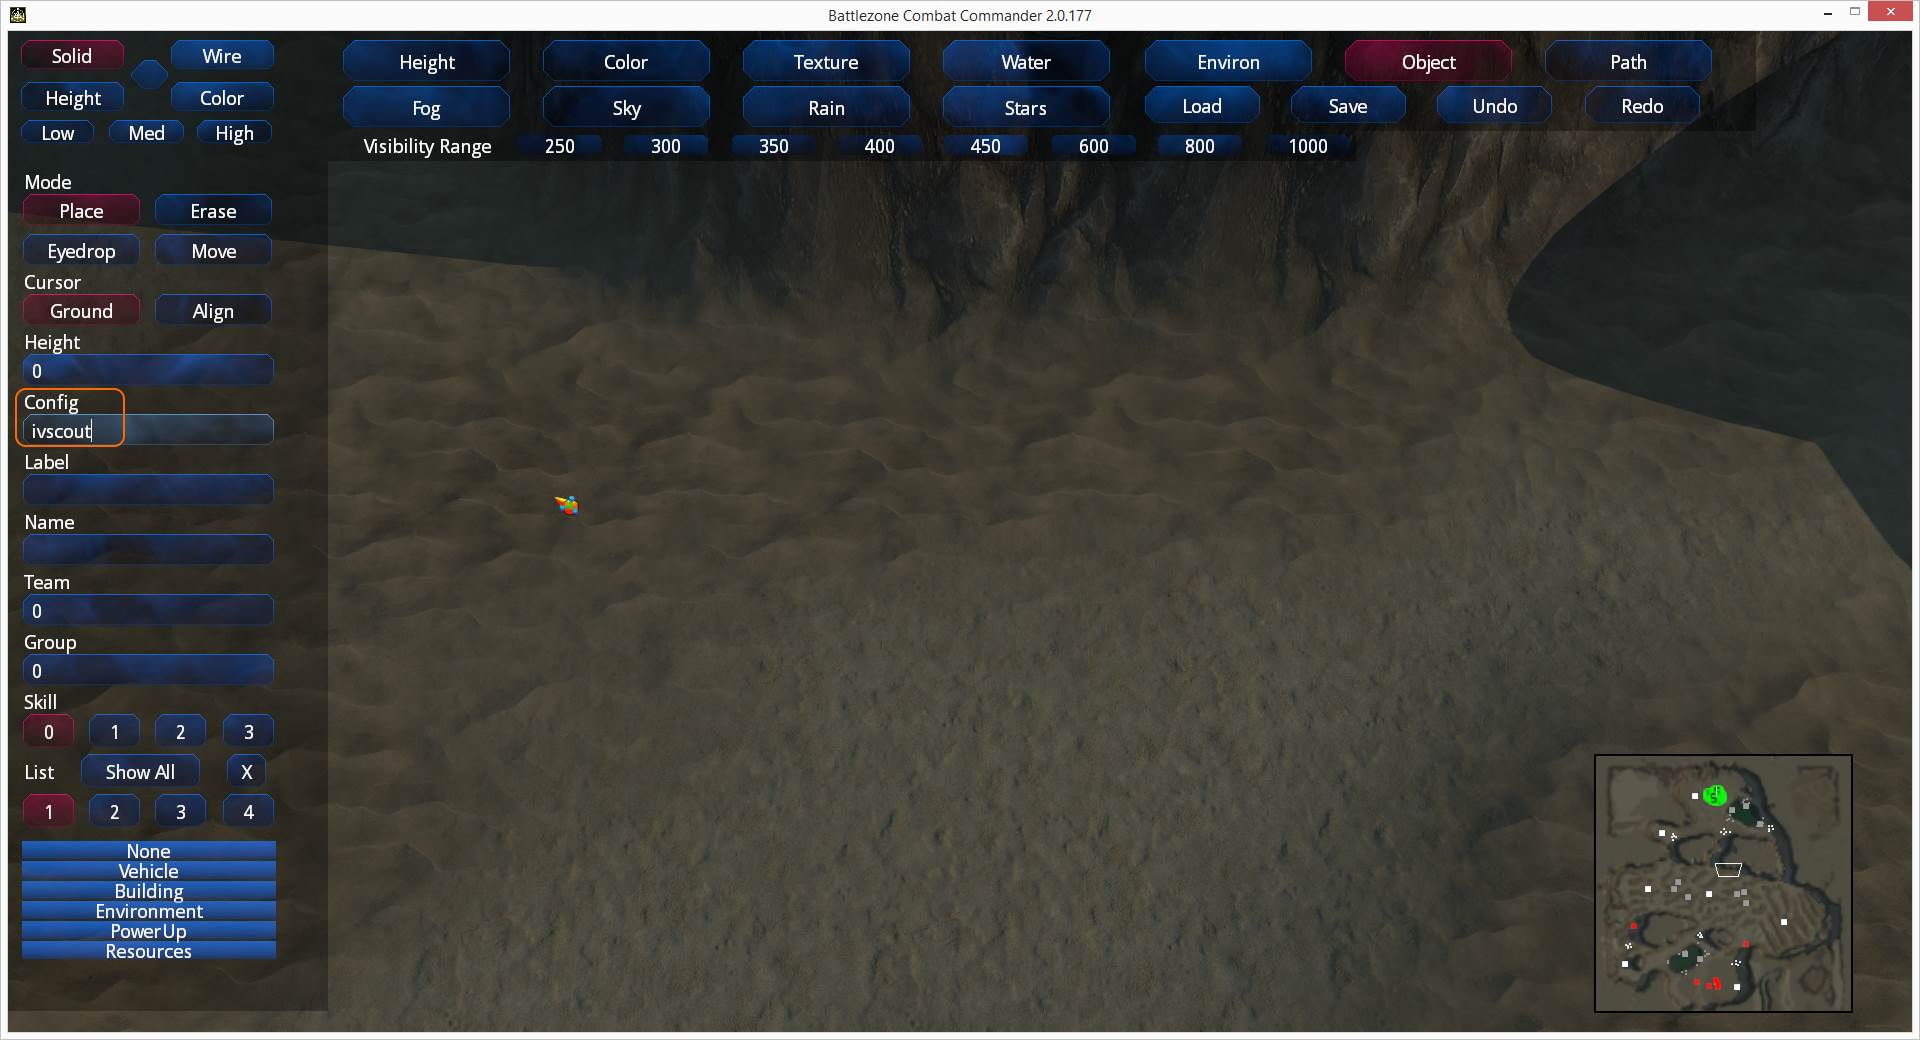
This is a quick way to load custom objects from the database as the pick list by default only displays standard assets.
Press [ESC] to access the game options menu. Select “Restart” to restart the mission.
Access the editor and select the [Object] tab.
This time, in the [Config] field, enter “ivscout_zzz” and press [Enter]
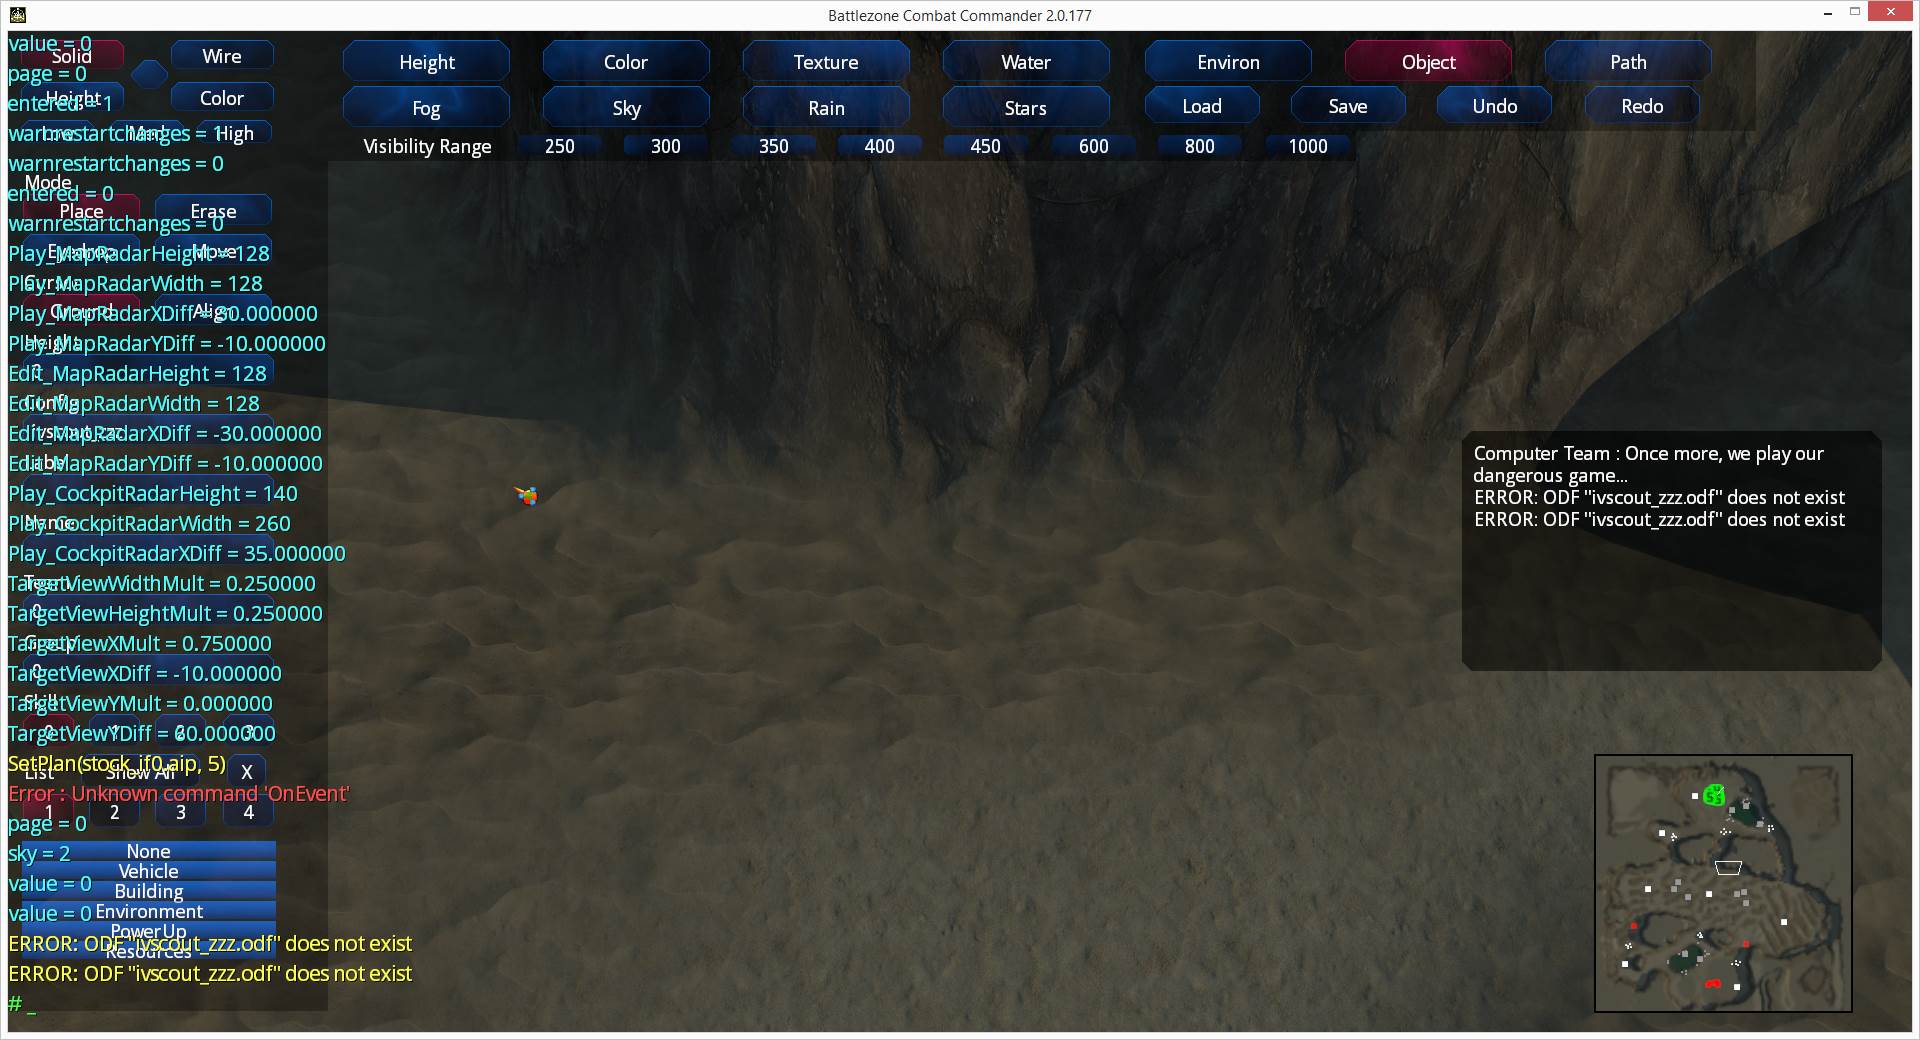
Note the following warning on screen and in the console:
ERROR: ODF "ivscout_zzz.odf" does not exist
Let’s try and load our custom model next.
Press [ESC] to access the game options menu. Select “Restart” to restart the mission.
Access the editor and select the [Object] tab.
In the [Config] field, enter “ivronin” and press [Enter]
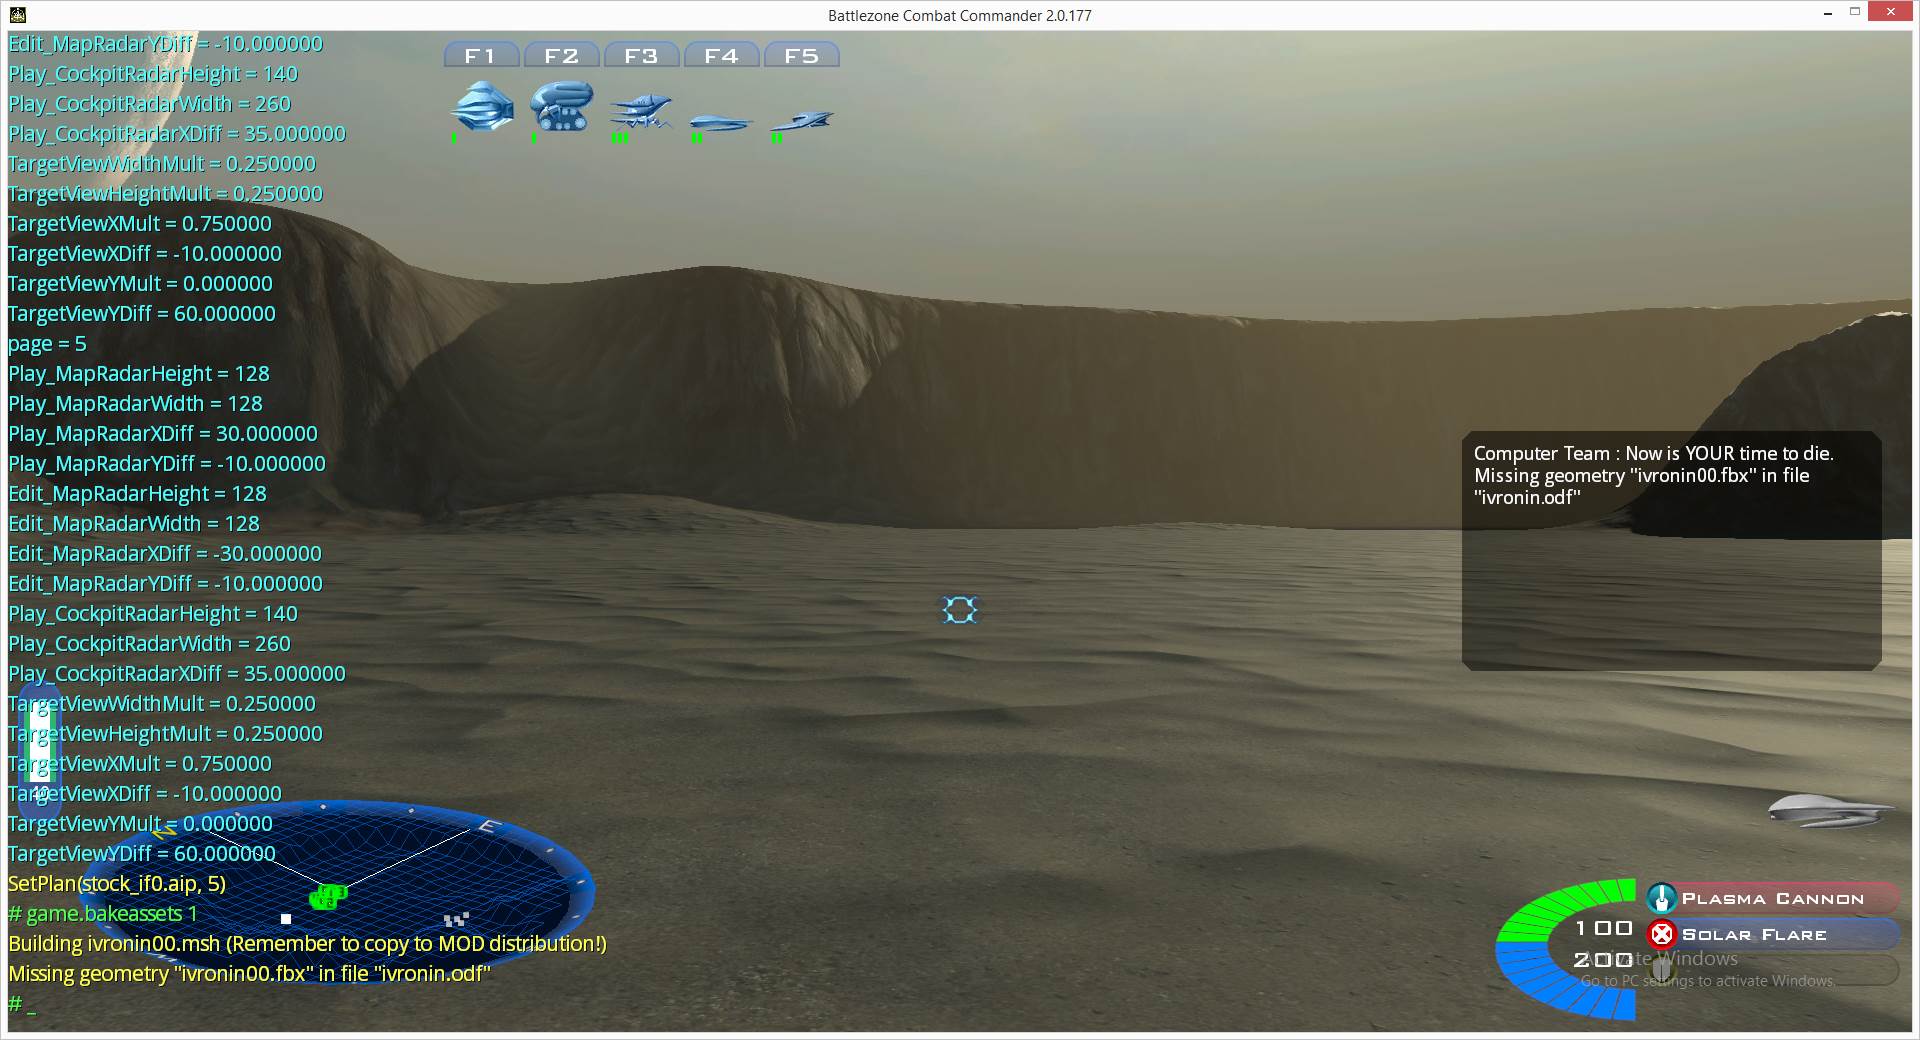
Note the following message appears in the console:
Building ivronin00.msh (Remember to copy to MOD distribution!)
By manually placing a new model in the map/mission, a game asset baking operation is triggered.
Note the following warning message appeas in the console and on-screen:
Missing geometry "ivronin00.fbx" in file "ivronin.odf"
This indicates the [.fbx] geometry file referenced inside the [.odf] file is not present.
Baking Assets
Instead of inserting a game object in the game editor to trigger the asset baking operation, we can also instruct the game to scan for all [.odf] files and bake all game assets in one go.
To initiate the asset baking process enter the following command:
game.bakeassets 1
Note again the following warning message in the console and on-screen:
Missing geometry "ivronin00.fbx" in file "ivronin.odf"
[!] Adding new files requires a reload of the game. Changes to files just need a restart of the mission.
You cannot run “game.bakeassets 1” a second time. You at least need to restart the mission.
“game.bakeassets 1” will parse the first directory listed in your active config (“addon” in all sensible configurations).
“game.bakeassets” or “gamebakeassets 0” will run over all assets in all paths and could take a very long time to complete.
“game bakeassets 2” will look at the top 2 directories, “game bakeassets 3” will look at the op 3 directories, etc.
How the baking process works
- Scan for [.odf] files.
- Scan for [.fbx] references in [.odf] files.
- Scan mesh data, animation data and materials / texture image files.
- For [.fbx] files listed under “geometryName”:
Only diffuse channel is used.
Only [.tga] (and [.png]) image files are supported.
Only file names are used; file paths are ignored. - For [.fbx] files listed under “animFile”:
Ignore textures.
Just grab animation mesh data. - Generate [.msh] file containing mesh data or [.msha] file containing animation data.
- If the diffuse texture image file was a [.tga] file, scan for a matching [.tga] or [.dds] file.
If a [.tga] file is found, generate a [.dds] file. - If the diffuse texture image file was a [.png] file, scan for a matching [.png] file.
- Scan for additional texture images with _c, _e, _n, _s file name suffix.
Again, if a [.tga] file is found, generate a [.dds] file. - Generate [.material] file containing all [.dds] or [.png] texture image files found.
Example of a [.material] file:
diffuse = 0.666667 0.666667 0.666667 1.000000
specular = 0.901961 0.901961 0.901961 1.000000
specularPower = 32.000000
emissive = 0.000000 0.000000 0.000000 1.000000
ambient = 0.666667 0.666667 0.666667 1.000000

[texture]
diffuse = ivscou00.dds
teamColor = ivscou00_c.dds
emissive = ivscou00_e.dds
normal = ivscou00_n.dds
specular = ivscou00_s.dds
So let’s place a source asset file [.fbx] and textures [.tga] from the 3D asset bundle in our “addon” folder.
[*.fbx] + [.tga] / [.png] → [*.msh] + [*.material] + [.dds]
For starters, we will need an [.fbx] file and a number of [.tga] files.
[.fbx]
Take “ivscout00.fbx” from the downloadable 3D asset bundle folder [sourceAssets\ISDF\vehicles\], place it in your addon folder and rename the file to “ivronin00.fbx”.
[.tga]
It is preferred to use [*.tga] files for bitmap textures with alpha channel (RGBA) rather than [*.png]. Targa files have a much simpler internal file structure than feature-rich PNG image files. It is not uncommon for PNG files to become unusable after editing and saving where as with Targa files this is less likely to occur.
You can use XnView to view and convert a file to [.tga] using a right mouse button menu in Windows file explorer. You can use Paint.NET, Photoshop or Gimp to edit [.tga] files.
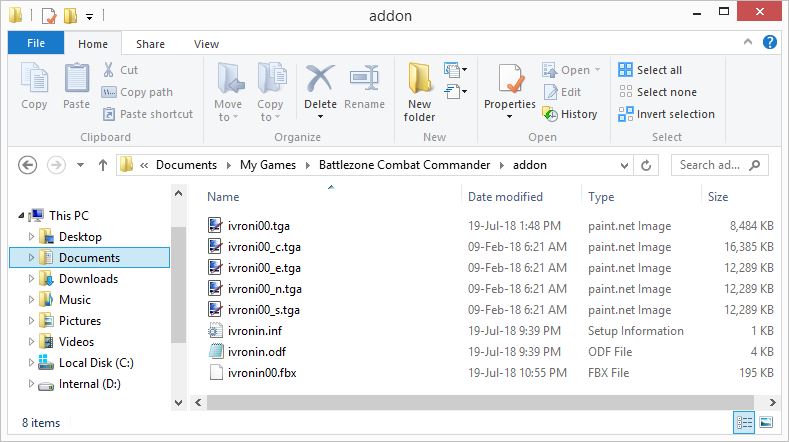
Take a copy of the following textures from the downloadable 3D asset bundle folder [sourceAssets\ISDF\vehicles\textures\], place them in your addon folder and rename accordingly.
ivscou00.tga → ivroni00.tga
ivscou00_c.tga → ivroni00_c.tga
ivscou00_e.tga → ivroni00_e.tga
ivscou00_n.tga → ivroni00_n.tga
ivscou00_s.tga → ivroni00_s.tga
Use Paint.NET to make some simple changes to the [ivroni00.tga] diffuse texture, like changing hue/saturation for example.
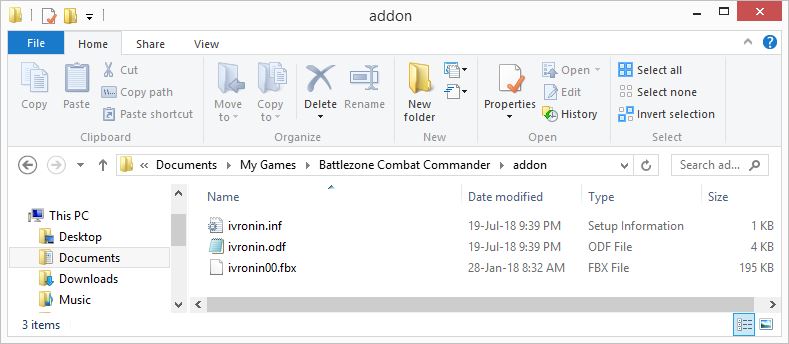
You should now have the following files in your “addon” folder:
Open [ivronin00.fbx] using Notepad++. Search for “tga”. There are multiple references to texture bitmap files that need to be updated to match the new file names:
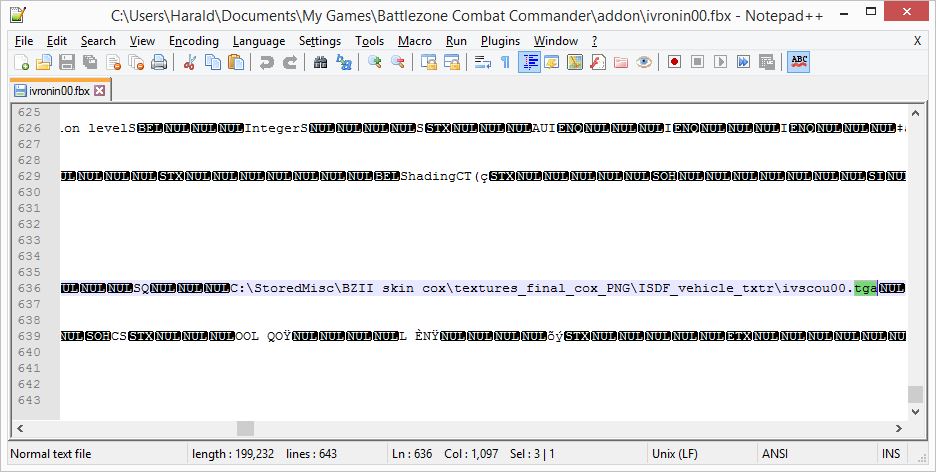
We have to make multiple edits in the file. Using find-and-replace-all we can quickly replace all occurrances in the file:

Don’t forget to save the file before closing Notepad++
Baking
Launch Battlezone Combat Commander.
Select Instant Action.
Choose a map (Alien Dunes) and click on the launch button.
Open the console using [CTRL][~].
game.bakeassets 1
[!] The bake operation is successful without further warnings.
If we now have a look in “…\My Documents\My Games\Battlezone Combat Commander\data\binData\” you will see the following automatically generated files have appeared:
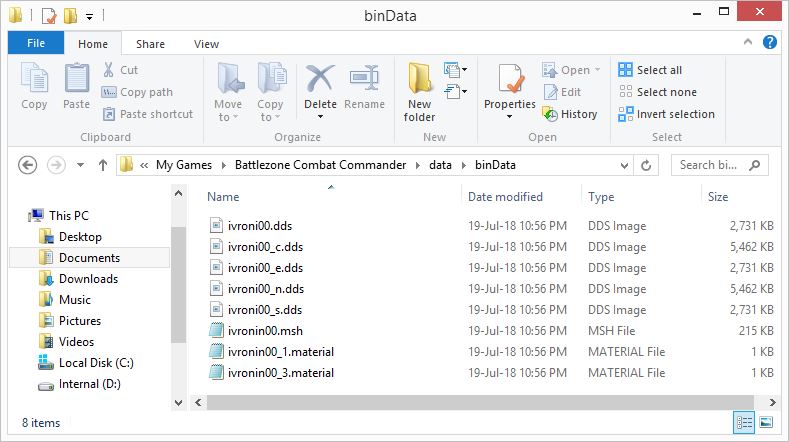
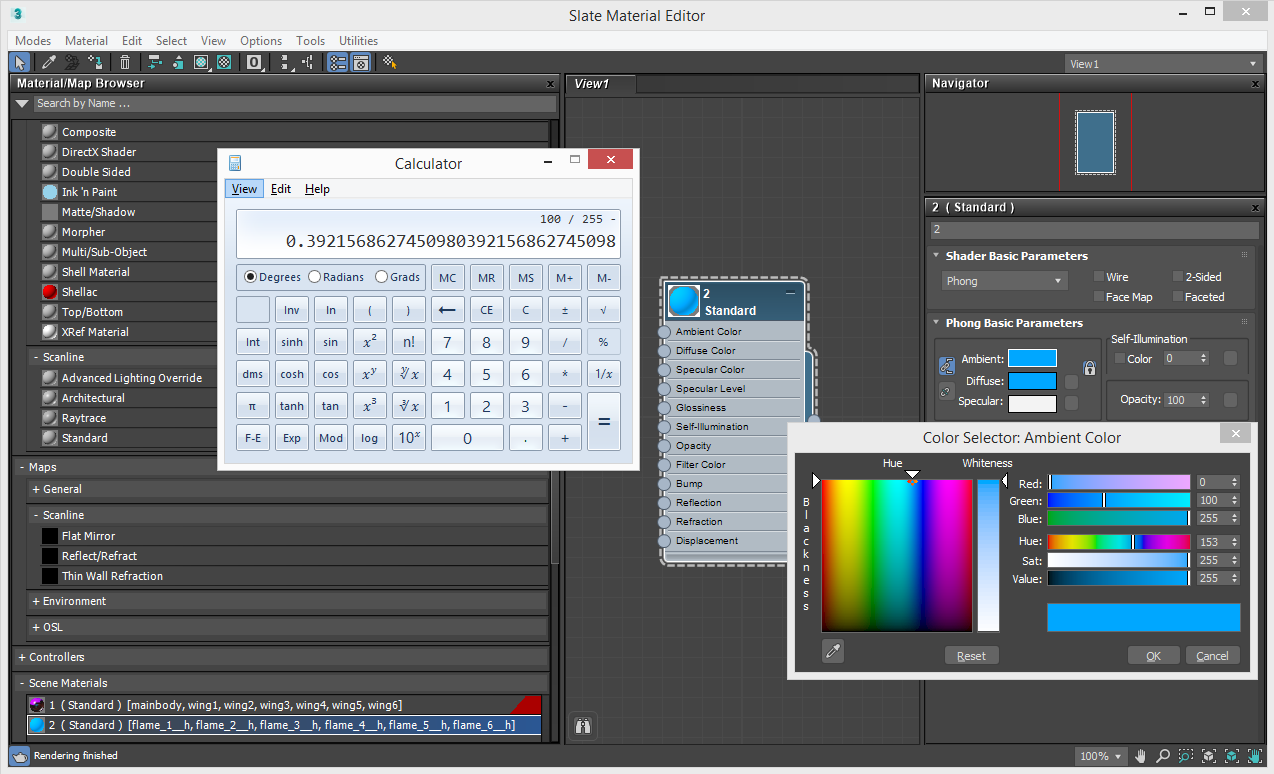
[ivronin00.msh] contains mesh, animation and references to material files.
[ivronin00_1.material] is the main multi-texture material applied to various parts of the model.
[solid]
diffuse = 0.666667 0.666667 0.666667 1.000000
specular = 0.901961 0.901961 0.901961 1.000000
specularPower = 32.000000
emissive = 0.000000 0.000000 0.000000 1.000000
ambient = 0.666667 0.666667 0.666667 1.000000

[texture]
diffuse = ivroni00.dds
teamColor = ivroni00_c.dds
emissive = ivroni00_e.dds
normal = ivroni00_n.dds
specular = ivroni00_s.dds
[ivscout00_custom_3.material] is the material applied to the engine ‘flame’ of the model.
[solid]
diffuse = 0.000000 0.392157 1.000000 1.000000
specular = 0.498039 0.454902 0.407843 1.000000
specularPower = 97.005821
emissive = 0.000000 0.000000 0.000000 1.000000
ambient = 0.000000 0.392157 1.000000 1.000000
Result
Launch Battlezone Combat Commander.
Select Instant Action.
Choose a map (Alien Dunes) and click on the launch button.
Open the console using [CTRL][~].
Let’s enable the game editor.
game.cheat bzeditor
Press [CTRL][~] to exit the console and return to the game.
Open the game editor using [CTRL][E].
Select the [Object] tab.
In the [Config] field, enter “ivronin” and press [Enter]
If you left click on the minimap you can move to the location on the map where the player object is located.
If you now left click in the main map area you can place ISDF Scout vehicles close to your position.
Press [CTRL][E] to exit the game editor.
Important
When editing a [.fbx] file quick and dirty this way, you have to keep the total number of characters in the file the same. If you add additional characters the file becomes unusable.
So if for example we want to use “ivronin00.tga” instead of “ivroni00.tga” we could have removed 1 character from the file path and added 1 character to the file name to make room for the additional letter.
Note also that your [.tga] textures need to be present and have matching names when baking assets for the [.material] file to list them properly. If your [.material] file does not contain a [textures] section, or only lists a single texture, you probably forgot to rename your texture image files.
The proper way to edit texture file references in an [.fbx] file is by importing and exporting using 3dsMax (or Blender).
As the [.fbx] file format is owned by Autodesk and Blender is a competitive product to Autodesk 3dsMax / Maya, compatibility between [.fbx] files and Blender is far from optimal. Noesis can be used to tweak files before importing / exporting in Blender, but 3dsmax unfortunately offers better compatibility with [.fbx] files.
Autodesk 3dsmax
So instead of using Notepad++ to edit FBX files, let’s have a look at 3D source asset bundle [ivscout00.fbx] using Autodesk 3dsmax (2019).
When importing FBX files, don’t just drag the file onto the 3dsmax grid and select “Import” as this will skip the [.fbx] import dialog window. Always use [File][Import][Import…].
3dsMax FBX import – Units and scaling
Open 3dsmax and select [Customize][Units Setup…]
You might think from looking at the screenshot below 3dsmax is configured for Meters, but you are wrong!
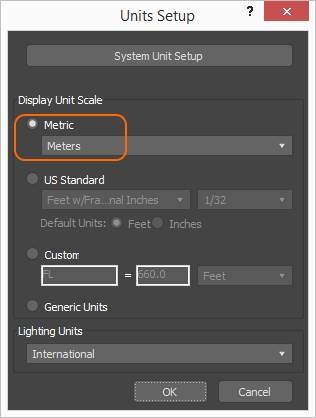
What you see in the above image is just the “display unit scale”. This controls the descriptive labels in dialog windows, but does not affect the coordinate system at all.
I prefer to simply use “Generic Units” where 1 unit is just 1 unit and has no “meaning”.
To change the System Unit Setup, you have to actually click on what is actually a button to find the ‘hidden menu’.
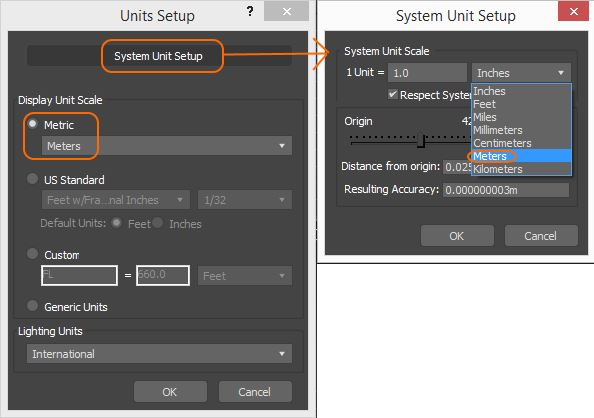
You can now select Inches or Meters – simply use whatever you are most familiar with or whatever units your game’s FBX files use. BZCC uses 1 unit = 1 meter, so I use this to avoid any accidental unit conversion scaling:
Display Unit scale: Generic Units
System Unit scale: Meters
Here’s what happens if you live in the United States and use “System Unit Scale: Inches“:
When importing a stock FBX file note the following settings:

“File Axis Direction: Z-up” means the Z axis is the ‘up’ direction in the saved data in the file. This is important.
“File Units: Meters” means all data saved in the files uses a scale where 1 measurement unit is a meter. This is important.
“System Units” and “System Axis Direction” relate to your copy of 3dsmax.
If we look at the Advanced Options section it appears the objects in the file will be automatically scaled down by 39.37% as in the file “1 unit = 1 meter” but on your copy of 3dsmax “1 unit = 1 inch”.
You can override this process like so:
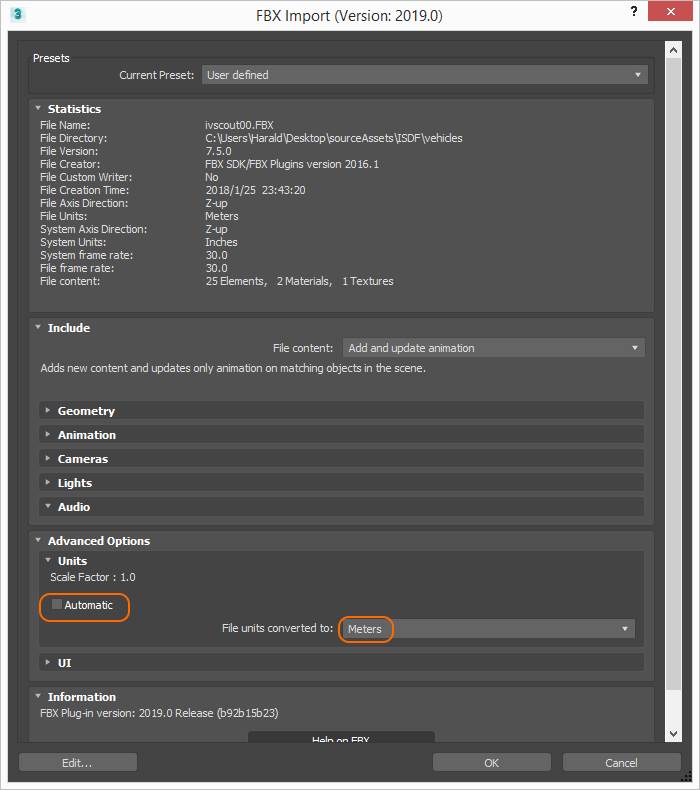
Note how the scale factor changes to 1.0. This means the model will be imported without any accidental scaling.
When we export our scene to FBX we may have to do the same and save units converted to Meters.

If your System Unit Setup was set to “Meters”, for modding BZCC files you could simply leave the ‘Automatic’ tickbox enabled and import / export files with your eyes closed…
Golden rules:
#1 Set the Display Unit Scale to Generic Units. This will save you a lot of headache.
#2 Configure System Units in 3dsMax to whatever you would use in most of your projects ie. Inches or Meters. If you will be doing a lot of BZCC modding, ‘Meters’ is recommended.
#3 When importing an FBX file always make sure the Scale Factor is 1.0 to avoid scaling of objects.
#4 When exporting, make sure to convert scene units to Meters. Ignore the Scale Factor.
3dsmax bitmap image texture file paths
Developers often store textures in a single folder structure. Like a library of texture image files. You can add texture library file paths in 3dsmax.
When opening a foreign 3dsmax scene (or importing a foreign FBX file), path names in the file often result in “missing texture” warnings. Additionally, file paths can be stored as absolute paths or relative paths. This behavior can be changed in 3dsmax preferences.
To resolve “missing texture” warnings, you would need to manually move the texture image file to one of the texture library path locations that 3dsmax scans for when opening files (or to add an additional texture library path).
Irrespective of the texture file path in a 3dsmax scene or FBX file, the program will always look in the current directory for missing texture image files as a last resort. So rather than manipulating texture file paths, you can simply place a needed texture image file in the current directory and re-open the scene or FBX file.
I personally like to remove paths in 3dsMax scenes, archives and FBX files when sharing with others where possible and appropriate. Opening a ZIP 3dsmax archive file and moving all textures into the root of the ZIP file is all that is needed typically.
If you need to edit texture file paths and either change absolute paths to relative paths, or strip the path completely, the following may be useful:
Locate the Utilities tab in the main user interface and press the [More…] button. Select “Bitmap /Photometric Paths” utility from the list.
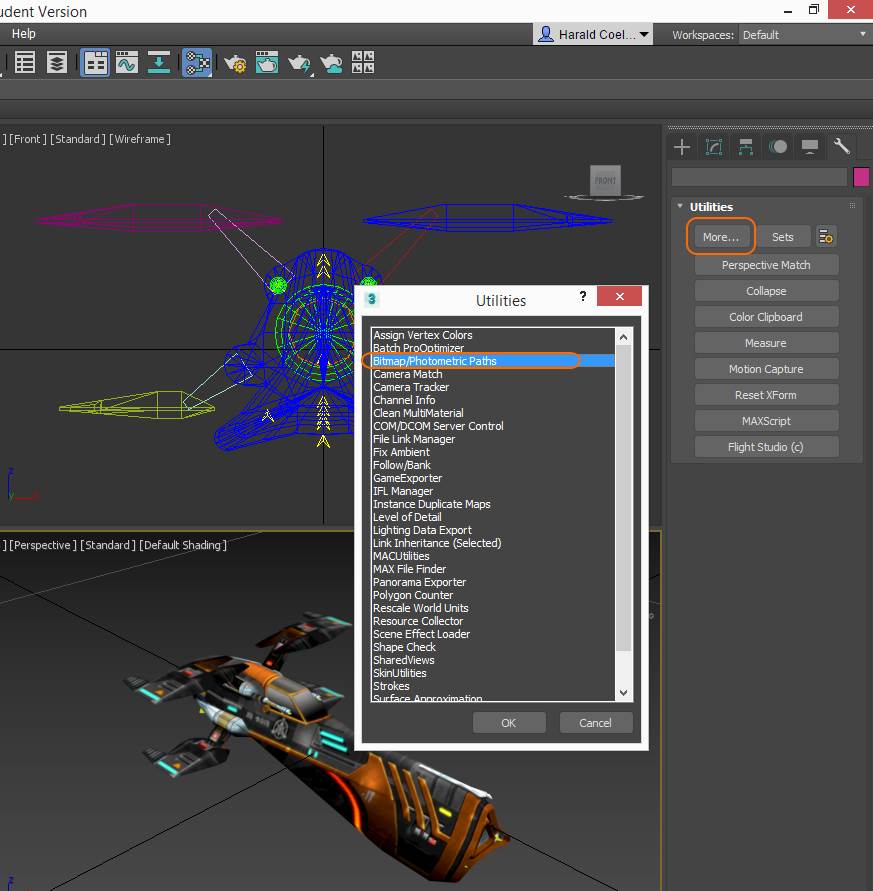
The Path Editor panel will appear. Click [Edit Resources…] to see and edit all texture file paths.
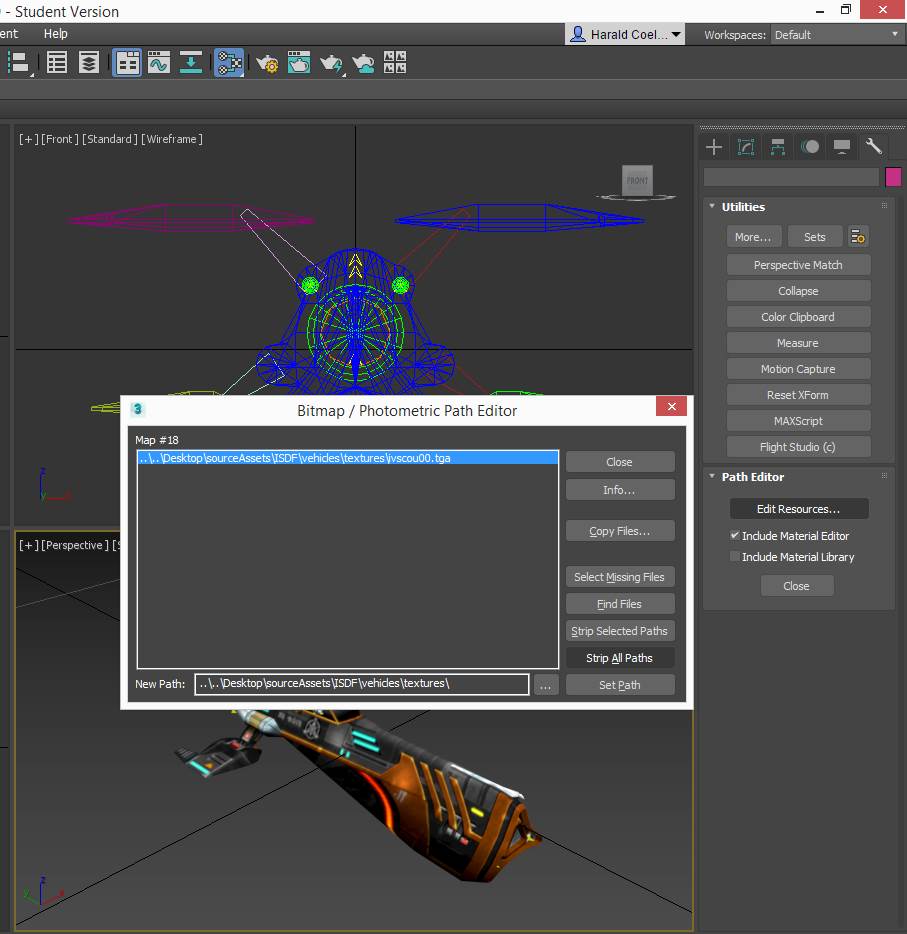
Unfortunately, you can’t change just the file name, so we have to do this the normal way.
Updating material bitmap image file references
Press [M] to open the Material Editor.
Note the “Scene Materials” section:
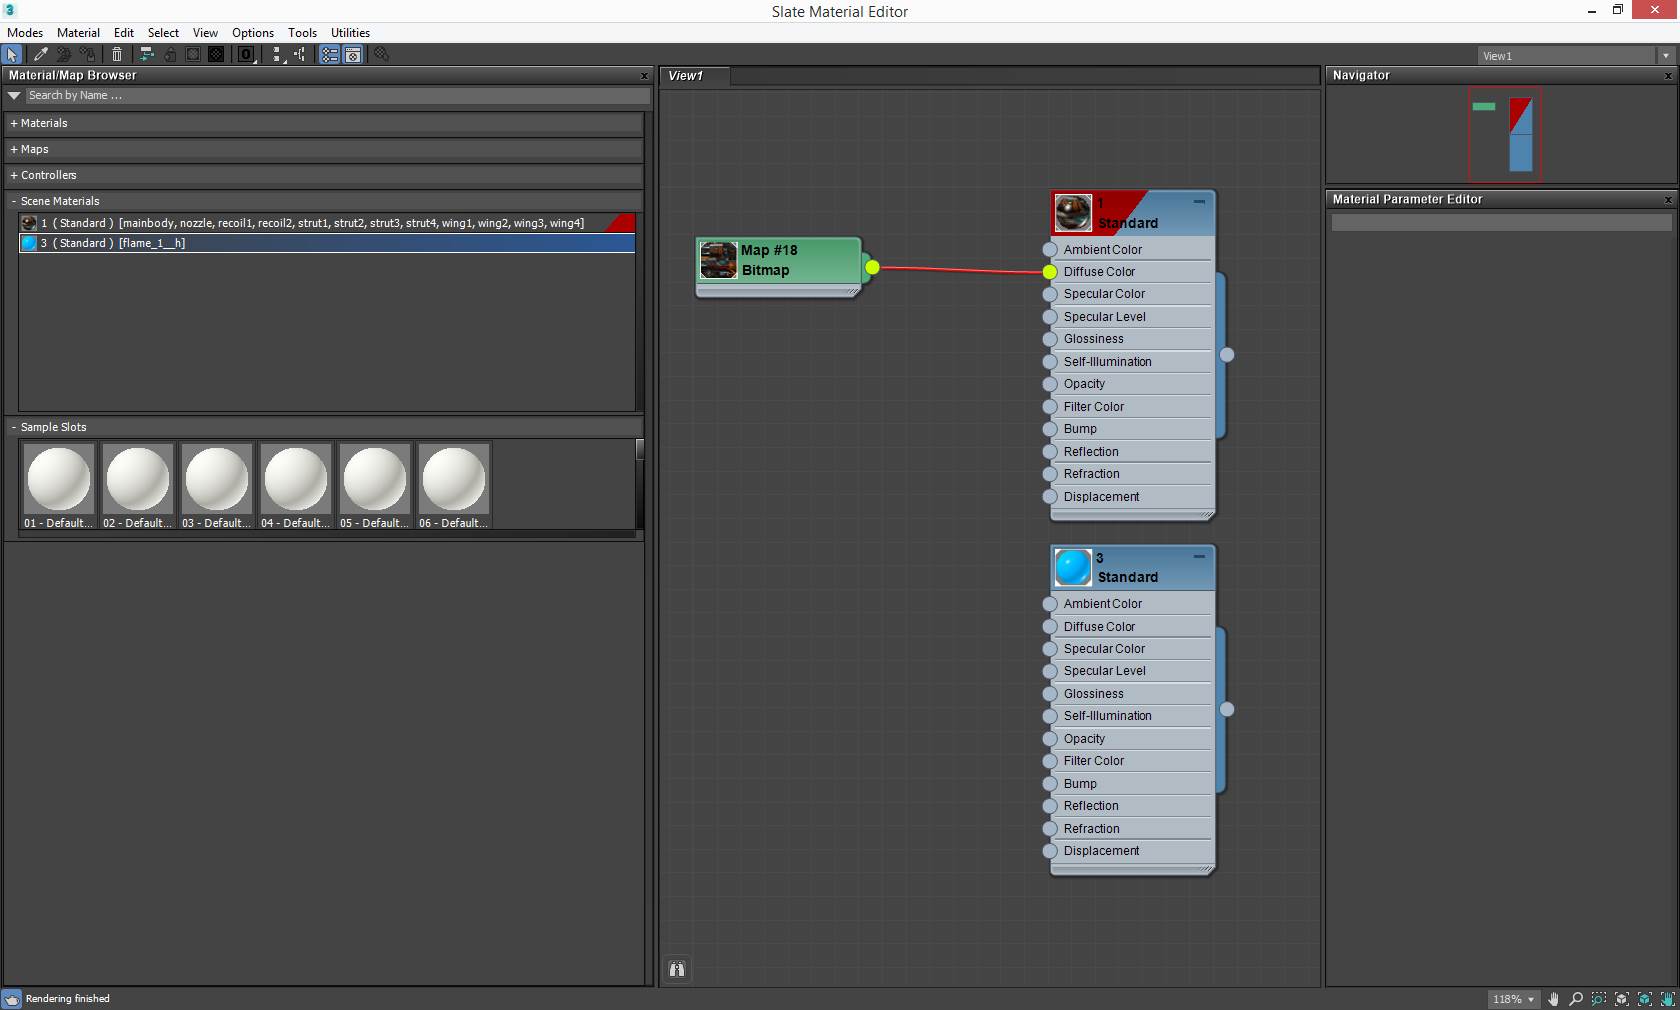
There are two materials:
Material “1” is applied to: “mainbody, nozzle, recoil1-2, strut1-4, wing1-4”.
Material “3” is applied to “flame_1__h”.
Note that the material names “1” and “3” do not correspond with the baked [.material] files we saw earlier when baking assets:
ivscout00_1.material
ivscout00_2.material
The numbers in the material files appear to be auto-generated by the asset baking process.
Note that material “1” has a Bitmap map connected to the diffuse map containing a [.tga] texture image file.
To change the diffuse map texture image file, click on the Bitmap map node and click on the file path to browse to a new image file.
Changing ivroni00.tga to ivronin00.tga
Rename all textures in your “addon” folder as follows:
ivroni00.tga → ivronin00.tga
ivroni00_c.tga → ivronin00_c.tga
ivroni00_e.tga → ivronin00_e.tga
ivroni00_n.tga → ivronin00_n.tga
ivroni00_s.tga → ivronin00_s.tga
Import “ivronin00.fbx” located in your “addon” folder in 3dsmax.
In 3dsMax material editor, click on material “1” in the “Scene Materials” section.
Click on the bitmap node.
Click on the file path and browse to file “ivronin00.tga” to update the image texture file reference.
Export to FBX using scaling factor 1.0. Save and overwrite file “ivronin.fbx” in your “addon” folder”.
We have now successfully changed the texture filename reference in ivronin00.fbx from “ivroni00.tga” to “ivronin00.tga”
Launch the game and bake assets.
If we look at [ivronin00_1.material] file, its contents now correctly reflects the texture image files present:
[solid]
diffuse = 0.666667 0.666667 0.666667 1.000000
specular = 0.901961 0.901961 0.901961 1.000000
specularPower = 32.000000
emissive = 0.000000 0.000000 0.000000 1.000000
ambient = 0.666667 0.666667 0.666667 1.000000

[texture]
diffuse = ivronin00.dds
teamColor = ivronin00_c.dds
emissive = ivronin00_e.dds
normal = ivronin00_n.dds
specular = ivronin00_s.dds
The model can now be loaded in game as before.
You can remove the obsolete [.dds] textures from data\binData that have the old name, or simply empty the folder and re-bake all assets from scratch.
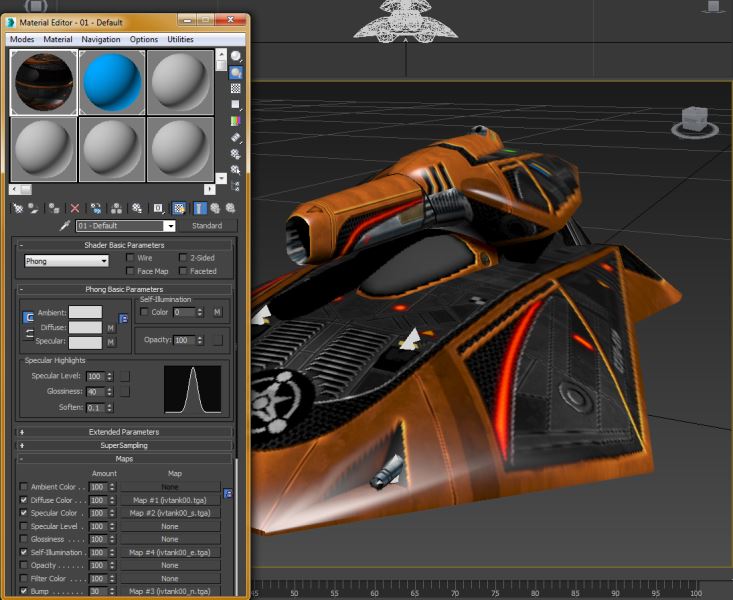
Now that we have a complete model, you can add the additional materials if you like. Just be careful as the stock [.fbx] files from the asset bundle only use the diffuse map channel. Here is an example of an ISDF Tank vehicle [ivtank] with a full material setup:
Animations – forward, neutral, reverse (ivscout)
Open “ivronin.odf” in your “addon” folder:
Make the following changes in bold:
[GameObjectClass]
baseName = "ivronin"
geometryName = "ivronin00.fbx"
cockpitName= "ivscout_cockpit.fbx"
animCount = 3
animName1 = "forward"
animFile1 = "ivscoutsf.fbx" → animFile1 = "ivroninsf.fbx"
animName2 = "neutral"
animFile2 = "ivscoutsn.fbx" → animFile2 = "ivroninsn.fbx"
animName3 = "reverse"
animFile3 = "ivscoutsr.fbx" → animFile2 = "ivroninsr.fbx"
Copy the three [.fbx] files from the 3D asset bundle, place then in your “addon” folder and rename accordingly.
Import “ivroninsf.fbx” in 3dsmax (make sure the Scale Factor is 1.0).
Ignore materials and bitmap texture references as the game baking process only looks at animation data for “animName” references. Remember that the static mesh object including wireframe and materials are generated from “geometryName”. “animName” is only used for its animation keys.
Select Perspective viewport and press [ALT][W] to toggle maximizing of the viewport (or find button in lower right corner).
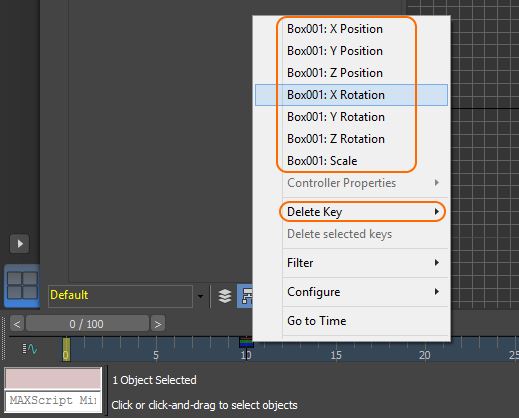
Press [CTRL][A] to select all objects. Note there are 3 animation keyframes in the timeline.
If you click on the various objects in the hierarchy, you will notice the following objects contain animation keyframes:
nozzle
strut1-4
wing 1-4
The animation keyframes look like this:
To test in the game, hop out of your vehicle (H).
Point your reticle to an ISDF scout and press [SPACE] to select it when prompted. In the comms menu, select option 5 “Pick me up”. Walk to the scout to enter the vehicle.
Press [SHIFT][F3] to toggle follow camera mode.
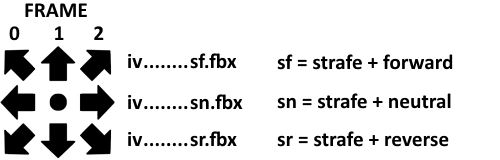
Frame 0 is used for strafing left whilst moving forward using WASD keys on your keyboard.
Frame 1 is used when simply moving forward using WASD keys on your keyboard.
Frame 2 is used for strafing right whilst moving forward using WASD keys on your keyboard.
Basically there a total of 9 animation frames (3×3) organized like this:
Making changes to animations in 3dsmax
Under “Graph Editors” menu, select “Track View – Curve Editor…”.
- To reset the Curve Editor to default settings, in “Editor” menu select “Curve Editor…”
- Horizontal + vertical zoom = [MOUSE SCROLL WHEEL]
- Horizontal zoom = [CTRL] [MOUSE SCROLL WHEEL]
- Vertical zoom = [SHIFT] [MOUSE SCROLL WHEEL]
- The double yellow vertical bars indicate the currently active frame in the timeline.
- Use [LEFT MOUSE BUTTON] to pan.
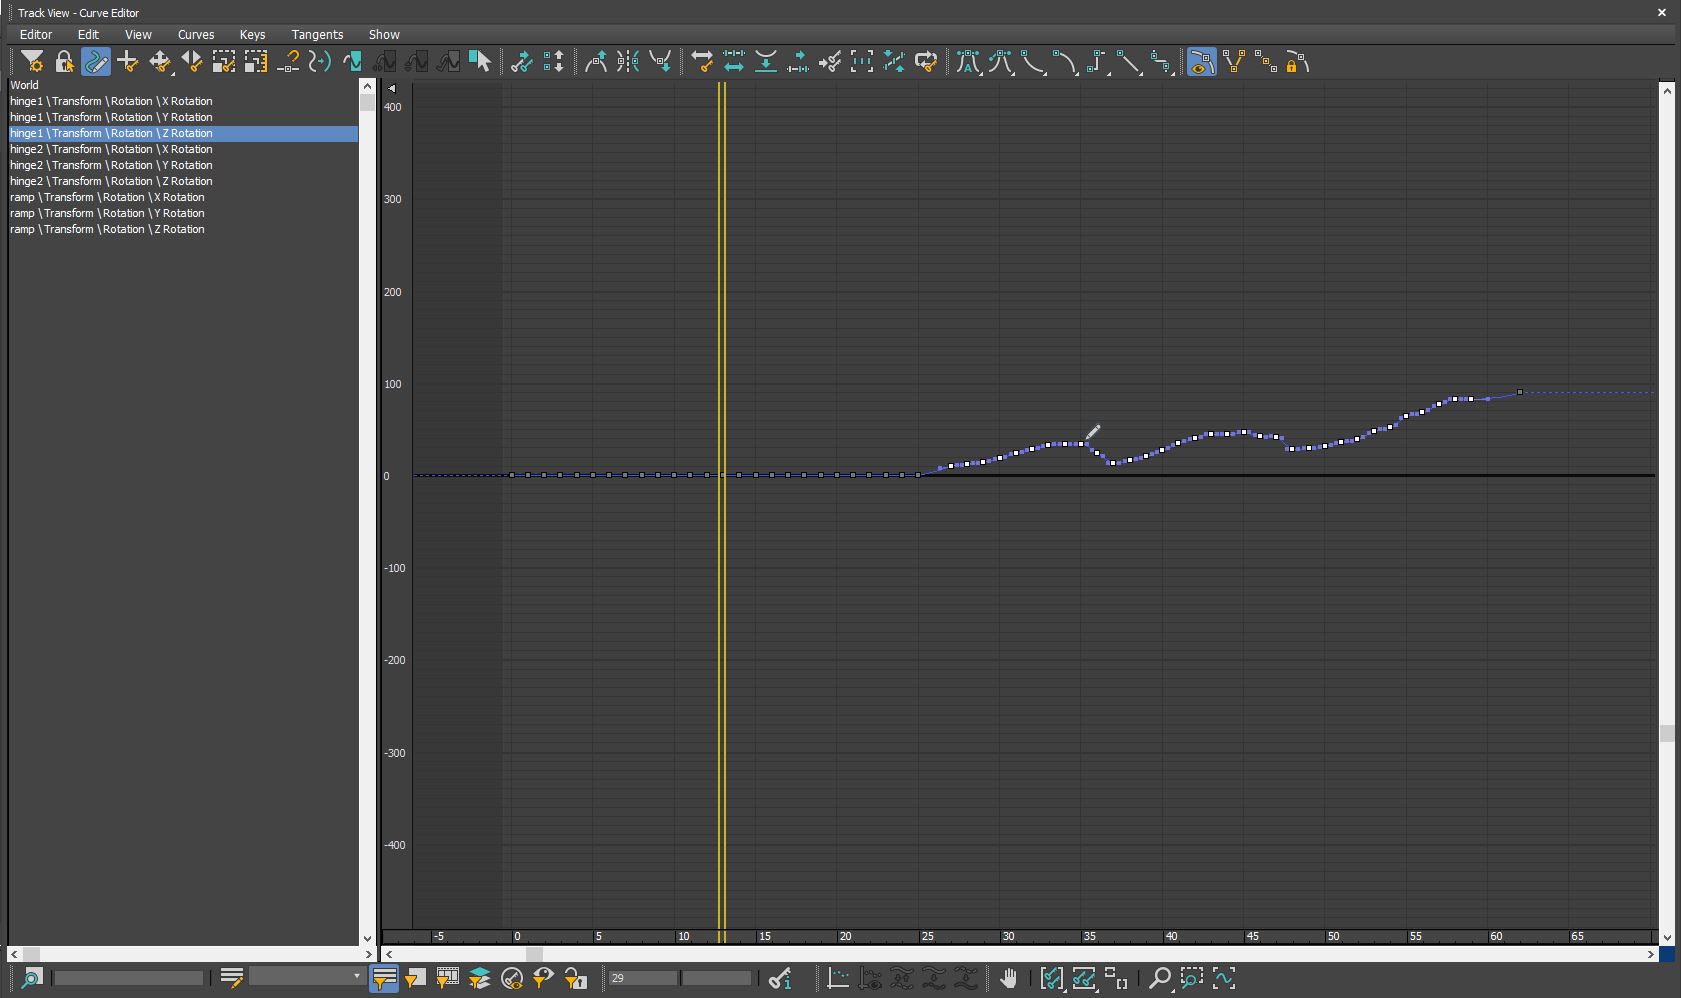
Use [CTRL] [MOUSE SCROLL WHEEL] to zoom in so that only frames 1 to 20 are visible.
Use [SHIFT] [MOUSE SCROLL WHEEL] to change the vertical scale so you can see all animation keys.
You should end up with something like this:
X axis = Red curves
Y axis = Green curves
Z axis = Blue curves.
Most keys represent rotation values round the Y-axis.
You can click on objects in the hierarchy and view the corresponding animation curve.
To reset the Curve Editor to default settings, in “Editor” menu select “Curve Editor…”
The following buttons are also useful:
![]()
If you select objects in the hierarchy + push these buttons in a specific order you should be able to get something like this on the screen.

It is a good idea to move the active frame slider (vertical yellow bars) to a frame you would like to edit. This way, you can see the changes happening in the viewports of the main window at the same time. Having a dual screen monitor setup with the main window and the curve editor side-by-side is recommended.
To make changes you can do any of the following:
#1 Move a key in the curve editor up or down. You will see a wing or strut in the main viewpoint rotate simultaneously.
#2 Rotate the wing or strut in the viewport along the Y-axis. You will see the entire curve in the Curve Editor move up or down (!) To edit a single animation key in the main windows you need to do as follows instead:
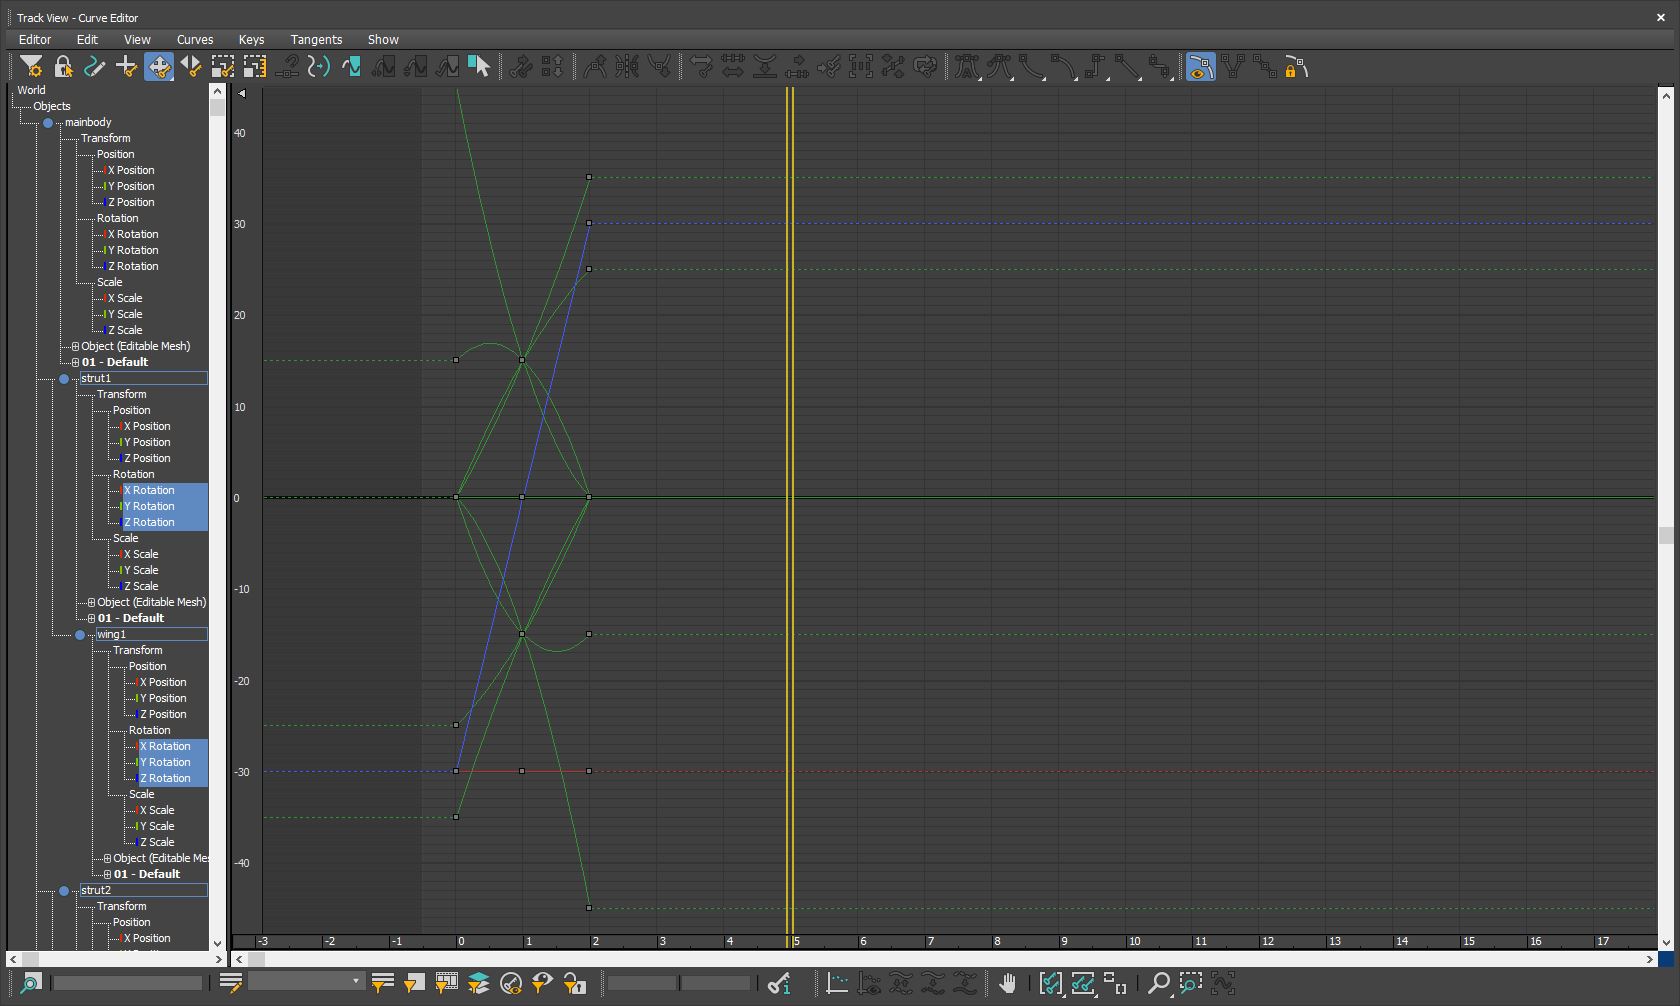
#3 You can right click an animation key in the timeline of the main window and select an animation key like “wing 1: Y rotation” and change its value. If you left mouse click on the small arrows to the right hand side of the Value input field and keep the mouse button pressed whilst moving the mouse up or down you can change the value smoothly without using the keyboard. You will see a single matching key on the corresponding curve in the Curve Editor move up or down simultaneously.
This is the basic idea behind editing keyframes in animations using the Timeline or the Curve Editor.
In this case the animation frames are stand-alone and not part of an animation sequence.
Let’s have a look at a model that uses an animation sequence next and how to edit it.
Animations – open, shake (dropship)
Let’s have a look at ISDF Dropship game assets.
There are a number of dropship game assets in the game folder and 3D source assets game bundle:
ivdrop.inf
ivdrop2.inf

ivdrop2_op.odf
ivdrop2_ld.odf
ivdrop2_fl.odf
ivdrop2_bn.odf
ivdrop2.odf
ivdrop_sh.odf
ivdrop_land.odf
ivdrop_fly.odf
ivdrop.odf

ivdrop00_crash.FBX
ivdrop00_crashsite.FBX
ivdrop00_fly.FBX
ivdrop00_land.FBX
ivdrop00_open.FBX
ivdrop00_shake.FBX
ivdrop00_takeoff.FBX
ivdrop02_bank.FBX
ivdrop02_fly.FBX
ivdrop02_land.FBX
ivdrop02_open.FBX
ivdrop02_takeoff.FBX
Some [.odf] files contain references to [.wav] sound files for specific use. Some [.odf[ files contain engine flame / smoke trails suggesting these models are viewed externally where others do not, suggesting the player object is located inside the game asset (in the cargo container).
[ivdrop.odf]
[GameObjectClass]
classLabel = "i76building"
geometryName = "ivdrop00_open.fbx"
animCount = 2
animName1 = "deploy"
animFile1 = "ivdrop00_open.fbx"
animName2 = "shake"
animFile2 = "ivdrop00_shake.fbx"
scrapCost = 0
scrapValue = 0
maxHealth = 10000
maxAmmo = 0
unitName = "Condor"
heatSignature = 0.8
imageSignature = 8.0
radarSignature = 1.0
ownsTerrain = 0
canDetect = 0
canInteract = 0
canCollide = 0
armorClass = L

[BuildingClass]
soundAmbient = "sdrop01.wav"
This seems to be the dropship game asset used in single player mission 1 “This is not a drill” where you are inside a shaky noisy dropship (in flight) that stops shaking (landing) and then the doors open. [sdrop1.wav] sound file matches with the rumbling engine noise of the dropship.
Let’s open [ivdrop00_open.fbx] in 3dsmax and look at the doors opening animation sequence:

Press [CTRL][A] to select all objects.
Note the animation keyframes appearing in the Timeline. There are 63 frames (0/100 to 62/100).
Under “Graph Editors” menu, select “Track View – Curve Editor…”.
Use [CTRL] [MOUSE SCROLL WHEEL] to zoom in horizontally until frames 0 to 62 fill your screen.
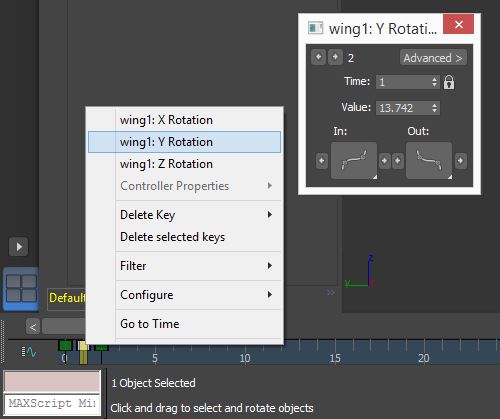
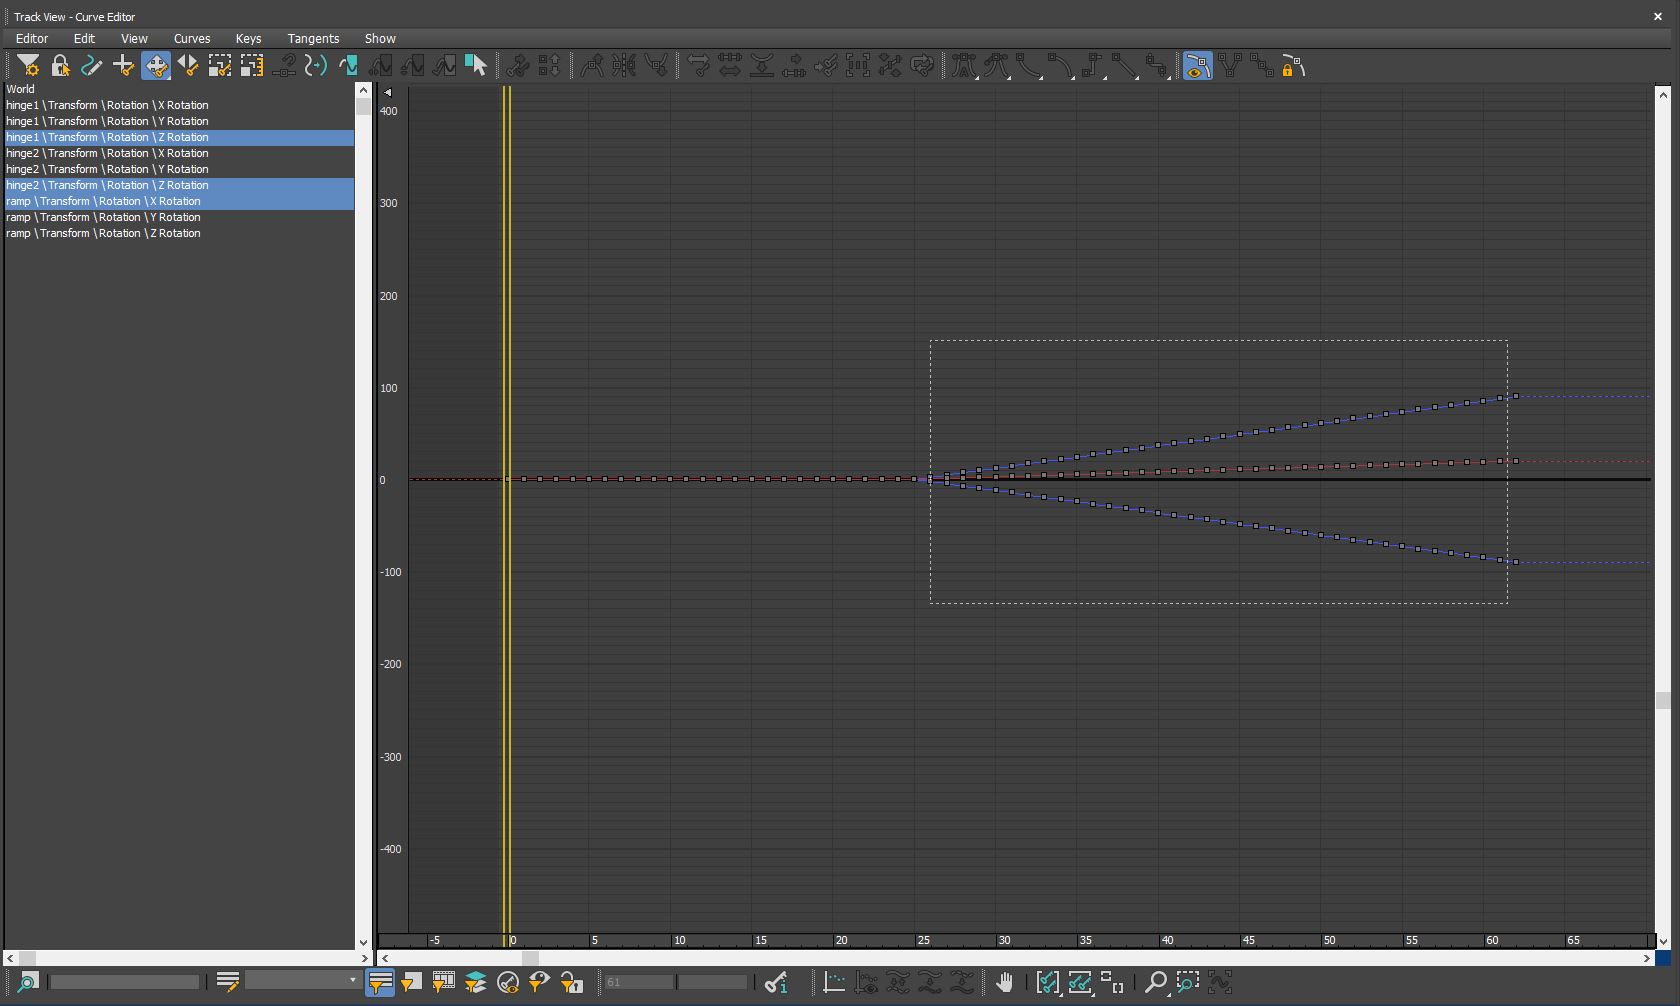
Select objects in the hierarchy window and use the filter buttons to end up with something like this:
![]()
You can click on each of the individual items in the hierarchy to see their animation curves.
Use [SHIFT] [LMB] or [CTRL][LMB] to select multiple objects.
It appears only the [left hinge Z rotation], the [right hinge Z rotation] and the [ramp X rotation] are animated at a constant speed (straight line = no easing).
For an animation sequence to work in older games traditionally every frame needed to be a keyframe. In 3dsmax you would normally only need an animation key at the start and at the end of such a simple animation sequence. BZCC supports this as well. A number of models still contain fully keyframed animations that could be optimized without a problem.
So to edit or recreate the animation, you could do this for example:
Drag a selection box over most of the point in the curve, making sure to leave a point at the start and at the end of the animation in place (= not selected).
With all the inner points highlighted, press [DEL]. You should end up with something like this:
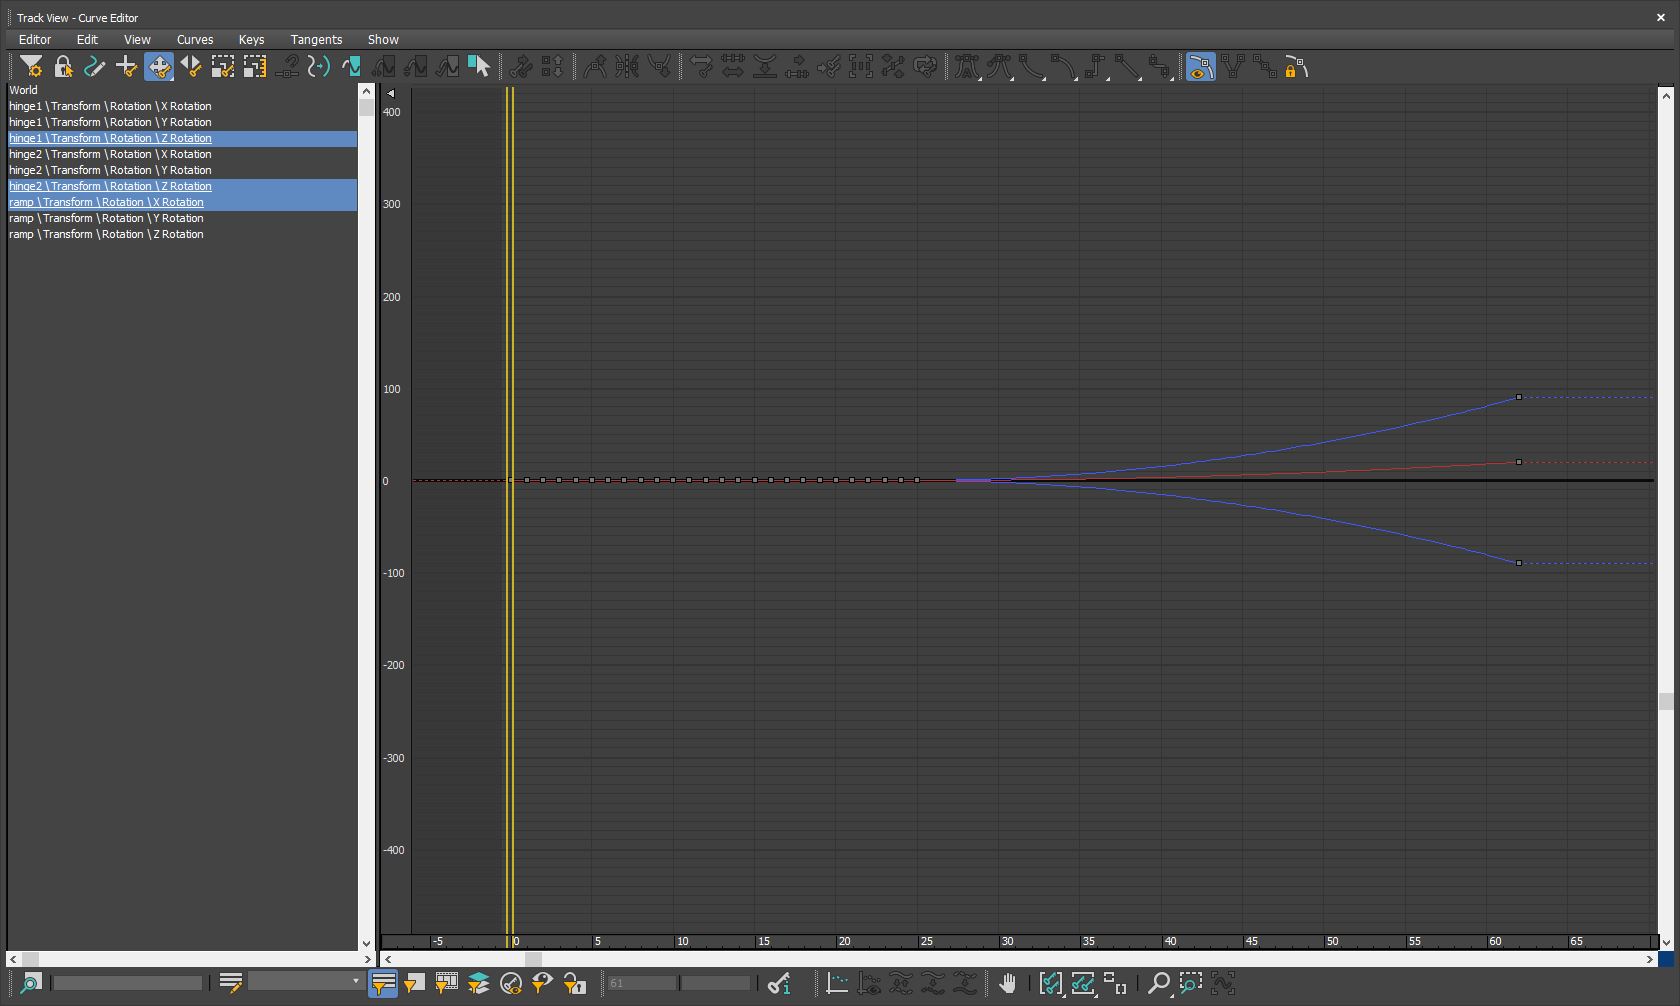
Note that the animation will continue to playback properly.
Select [left hinge Z rotation] in the hierarchy. Only a single curve is visible.
Region-select the start point and end point in the curve.
Start exploring the buttons in the toolbar.
Simply click on each one and press [CTRL][Z] to undo your changes or [CTRL][Y] to re-do your changes. You can press [CTRL][Z] and [CTRL]Y] multiple times if need be.
If toolbar buttons appear unavailable it is probably because you haven’t selected a start point / end point in the curve first for the button to operate on.
![]()
These buttons change the shape of the curve. The shape of the curve affects the value of an animated property over the intermediate frames between two keys. Suppose you have 100 frames + a key at frame 0 with value “0” + a key at frame 100 with value “10”. If the shape of the curve is a straight line, it means at frame 20 the value is probably 2 and at frame 30 the value is probably 3. Depends on the shape of your curve. Straight line = proportional. Stepped = intermediate values are set to zero. Sine wave = value increments slow down near start and finish (easing).
To switch between curve points editing modes (filtering, selecting, drawing, moving, adding, sliding) use the following buttons in the toolbar:
![]()
You can draw curves freehand and then smoothen them. Click on the pencil and simply start drawing.
If you simply want to go back to the original situation for some reason, you could do this::
![]() Draw a random curve between start and end points. This will create the intermediate points needed for each frame.
Draw a random curve between start and end points. This will create the intermediate points needed for each frame.
![]() Switch to point move mode. Click on an empty space to deselect all points. Drag a selection box over the points of the slope as before.
Switch to point move mode. Click on an empty space to deselect all points. Drag a selection box over the points of the slope as before.
![]() Use “Relax keys” button. Keep tapping repeatedly until the curve becomes a straight line.
Use “Relax keys” button. Keep tapping repeatedly until the curve becomes a straight line.
If you have an animation sequence with a start and end point, you should now be able to modify all the keys in between.
You should now also be able to create animation key curves for addional objects as well. You can animate any transformation (= move, rotate, scale) along the X, Y or Z axis.
[ivronin00.fbx]
Let’s continue our work on our [ivronin] game asset.
The goal is to create a custom playable model based on [ivscout] containing unique:
- mesh
- textures
- animations
- sounds
- sfx shaders
We currently have a simple game asset based on [ivscout]. We need to start looking at creating a unique mesh object.
Inspiration
We need a model that meets the following requirements:
ISDF THUNDERBOLT SCOUT

Hardpoints:
- 2 Guns (C)
- 1 Missile (C)
- 1 Special
We will need to add all the hardpoints manually and pay attention to the hierarchy of a [ivscout] game asset:

It helps if the model is:
Low poly
Royalty free license
Uses fixed guns and not use a moveable turret
Hovers so that there are no tracks or wheels to animate
Has a cockpit to fit a person
2048 x 2048 pixels resolution textures
Multiple texture maps: diffuse, specular, normal, etc.
https://www.cgtrader.com/3d-models?author=CGPitbull
https://www.turbosquid.com/Search/Artists/CGPitbull

[!] Important – A royalty free license does not mean you can share a purchased model in its original form.
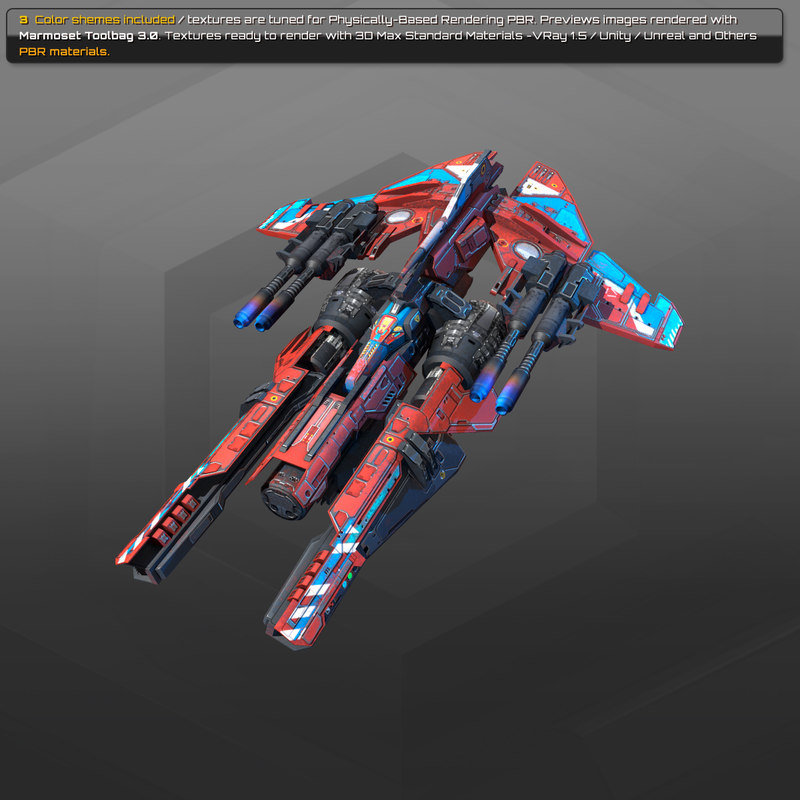
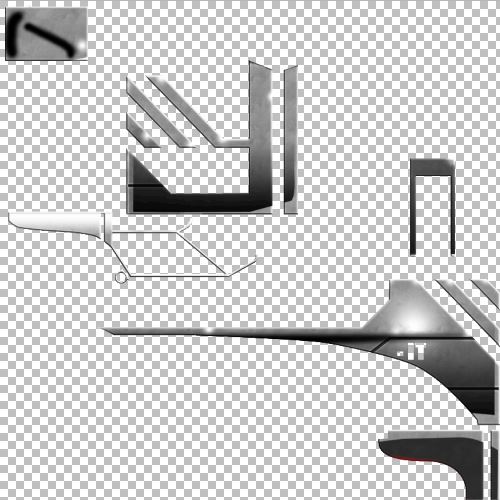
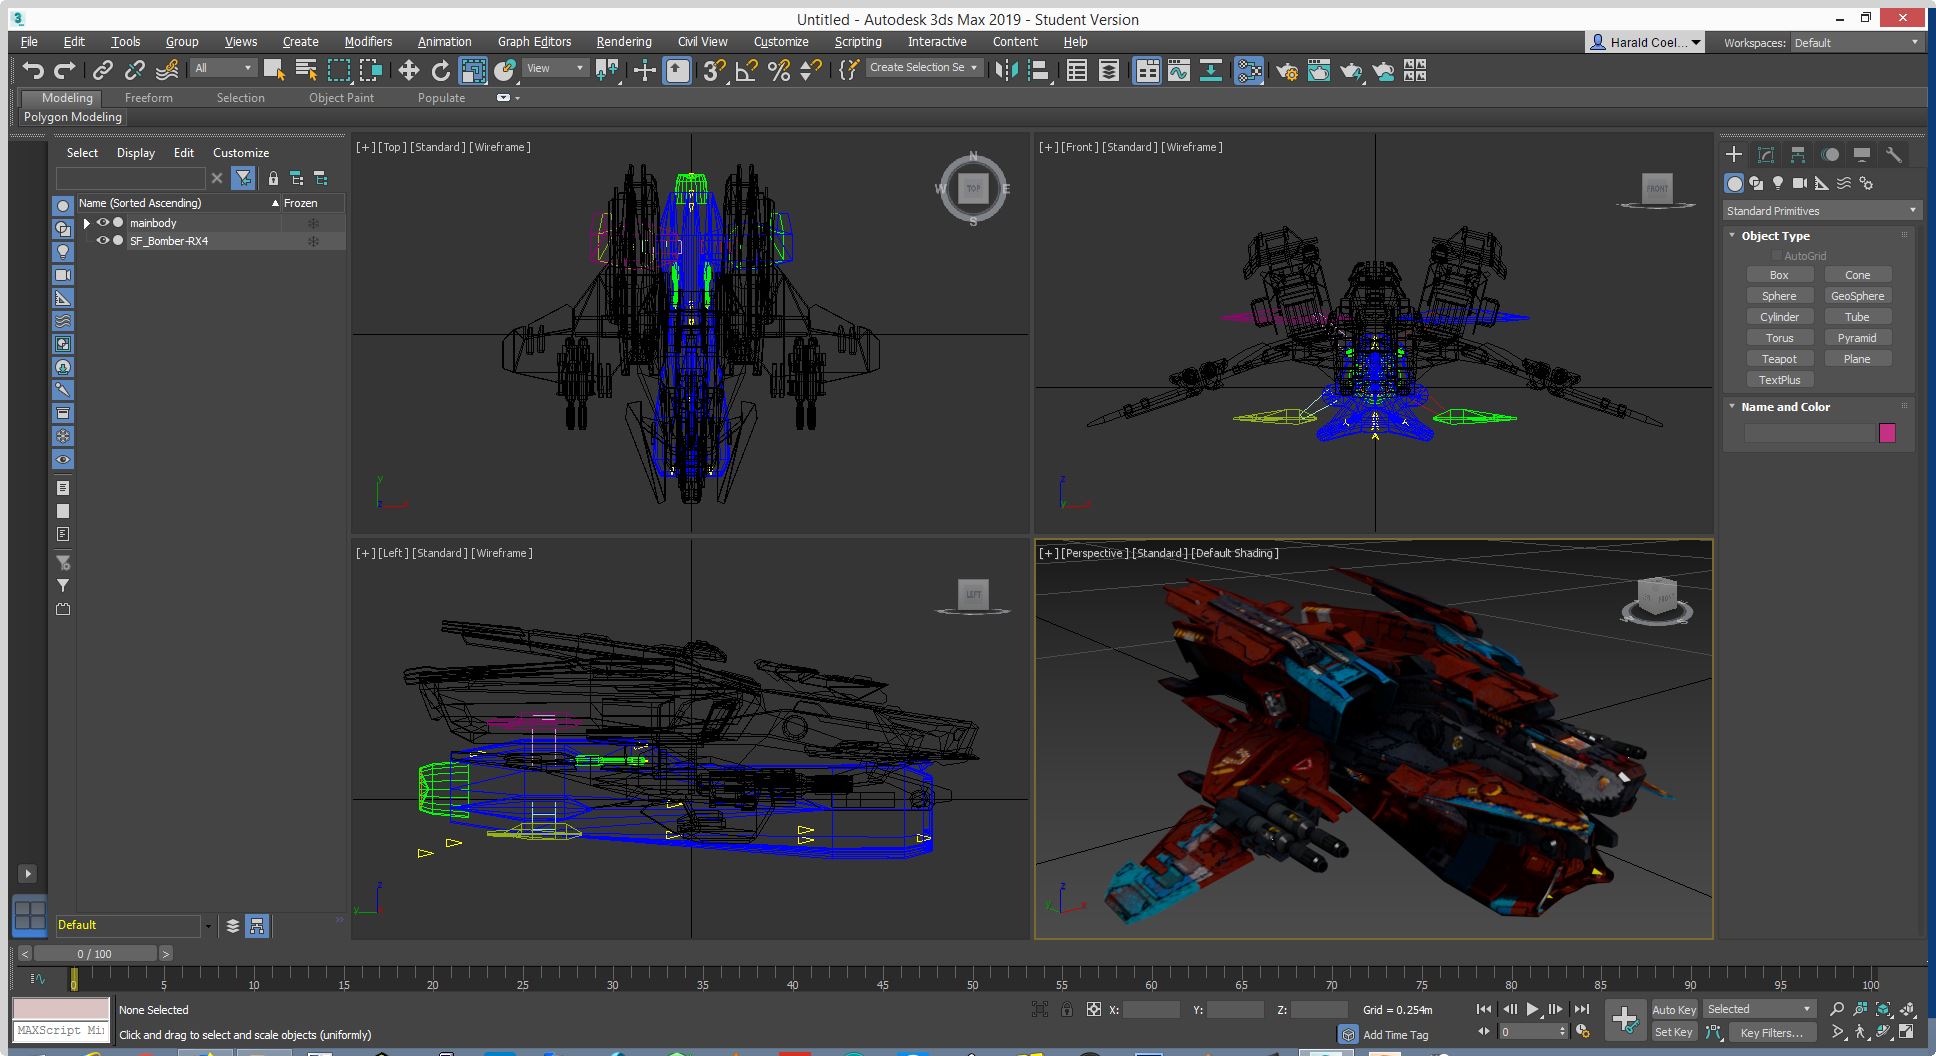
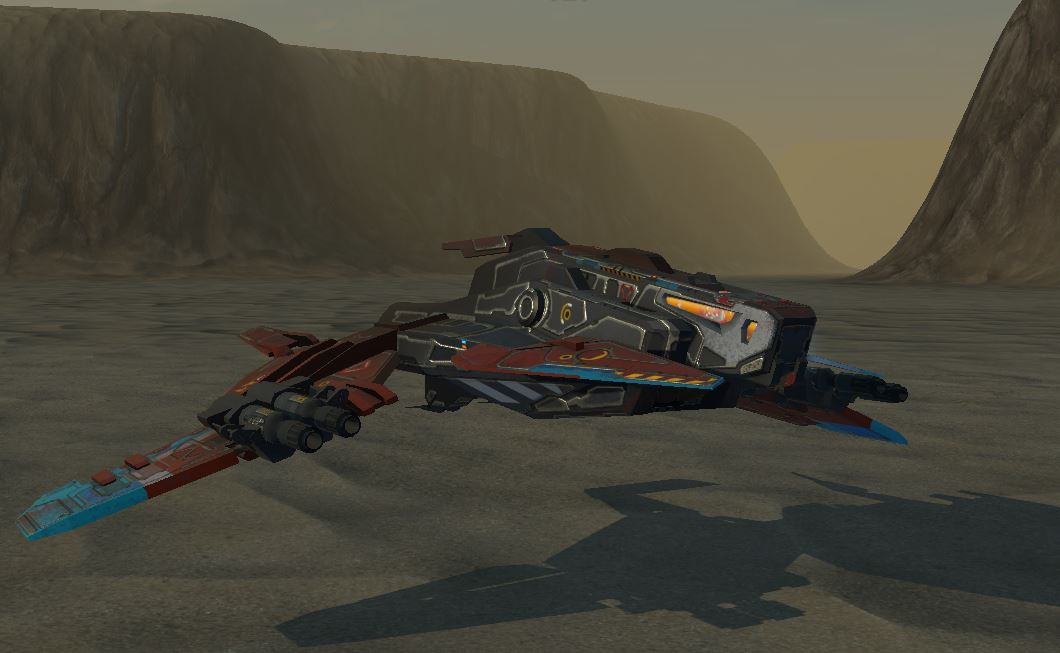
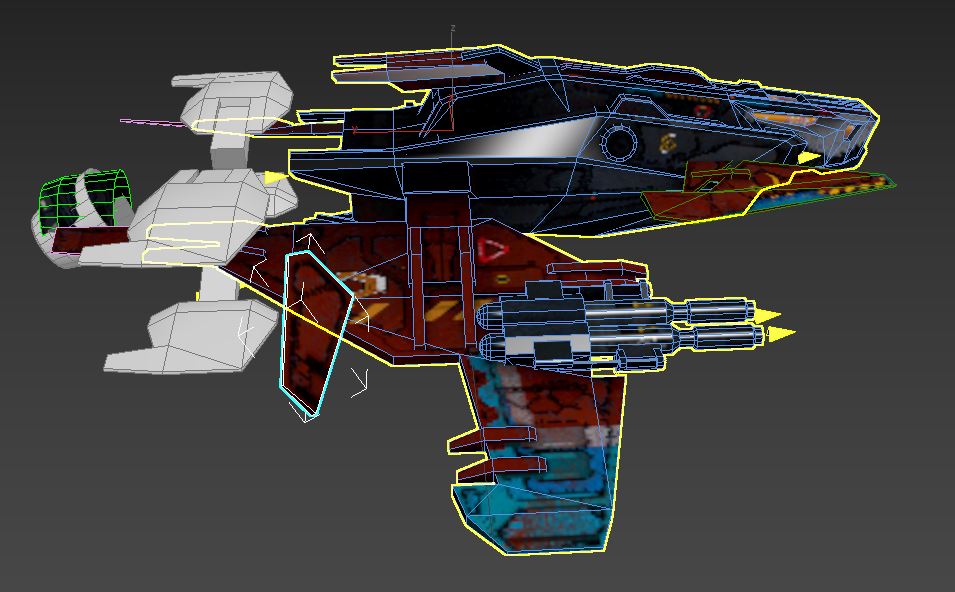
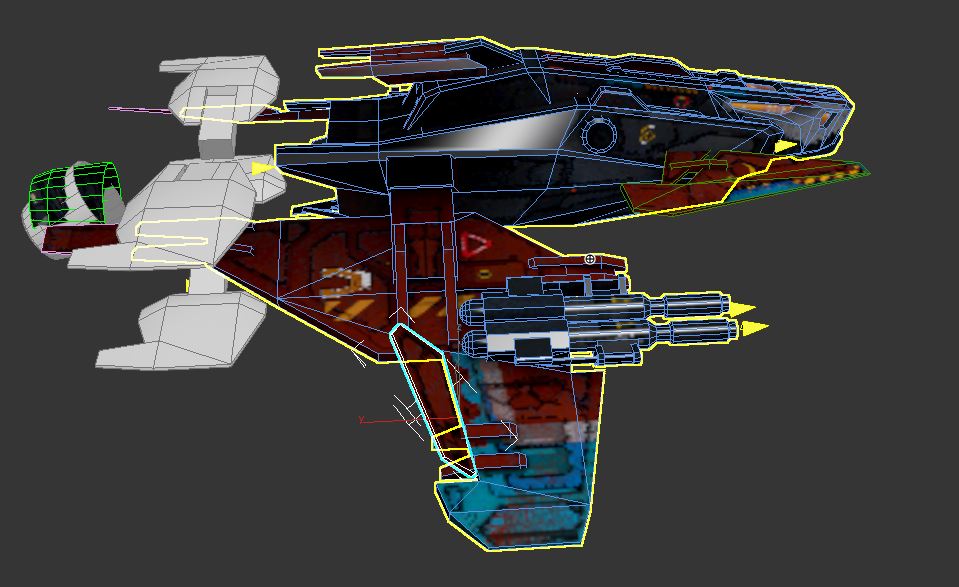
I have purchased the ship in the first picture from the Unity asset store as that suits my needs:
https://assetstore.unity.com/packages/3d/vehicles/space/sf-bomber-rx4-52080
Unfortunately I will need to now chop it up significantly in order to share it as a public domain .fbx model without violating the license agreement of the original purchased item. I will remove the top mount engines, remove details in the mesh and remove unused elements from the image textures. I don’t like having to do this, but it is necessary to protect and respect the original content creator’s hard work.
The reason I don’t use a poor quality public domain model of a Star Wars AT-ST or TIE fighter is that I would likely lose interest. Remember we are modding BZCC here – the greatest game of all time!
You can always purchase a model (from CGpitbull) on TurboSquid or CGtrader and make your own changes.
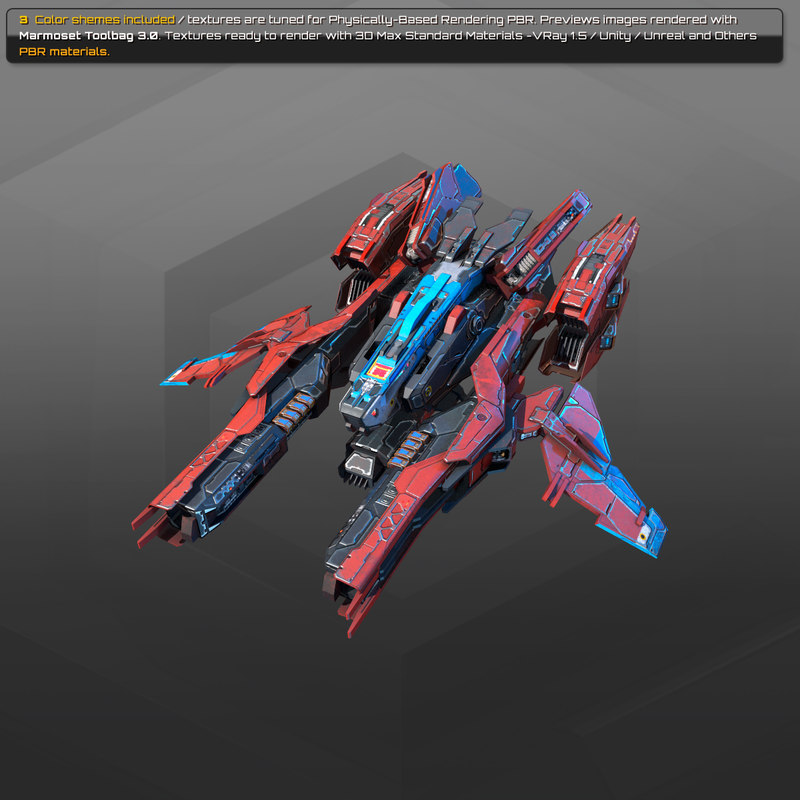
I couldn’t resist rendering the purchased model using Blender’s “Principal Shader” in “Cycles Renderer” to see if the quality is up to scratch:

This is a quality model. This concludes my promotion of CGpitbull most excellent assets. 10/10 would buy again.
Step 1 – Importing, positioning, scaling and material setup
Investigate the new model’s textures, convert to 2048 x 2048 pixel [.tga] and try to match and name the files as best you can:
diffuse = ivronin00.dds
teamColor = ivronin00_c.dds
emissive = ivronin00_e.dds
normal = ivronin00_n.dds
specular = ivronin00_s.dds
‘Emissive’ is often called ‘self-illumination’ or ‘glow’. ‘Specular’ may be ‘called reflection’ or ‘highlights’. ‘teamColor is a [.tga] file with transparency where the parts that can be colorized for multiplayer team play are visible in gray tone. It looks like this is cut from a diffuse channel bitmap and saved as grayscale.
Import ivscout00.fbx. Make sure to use a Scaling Factor of 1.0. Remember:
Material “1” is applied to: “mainbody, nozzle, recoil1-2, strut1-4, wing1-4”.
Material “1” has a single bitmap in the diffuse map.
Material “3” is applied to “flame_1__h”.
Import the new model.
Apply material “1” to every part of the new model.
Any materials that came with the new model will be discarded when you save and re-open your 3dsmax scene.
Change the bitmap texture file of material “1” to point to the new model’s diffuse texture “ivronin00.tga”.
Scale, rotate and position the new model to match the ISDF Scout vehicle.
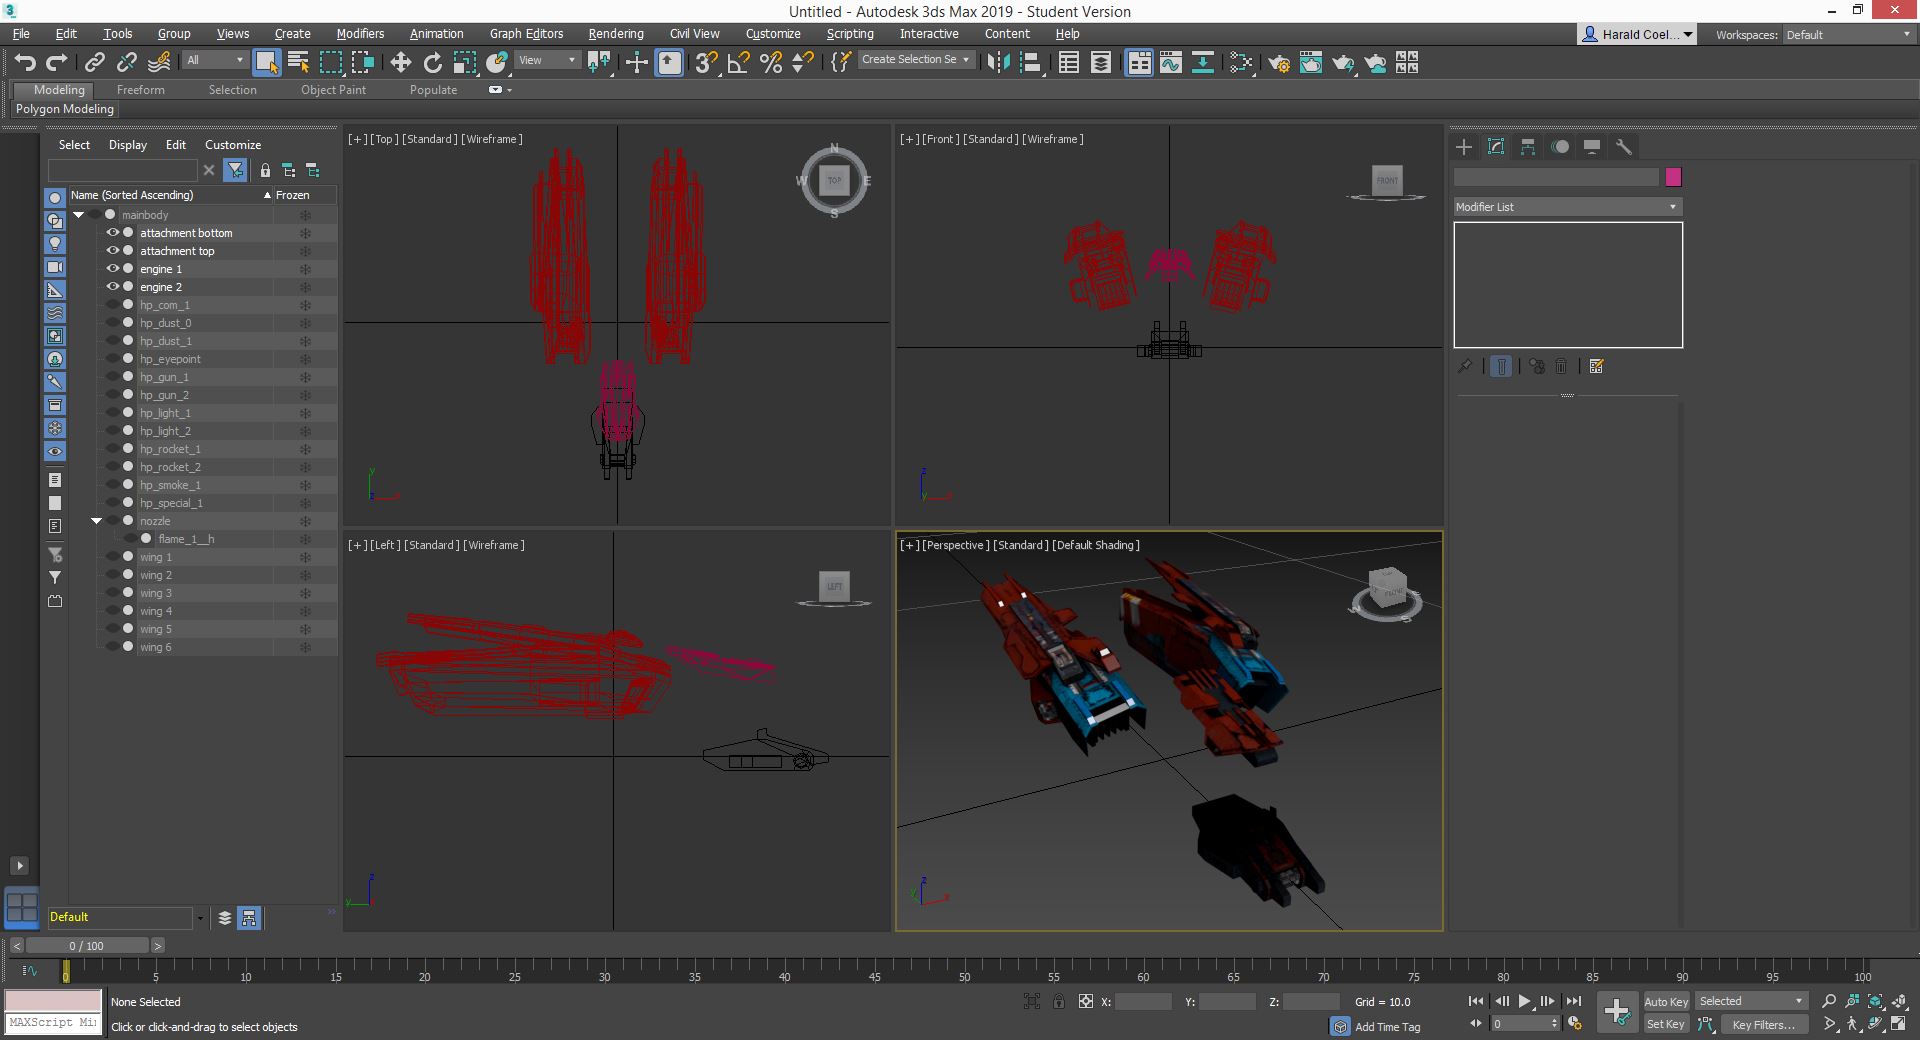
You should now end up with something like this:
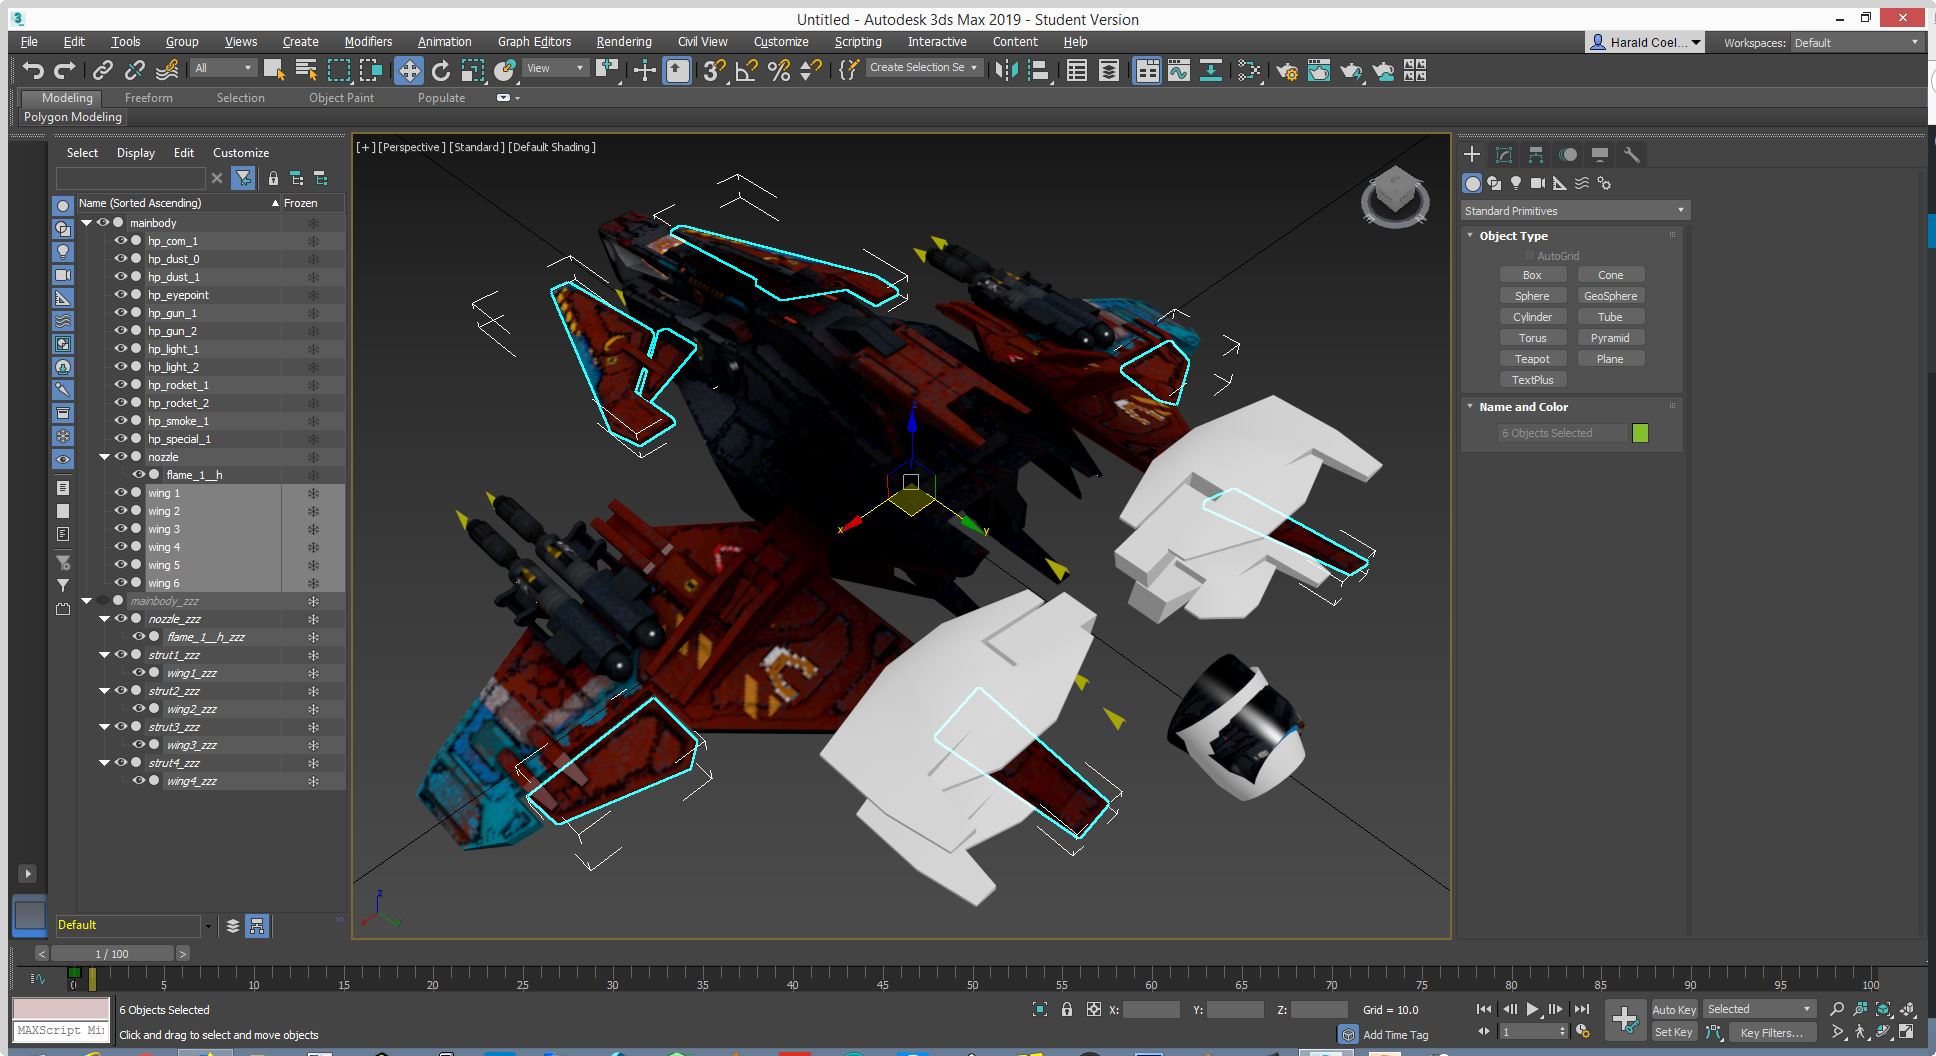
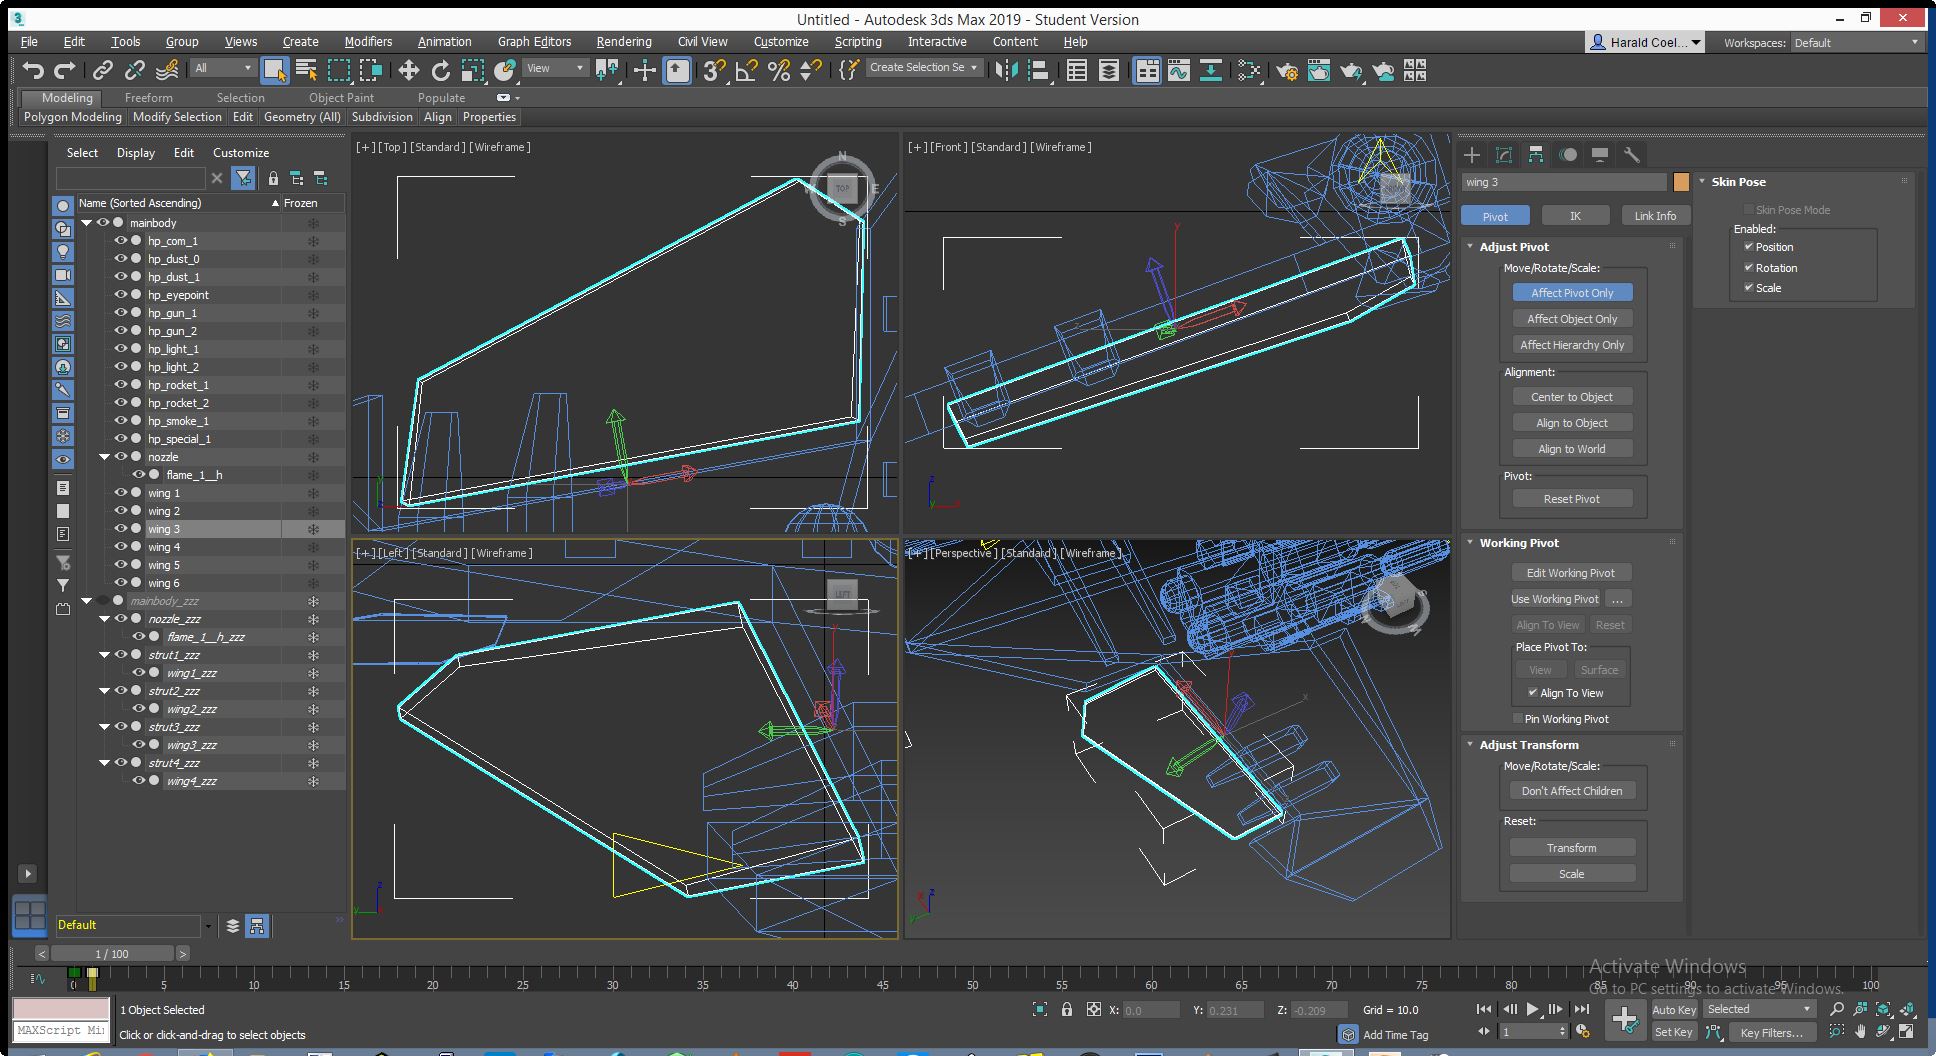
Step 2 – Hierarchy panel
In he hierarchy panel, do as follows:
Name your new model “mainbody_new”
If your new model consists of several parts, select the largest main hull object and name that “mainbody_new”. Place all the other parts as children inside parent “mainbody_new”.
Drag all hardpoints from “mainbody” into “mainbody_new”
Note: The facing direction of hardpoints is no longer relevant – they always fire in the direction of the eyepoint/reticle.
Delete ivscout00 “wing 1-4”
Delete ivscout00 “strut 1-4”
Delete ivscout “recoil 1-2”
“nozzle” contains a 2D circular object “flame_1__h” that has material “3” attached and is used for special effects. As a child of the animated “nozzle” object it will move as the nozzle moves. Let’s drag “nozzle” (containing “flame_1__h) over to “mainbody_new” for now until we can find a new home for both of them later.
Step 4 – Reset transforms (rotate, scale)
If you right mouse click on Rotate and Scale buttons, you will see the numerical values of these transforms. For example:

We want these values applied to our mesh and the transforms returned to their default values as if the object was never rotated or scaled:
Rotate (X): 0
Rotate (Y): 0
Rotate (Z): 0
Scale (X): 100
Scale (Y): 100
Scale (Z): 100
To reset the transforms and apply the changes to the mesh:
Select “mainbody” object.
Go to the “Utilities” panel and select “Reset Xform”.
Click on “Reset selected” button.
There is now an Xform modifier added to the modifier stack on top of the Editable Poly object that contains the rotation and scaling transforms.
You can collapse the stack (= flatten) back to an Editable Poly.
If you right click the Rotate or Scale buttons, the values should now show default values as if the mesh object was never rotated or scaled.
[!] If you do not perform these steps you will experience in-game scaling issues of your objects.
Tip: You can easily avoid all of this by applying any rotation or scale transforms in sub-object edit mode (vertex, face, poly editing). Transforms applied in sub-object edit mode will apply to the mesh data inside the object rather than the object as a whole.
Step 3 – Create frame 0 rotation keys for root object
This is used to set the initial orientation of the model in-game. For example, for when the model in-game needs to be facing up instead of facing forward like when launching your horizontal flying hovercraft as a Kerbal Space Program vertical rocket…
The game requires the root object [mainbody] to have the following keys:
[Frame 0 – mainbody – rotation – X axis] should have a value of 0
[Frame 0 – mainbody – rotation – Y axis] should have a value of 0
[Frame 0 – mainbody – rotation – Z axis] should have a value of 0
Select frame 0 on the Timeline.
Press the “Set key button”. This will create position, rotation and scale transform animation keys for X, Y and Z axis with a single mouse click.
Right click frame 0 on the Timeline and inspect the rotation key values.
Right click frame 0 on the Timeline and delete all position and scale keys.
Step 4 – Export and save to FBX
Export to FBX making sure to save scene units in Meters and set axis conversion to Z-up:
This is the result sofar.
Step 5 – Cleanup
We will need to chop up the vehicle and delete a lot of geometry to make it unique if we want to be able to share it. We will also need to animate parts of the mesh.
Select parts of your mesh that will be animated or deleted by using sub object edit mode (“elements”).
Hold [SHIFT] whilst repeatedly clicking [LMB] on parts of the mesh to select multiple elements.
When you have isoleted a part of your mesh this is to become a separate object (that will either be animated or deleted), click “Detach” to detach into a separate object. Give it a name and press [ENTER].
Make the separate object a child of “mainbody” in the hierarchy panel.
Move hardpoints to suitable locations. hp_com_1 = center of mass = pivot point.
This is what I plan to keep and animate:

This is what I plan to delete:
I will paint over the areas in the image textures that are no longer needed.
This should be sufficient to meet license requirements and allow me to share the model.
[ivroninsf.fbx]
We need to animate parts of the mesh for movement.
Start a new 3dsmax scene.
Import [ivronin.fbx] from our “addon” folder. This will be the basis for our [ivroninsf.fbx] file.
We will make the necessary changes and export the 3dsmax scene to [ivroninsf.fbx] when done.
We could really use [ivscoutsf.fbx] from the 3D source asset bundle right now.
3dsmax does not like it when multiple objects have the same name however. We could add a suffix “_zzz” to every single object but that is a lot of work and most of the objects are not animated and not needed anyway.
Also, there is this:
Freezing objects
Frozen objects remain visible, but can’t be selected. This is useful if you want to use an object for reference purposes only.
Either right-click objects in the hierarchy panel or in the viewport and choose “Freeze selected”, or use the ‘snowflake’ button in the hierarchy panel. Be careful when using the hierarchy panel as you can easily miss child objects (expand all items if need be).
Hiding objects
This is useful for hiding objects in the viewport that are obstructing your view and are not needed (but you don’t want to delete them as you might need them still at times). Right click an object and choose “Hide selected” or use the ‘eye’ button in the hierarchy panel.
See-through mode
Press [ALT][X] make any selected object “see through” temporarily in your viewport. Press again to toggle. Very handy.
Deleting objects
3dsmax does not like it when multiple objects have the same name. So if we want to avoid having to rename a lot of objects we are not going to need and clutter the hierarchy panel , it is best to just delete. Note that if we accidentilly hit ‘save’, there is no risk of accidentally overwriting [ivscoutsf.fbx] as we are working in an unsaved ‘Untitled’ 3dsmax scene. FBX files are always ‘imported’, never ‘opened’. Deleting is without risk here.
Viewport modes
Try out the following view modes for your perspective viewport:
"Default shading"
"Clay"
Enable "Edged Faces" overlay.
Tick "Wireframe override" and untick again.
Let’s start again.
Start a new 3dsmax scene.
Import [ivscoutsf.fbx] from the 3D source asset bundle.
Delete all hardpoints as they are not animated and not needed.
Add a suffix “_zzz” to every single remaining object (don’t forget the child items in the hierarchy panel!)
[CTRL][A] to select all objects. Right click and select “Freeze selection”
Hide [mainbody_zzz] using the “eye” button in the hierarchy panel.
Move the timeline slider between frame 0 -2 and admire your handiwork.
Import [ivroninsf.fbx] from your “addon” folder.
We will need to animate [wing1-6] and [nozzle + flame_1__h] next.
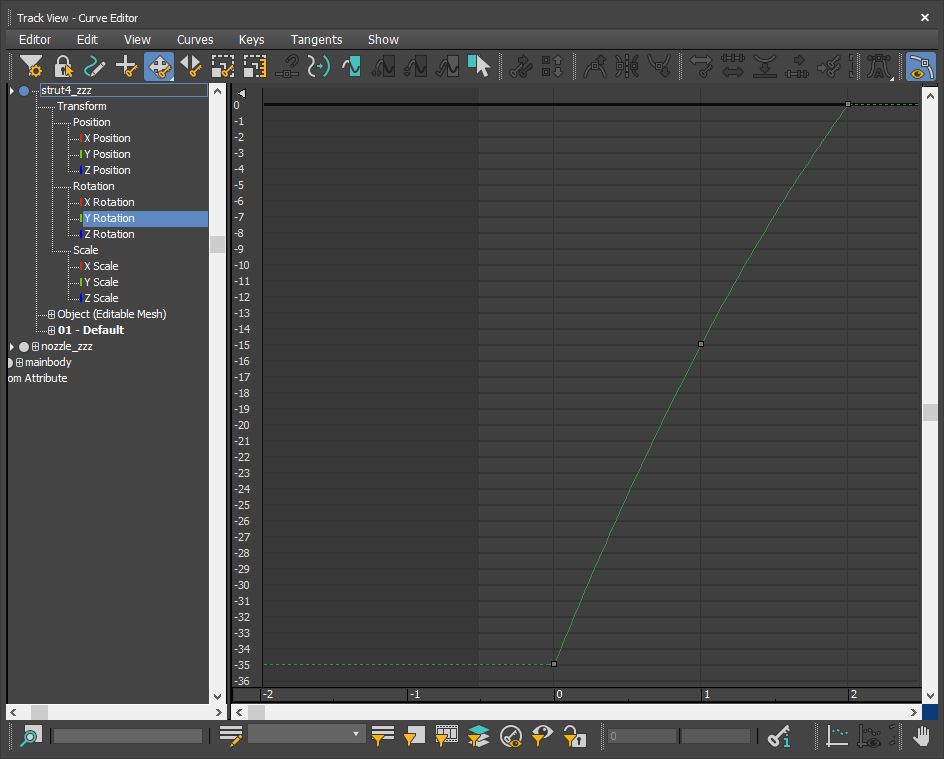
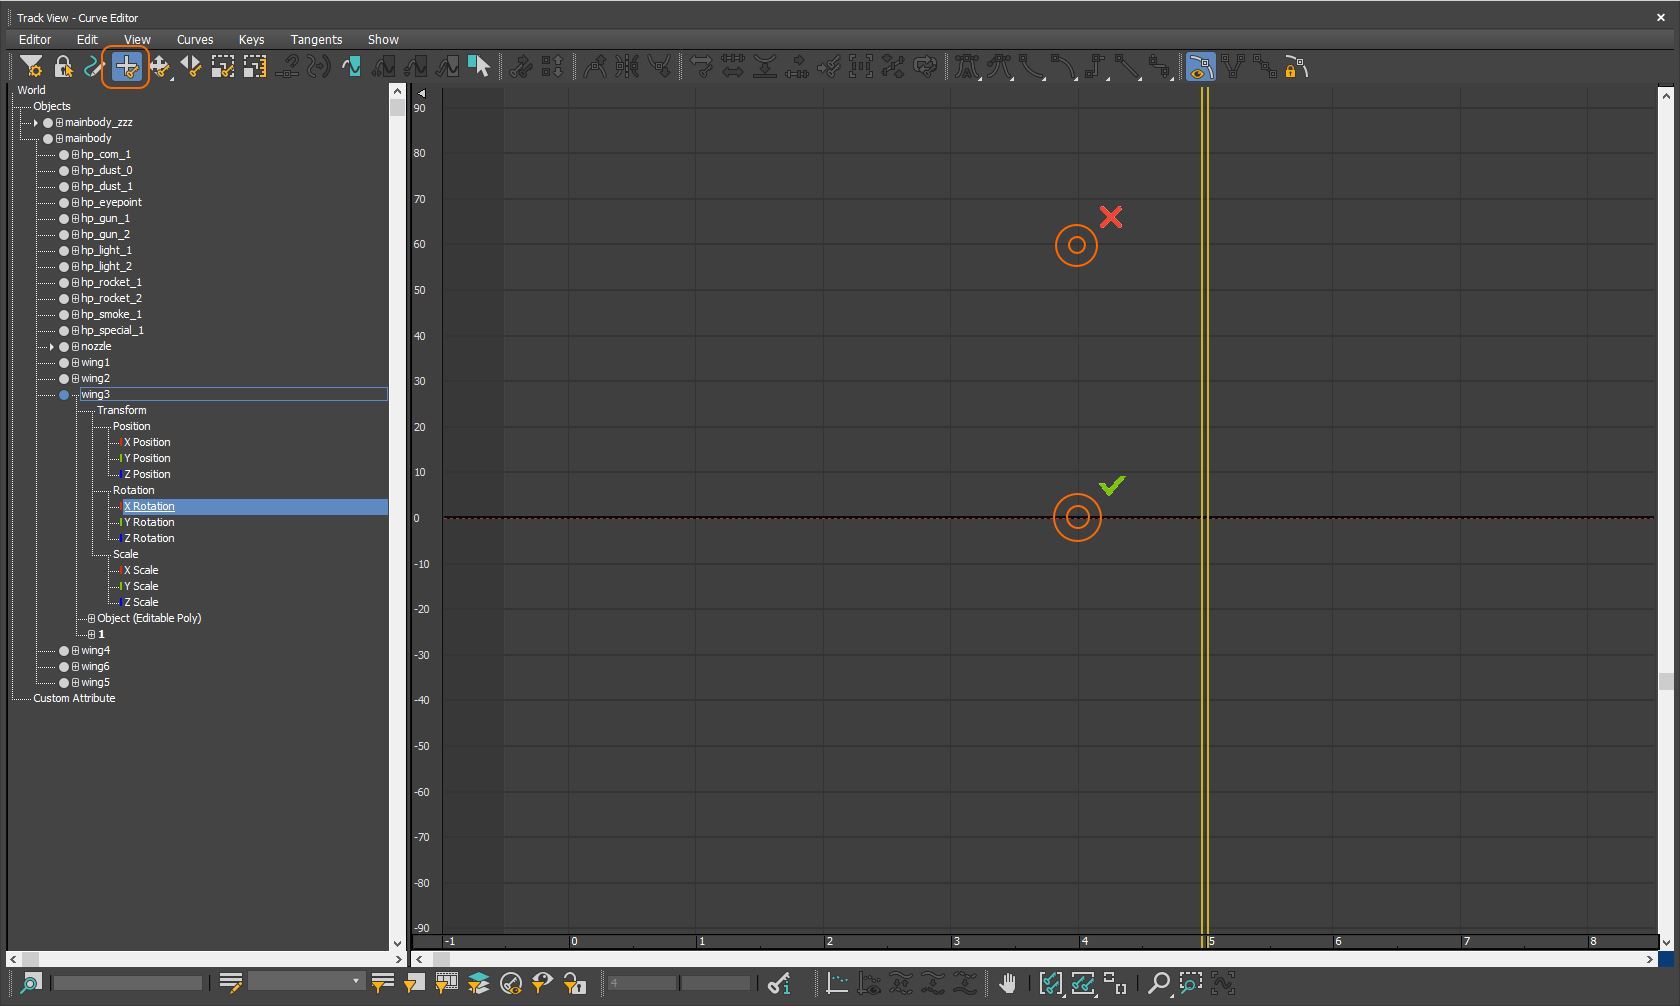
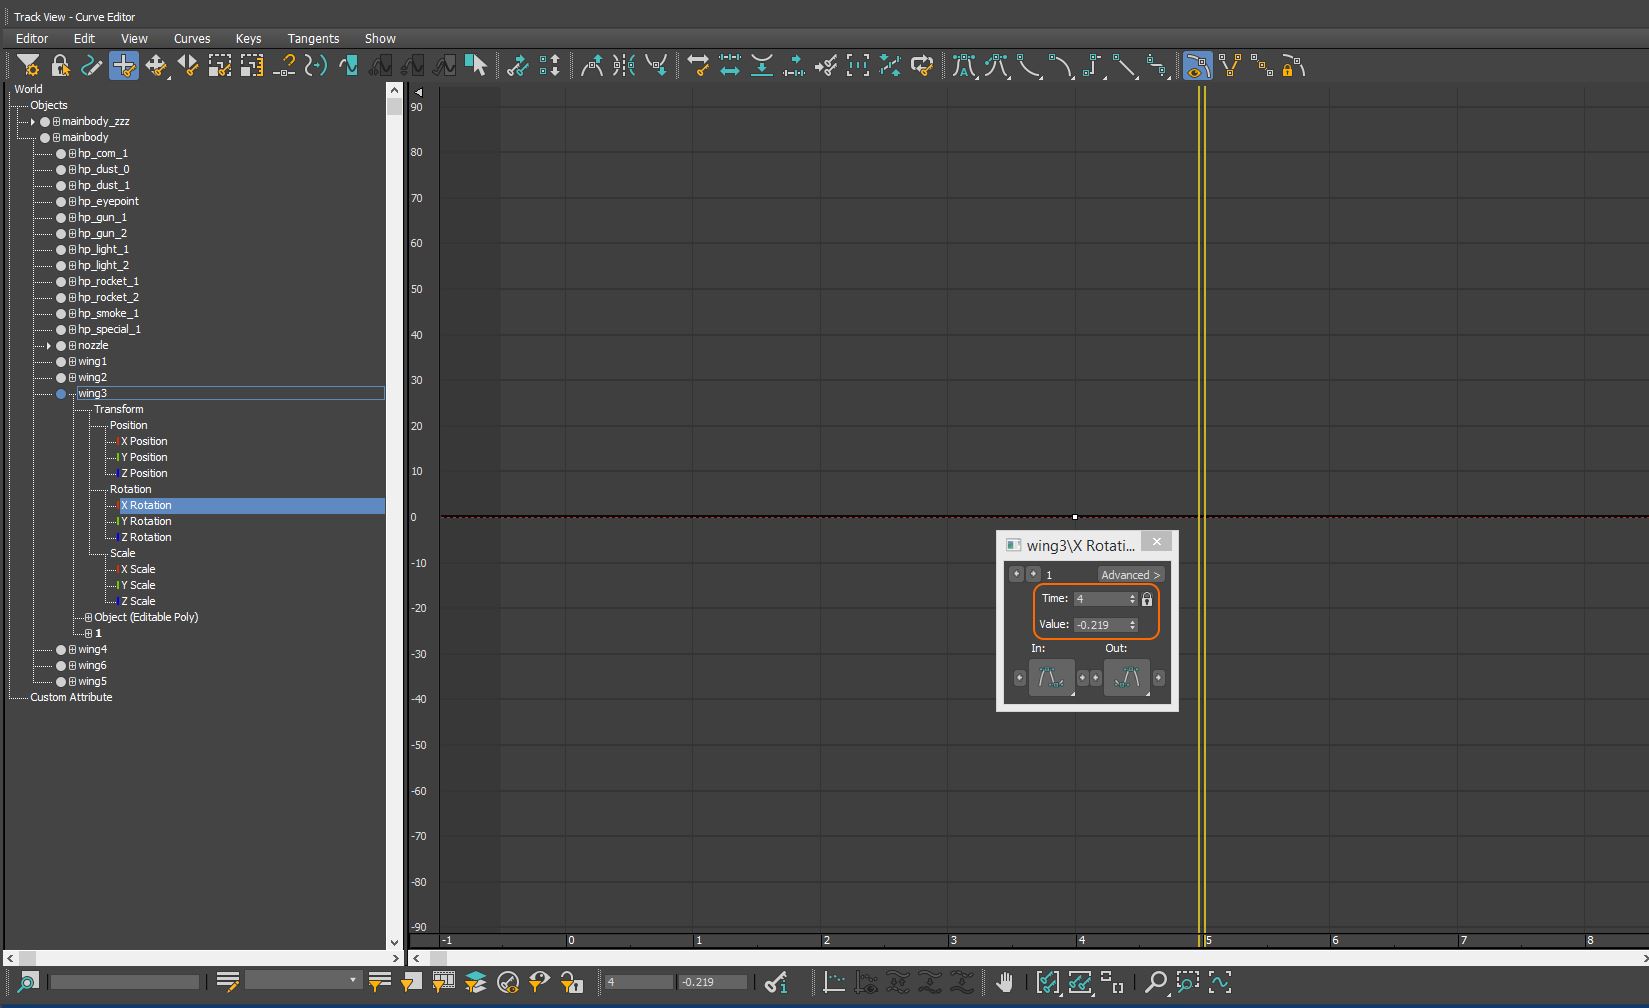
Select [strut4_zzz] in the hierarchy panel.
From the [Graph Editors] menu select [Track View – Curve Editor…]
Click on “Y” rotation.
In the TImeline, move between frames [0] and [2]. Values on the vertical axis in the Curve editor represent degrees. Frame 0: -35 degrees. Frame 1: -15 degrees. Frame 3: 0 degrees.
Frame 0:
(left + forward)
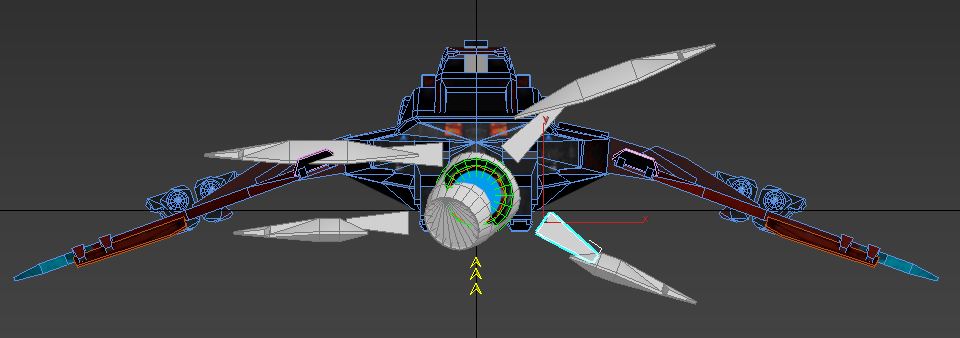 Frozen [strut4_zzz] object highlighted in lightblue colored outline at -35 degrees rotation.
Frame 1:
(forward)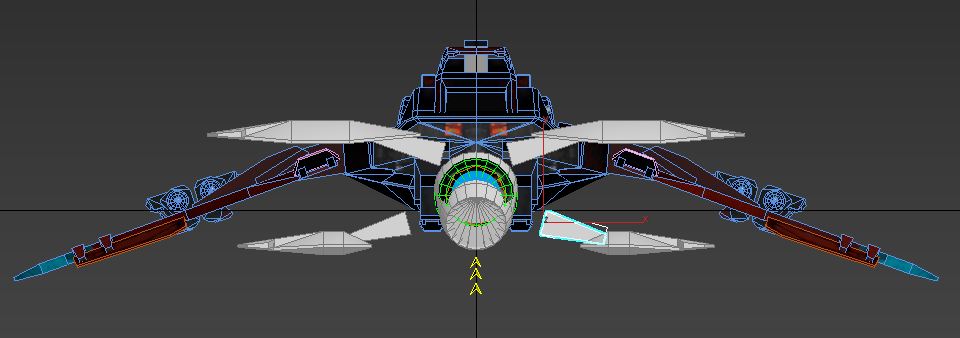 Frozen [strut4_zzz] object highlighted in lightblue colored outline at -15 degrees rotation.
Frame 2:
(right + forward)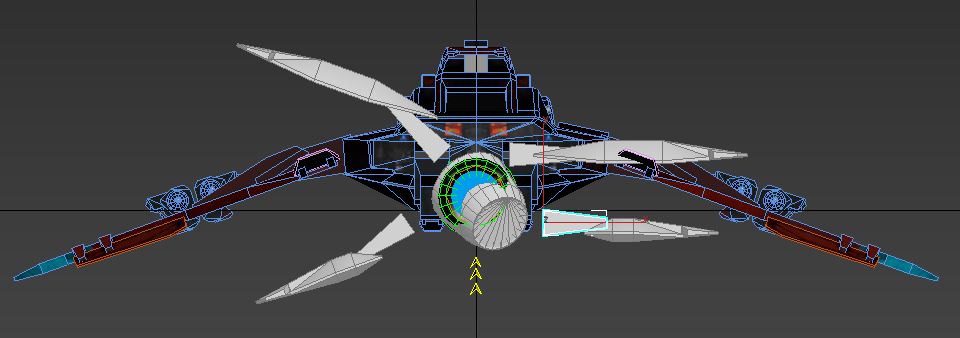 Frozen [strut4_zzz] object highlighted in lightblue colored outline at 0 degrees rotation.
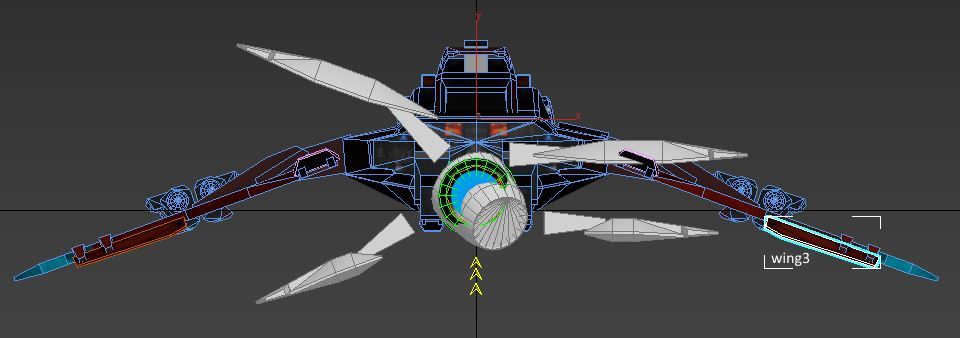
Select [wing3] in the hierarchy panel.
Note how the Curve Editor has switched to object [wing3]. There are no animation keys (yet…).
Note that this is a hover craft and the ‘wings’ represent anti-gravity engines, not airplane wings. There is not much air on Pluto. So let’s pretend this “wing” is in fact a downward facing anti-gravity engine. If the vehcile moves forward in a straight line, we could tilt [wing3] so it looks as if it is assisting in pushing the vehicle in a forward direction. Let’s try creating a key in frame 1 (= moving forward in a straight line) with a value of 60 (= 60 degrees).
Move the Timeline slider to frame 5 so it is out of the way for now.
In the Curve Editor, place the mouse cursor over the main grid and use [SHIFT][MOUSE SCROLL WHEEL] and [CTRL][MOUSE SCROLL WHEEL] to zoom in/out to match the screenshot below. Use [MIDDLE MOUSE BUTTON] to pan.
Double click on “+” button in the top toolbar to start adding new keys.
Note the dotted red line. You can only create new keys on the red line. Left-click somewhere close to Frame 4 along the dotted red line to create a new key.
If you hover the mouse over the newly created key you can change the values.
Set “Time” to “1” (= Frame 1). This represents our vehicle moving forward in a straight line.
Set “Value” to”60″. This represents an X Rotation angle value of 60 degrees.
Note the dotted red line has now befome solid red, indicating the start of an animation key curve.
You can left-click anywhere on the red line to create additional keys, then right-click to edit “Time” and “Value” to accurately place the key.
For now, move the Timeline slider to frame 1 to see the result of adding this key in the viewport:
It sort of worked, but not just quite. [wing3] seems to “pivot” around the wrong point of origin.
Press [CTRL][Z} (repeatedly if need be) to undo the creation of our animation key. [wing3] should now be back to its original position.
Let’s have a look at our pivot issue:

It turns out when we detached this part from the main mesh earlier, the pivot is automatically set to X Y Z coordinates (0,0,0) or “origin”.
Move and rotate the pivot so that it looks good in all four viewports. This can be somewhat difficult for beginners. Don’t use Perspective viewport; instead, only use each of the elevation views (Top, Left, Front).
Have a closer look at the [Left] viewport in the above screenshot (bottom left corner). Note that [wing3] in its resting position is angled downward slightly to add to the confusion. Animation experts would avoid these unneccesary angles between separate objects before they start animating. It should not affect us much as this object will only be rotated along a single axis. I have cleaned this up in my version.
Don’t forget to deactivate “Affect Pivot Only” when the pivot is postioned to your liking.
There is no need to reset transforms (Reset Xforms) as decribed earlier for pivots, as this will effectively reset the pivot to its original position.
In the Curve Editor, add a new key as explained earlier:
Hover the mouse over the newly created key and press the right mouse button to change its values:
Set “Time” to “1” (= Frame 1). This represents our vehicle moving forward in a straight line.
Set “Value” to”60″. This represents an X Rotation angle value of 60 degrees.
Move the Timeline slider to frame 1 to see the result of adding this key in the viewport:
This is more like it:
The downward facing anti-gravity engine is helping to push the vehicle forward. We can add some “anti-gravity engine” special effect later perhaps to give it a bit more of an anti-gravity engine-like appearance.
Try creating additional keys in the animation curve for frame 0 and frame 2.
You can now animate any of the remaining [wing] objects as you see fit. Don’t forget to align the pivot of each [wing] object first.
When complete, remove any obsolete [ivscout] objects and export the remaining animated model to [ivroninsf.fbx]. Scroll down to download my copy of the completed file.
You can repeat the same process for [ivroninsn.fbx] and [ivroninsr.fbx]
Help, 3dsmax crashes when importing an FBX file
I used to not save my 3dsmax scenes and just exclusively work with FBX files. Not anymore. This is why:
I was working on an imported FBX file in an unsaved “Untitled” 3dsmax scene. I exported to FBX and closed the program. When I later on tried to import the FBX file to make additional changes, 3dsmax crashed.
[!] Keep older versions of important files.
[!] Save your 3dsmax scene when exporting to FBX.
[!] Make frequent copies of your “addon” folder.
[!] Don’t overwrite FBX files if you haven’t got a saved 3dsmax scene handy.
[!] File > Reset 3dsMax and test if the FBX file imports properly. Then overwrite the file.
I do a bit of everything.
How to fix a damaged FBX file?
You can’t, really. Unless the file imports correctly in another program (i.e. Noesis), you are stuck.
But I have kept the 3dsmax scene…
If you still have the 3dsmax scene file you will notice that every time you export to FBX and try to import the file, it crashes 3dsmax. We will need to find out what changes have caused this behavior. Some things you can do:
1. Make a backup of your “addon” folder while you still have all files as soon as possible.
2. Start a new 3dsmax scene and select File > Merge to import all geometry (including materials, animation keys, etc) from the suspected faulty 3dsmax scene.
3. Check the Modifier stack for each object in your scene to see if there is anything that should not be there.
4. Reset Xforms for objects that you recently rotated or scaled (mesh, pivot) if you can remember.
5.Convert objects from Editable Poly to Editable Mesh to Editable Poly (or vice versa). Not sure if this is really woth trying, it is just an idea.
4. This is what helped me: make a copy of your suspected faulty 3dsMax scene, delete 50% of the objects in the scene, export to FBX. Reset 3dsMax. Import the FBX file. If the FBX file fails to import, the problem is caused by these 50% of all objects. If the FBX file imports properly, it means the problem is caused by the other 50% of all objects. Repeat until you have isolated the object(s) in your scene that cause the problem.
5. In the [Graph Editors] menu select [Track Views – Dope Editor…]. This is an easy way to see which frames have animation keys. You can do the same thing as what you did with your objects. Delete 50% and export/import FBX to see which keys cause problems. You can also use [Track Views – Curve Editor…] if you are more familiar with using that.
6. Delete all Materials in the Material Editor. If you accidentally assigned a material to a Hardpoint, you will realize there is no easy way to undo that later on. Here is a quick way to take away a material from an object (i.e. hardpoints). Select one or more objects and enter the following into the Maxscript Listener (lower left corner):
$.material=undefined
Once a material is no longer in use, it will disappear from the “Scene Materials” panel in the Material Editor and will no longer be present when you save and reopen your 3dsmax file.
Problem solved
In my case the cause of the problem was the following:
I had used the “add keys” button on the Timeline to quickly add some keys to start animating an object.

I forgot that this button by default creates keys for all transforms (move, rotate, scale) and for all axis (X, Y, Z). Keys are created in the current frame with a value of “0”.
When I deleted some of these keys and exported to an FBX file, this file suddenly imported properly as if nothing had happened.
Lesson learned: keep your 3dsmax scene when you are making lots of changes and exporting to FBX format.
Help – I discovered late in the process I want to detach parts of my main model [mainbody] to animate these parts
Okay, so you find yourself detaching objects in [ivronin00sf.fbx] to animate, or adding new objects perhaps.
Remember that “animName” files are only usef for their animation keys. You will need to update the “geometryName” file so that when baking, the generated mesh file [.msh] and material file [.material] match the animation keys file [.msha]
Start a new 3dsMax scene.
Import [ivronin00sf.fbx].
Select all objects
Set the material to undefined as explained earlier.
Figure out how to delete all animation keys.
Hardpoints can be deleted; we only want to update geometry.
Add a suffix “_zzz” to all remaining objects in the hierarchy panel.
Now import [ivronin00.fbx]
Place all items located under [“mainbody”] under [“mainbody_new”]
Delete [mainbody].
Remove any objects that are no nonger needed. and rename all objects that have a “_zzz” suffix to take their place by removing the “_zzz” suffix.
Assign material “1” and material “3” to your objects.
Don’t forget to create X + Y + Z Rotation key for the [mainbody] object for frame 0 with a value of 0.
Export to [ivronin00.fbx] Try not to overwrite the original file – keep a copy, just in case….
Help – I don’t like having to add a “_zzz” suffix to all my objects. Is this really necessary?
There is another way, but at first glance does not seem to help much:
Launch 3dsmax
Import FBX file “a.fbx”
Now save as a 3dsmax scene “a.max”
Launch or Reset 3dsmax
Import FBX file “b.fbx”
Instead of importing “a.fbx”, we instead merge “a.max”
This gives us more flexibility:


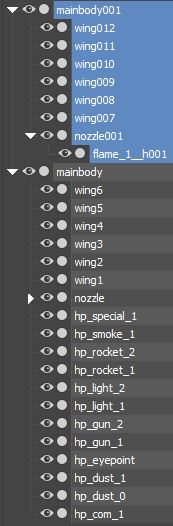
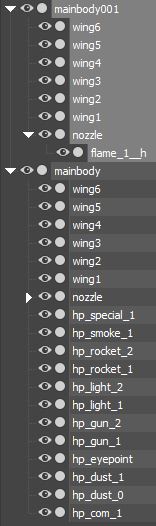
In the final result, note the existing [wing1] to [wing6] under [mainbody]. Note the new [wing007] to [wing012] objects under [mainbody001] in the hierarchy:
]

You would think that by having objects placed under a different parent object, the import process is clever enough to realize there is no conflict.
Also note that 3dsmax in itself does allow two objects to have the same name:
![]()
The import process could simply import the two hierarchies side by side and let me deal with it. After some more experimenting I found the correct way to do this.
Problem solved
Launch 3dsmax
Import FBX file “a.fbx”
Now save as a 3dsmax scene “a.max”
Launch or Reset 3dsmax
Import FBX file “b.fbx”
Instead of importing “a.fbx”, we instead merge “a.max”
Now here is where it gets interesting:
This will create a renamed [mainbody001] root object in the hierarchy:
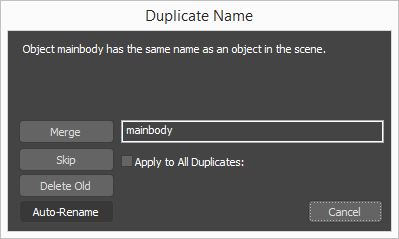
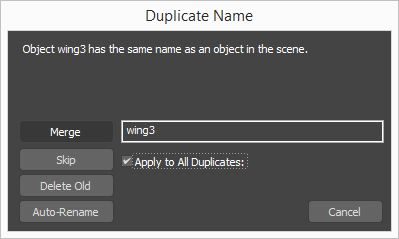
Now that our parent object is renamed, we can simply merge all other objects without renaming:
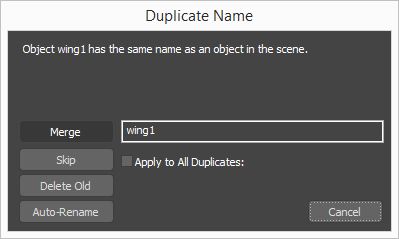

Just hit “Apply to All Duplicates” next.
Materials.
The end result:
This is the cleanest dual import of two FBX files with matching hierarchies possible.
Engine nozzle / hover effect – “flame_[1-16]__h”
[ivscout00.fbx] contains a single nozzle and flame object. The flame object is a single polygon (“face”) that is used as an emitter for a special effect. This special effect is built-in and can be used for engine thrust (propulsion or anti-grav hover thrust). If you have a look at ivtank00.fbx you will see it contains four separate “flame_[1-4]__h” objects. Two are used for the dual engine nozzles (forward thrust) and two are used as hover engines. The “__h” suffix indicates the mesh itself should be hidden and not rendered in-game.
Flames can only be 2d polygons, usually 1 ‘face’ in definition (no subdivisions) and have the pivot lined up with the normal.
Let’s have a look at our [ivronin00.fbx] model again:
- Clone the six wing mesh objects and name them “flame_[1-6]__h”
- In sub-object mode, remove all faces except for the large horizontal bottom surface of each mesh.
- Switch to edge mode and use the [Backspace] key to remove any internal edges It does not matter if the polygon ends up being 3,4, 5 or 6 sided, as long as the single polygon is not subdivided – it has to be a single polygon.
- In the hierarchy panel, move the objects as child objects of the animated wing objects so they move together as one.
- Create a new material and assign it to each of the “flame_[1-16]__h” objects.
- Export to FBX.
Emitter direction
In order to set the correct emitter direction, the pivot of each wing surface needs to be rotated.
The green arrow needs to be pointing down:

If we now bake assets in game, you will notice a second material file is generated in data/binData:
ivronin00_2.material:
[solid]
diffuse = 0.588000 0.588000 0.588000 1.000000
specular = 0.000000 0.000000 0.000000 1.000000
specularPower = 2.000000
emissive = 0.000000 0.000000 0.000000 1.000000
ambient = 0.588000 0.588000 0.588000 1.000000
3dsmax default material diffuse color is a light gray. The game uses float number format for all values. 0.000000 = “0”. 1.000000 = “255”. 255 * 0.588 = 150 (DEC) = 96 (HEX). The diffuse color in the material file translates to an RGBA color code value of #969696FF, which is a light gray.
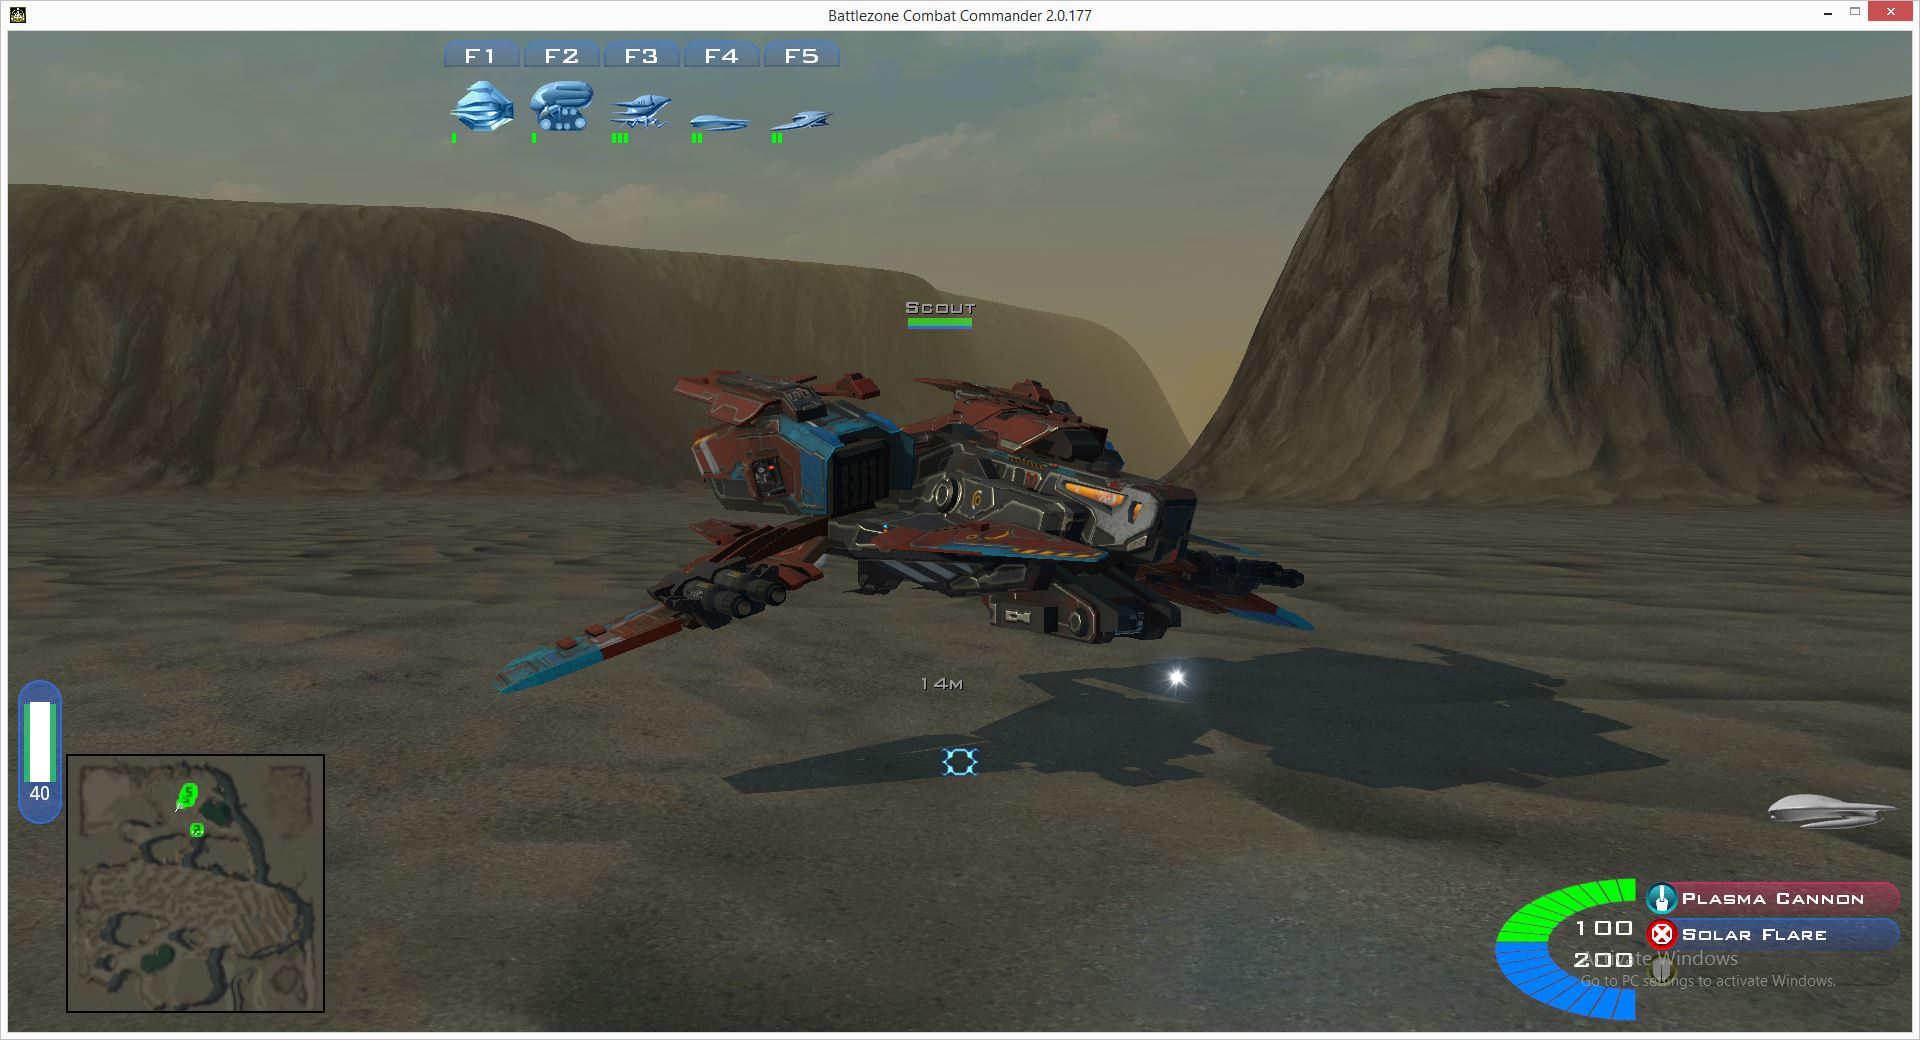
The resulting effect in game looks like this:
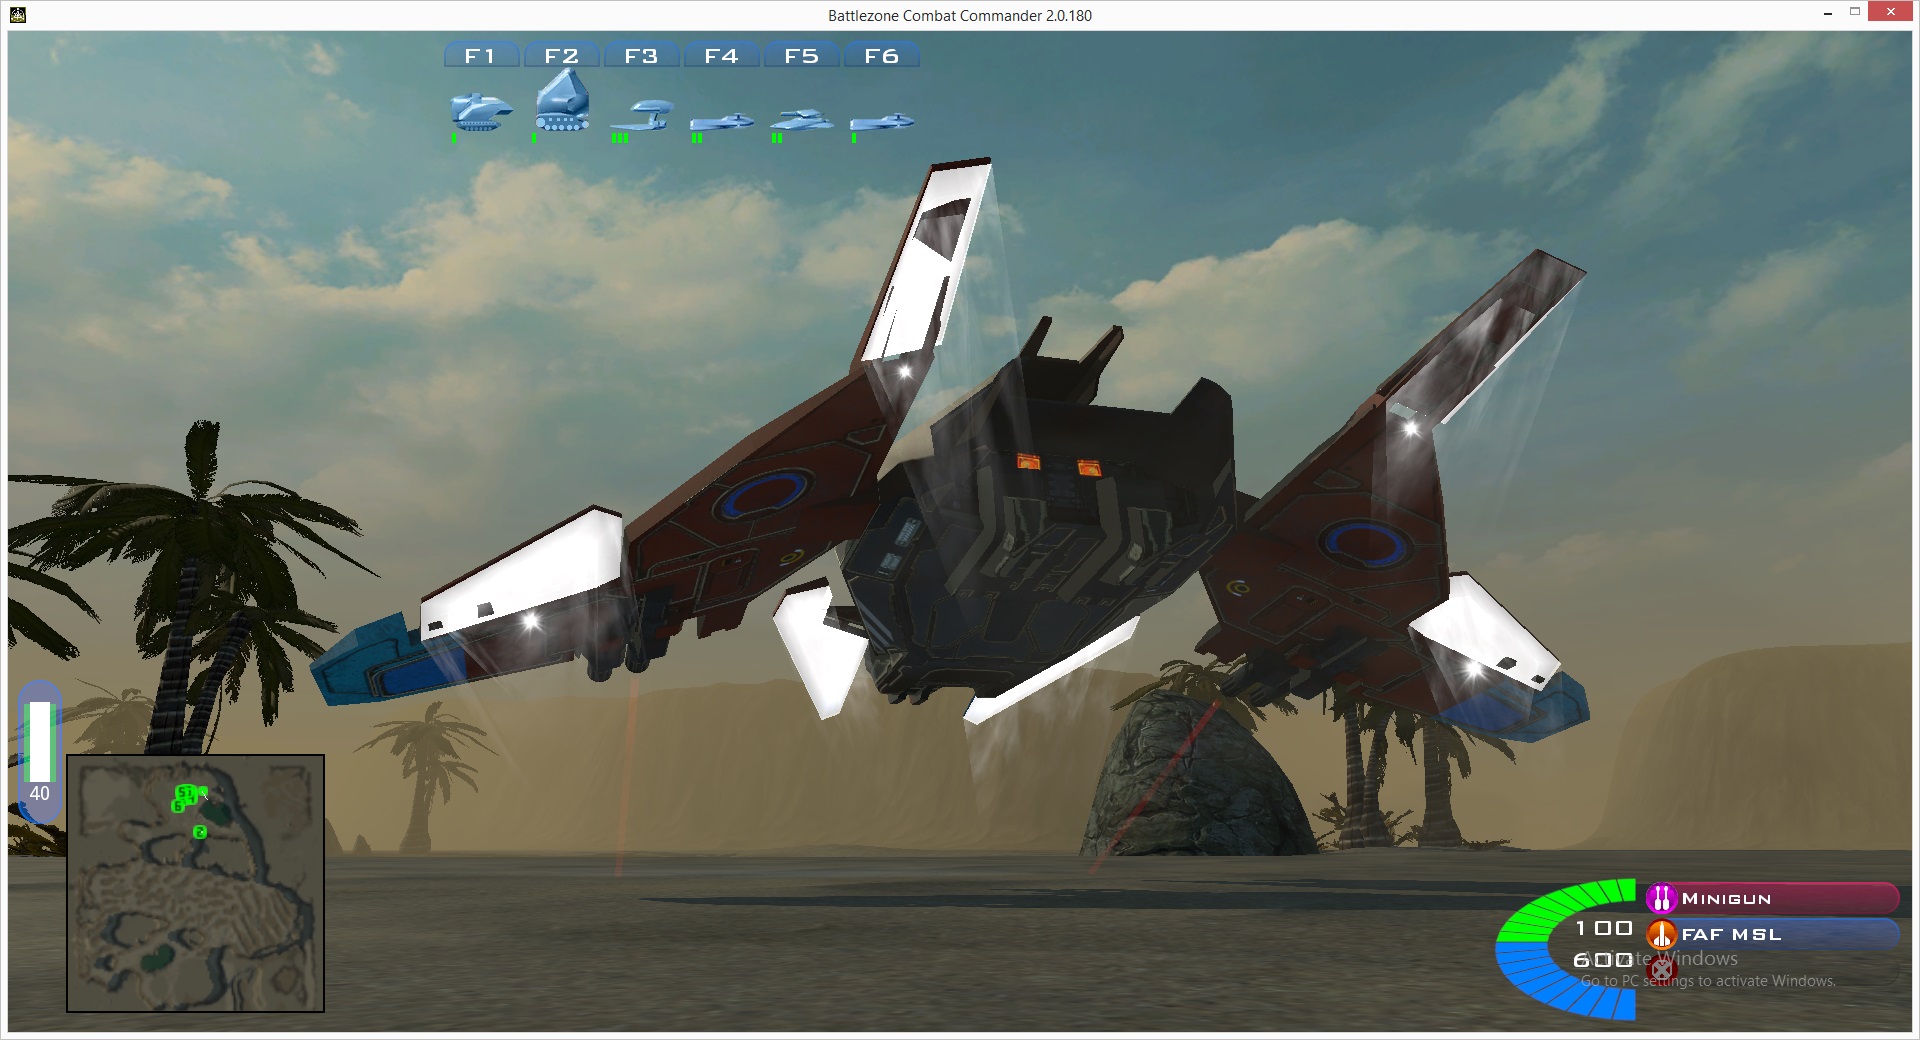
Note that the dark textured wing brackets are protruding the bright white emitter surfaces. We may need to scale down the size of the emitter surfaces a bit I think. We also need to move the pivot to the center of each emitter polygon, as it currently still sits on the edge of the polygon where it was used as a hinge for animation purposes previously.
The material used for the ivtank00.fbx model in the source asset bundle (ivtank00_3.material) looks like this:
[solid]
diffuse = 0.000000 0.392157 1.000000 1.000000
specular = 0.000000 0.000000 0.000000 1.000000
specularPower = 2.000000
emissive = 0.000000 0.000000 0.000000 1.000000
ambient = 0.000000 0.392157 1.000000 1.000000
This translates to a diffuse / ambient color code of:
R = 0 (DEC) = 00 (HEX)
G = 100 (DEC) = 64 (HEX)
B = 255 (DEC) = FF (HEX)
A = 255 (DEC) = FF (HEX)
Resulting in RGBA color code #0064FFFF
If we make changes to the baked .material file “ivronin00_2.material, you will notice the changes are overwritten when you run “game.bakeassets 1”. This is because .material files are baked (generated) and should not be touched. You should edit the material used in ivronin00.fbx in 3dsMax instead.
Note: if you know what you are doing, you can copy and paste a “.material” file from “data/binData” into your “addon” folder to override the file in “data/binData” from being used. You can then tweak the values as needed. This process is not recommended however.
So lets edit the material in 3dsMax:
This will result in the following material file values:
[solid]
diffuse = 0.000000 0.392157 1.000000 1.000000
specular = 0.000000 0.000000 0.000000 1.000000
specularPower = 2.000000
emissive = 0.000000 0.000000 0.000000 1.000000
ambient = 0.000000 0.392157 1.000000 1.000000
And the final result in-game:
Source files
ivronin.inf

ivronin.odf

ivronin00.fbx

ivronin00.tga

ivronin00_e.tga

ivronin00_n.tga

ivronin00_s.tga

ivroninsf.fbx

ivroninsn.fbx

ivroninsr.fbx
don’t get distracted: the goal is to remove all ivscout references from ivronin.odf. We want a 100% complete custom mesh, textured, animated, sound, sfx shadered game asset based on ivscout that you can control as playable vehicle in-game.
[to be continued]
To do list:
1. Fix/add recoil
Change (Steam) shortcut
bla bla
Creating a custom map (blank.zip)
Now that we can add custom game assets, let’s look at creating a custom map for a mission.
LUA modding to have the AI move an asset from location A to location B and back agian.
gegc – Today at 4:08 PM
hmmm I might do that
that’s pretty much where I am right now
Empty map
Add stock terrain (don’t go into detail just yet).
Add stock sky
Add static stock objects
Start with adding bare minimum of units
Start with path editor
Start creating the most basic mission (move something from A to B and back again or something.
How to customize terrain (+ blending) Reuse what is out there.
(Don’t forget Nielk1’s most excellent recompiled terain editor for BZCC)
Some useful info from app.discord chat:
Among this improvement was putting the geom scale into the ODF as well, all an attempt to make the system more reliable.
it doesn’t matter what or where things are in the actual skel of an animation model, the game doesn’t even read the model parts. It only takes the animation data and bakes it into the MSH as an animation applied to the root geometryName model. That’s why XSI’s can be used for animation models, for an FBX. As long as piece names and pivots are right in the geometryName, it’ll animate properly
Luckily, the facing direction of HP’s is no longer relevant. They always fire the direction of the eyepoint/reticle.